Released: June, 2019
Summary
This overview highlights the completely rebuilt Note/File form throughout the system. We have updated the look and feel, in addition to adding some functionality that increases the efficiency of creating, editing, and sharing a Note and/or File Attachment.
Browser Cache: Some browsers don't automatically recognize that there is new code on our servers, which may cause our pages to behave strangely. If you encounter any issues, please first try hitting the CTRL+F5 keys on your keyboard to refresh the page.
Note to System Administrators: If you have used the “Customize this Form” feature on the prior version of the Note/File form then you will need to reapply any of those changes after this feature is released.
Customizations Include:
Hidden settings
Tooltips
Background Color
Font color
Font format (bold, italic, underline)
Highlights
When creating or editing a note, the latest version now opens as a ‘pop-up’. This should allow you to create or edit a note, and easily navigate back to your starting point. Below we will walk through a few of the features that are now native in your Note/File form.

(1) Drag and Drop to Upload Files: Including an attachment/file as a part of your Note is now easier with ‘drag and drop’ functionality. You can also browse for the file instead.
(2) Access to the Note and File: Access to the Note and/or File can be granted with or without a login.
Internal Access: This setting defines permissions for users who have a login and password to the system. You can establish the initial permissions upon the creation of the Note, and then after the Note is created you may update the permissions through the “Permissions" option on the Note.
External Access: ‘External’ is defined as access to the Note and/or File without actually logging into the system, either through a direct link or via API.
Here is a list of the menu options for External Access and their definitions:
No external access - Access to this Note and File require a system login, and will then default to the Internal Permissions settings.
Share this File as a link* - This setting allows direct access only to the attached file without the need for login credentials to the system.
Publish this Note and File to the Web* - Allows you to publish information from the Note, and provide a direct link to the attachment using your own website. When there is not an attached file on the note, this option will read “Publish this Note to the Web”.
* These settings provide the ability to copy the link to the file to your computer's clipboard.
(3) “Copy File Link”: This link allows you to copy a URL which links directly to the attached File to your clipboard. On new Notes, clicking this option will copy the link to your clipboard only after you have saved the Note. The link is only visible when there is an attachment and External access is set to “Share this File as a link” or “Publish this Note and File to the Web”. Setting the External access to “No external access” will disable the URL link to the file.
(4) + Show more / - Show less: By default, the Note/File form always loads in a minimized state and shows you the most frequently used fields. If you are a frequent user of the options that are under the “Show more” link, you can have your system updated to always expand this form and show all of the fields at one time.
Additional Features
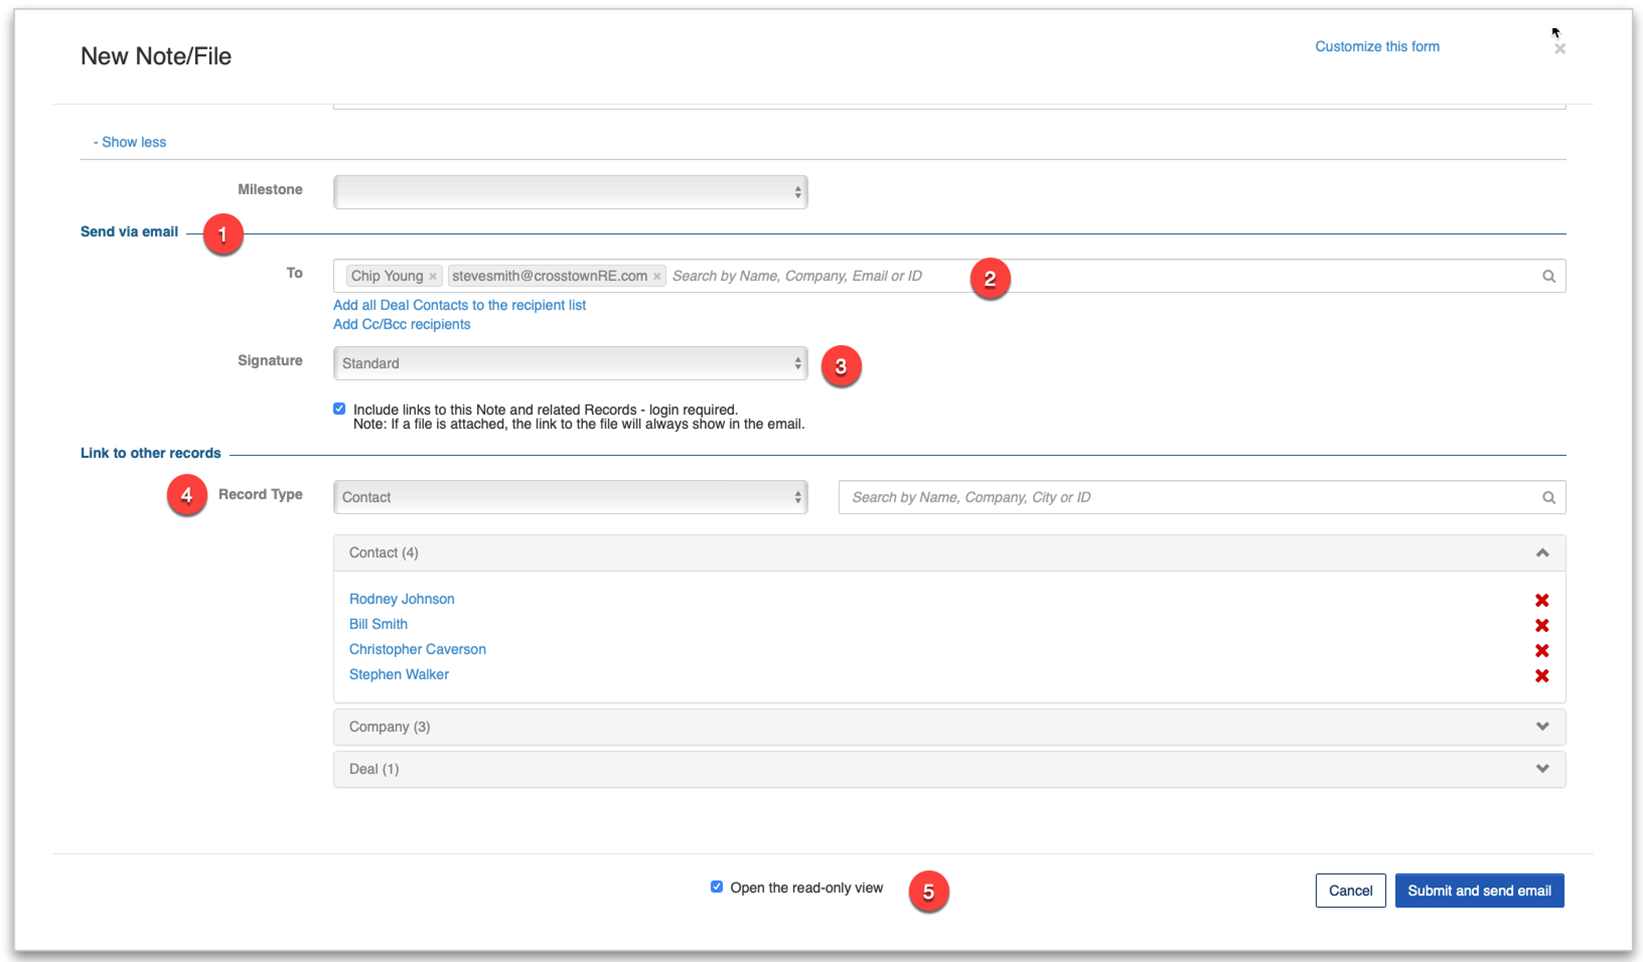
(1) Email the Note: Email the Note content, with the option to include links to the Note, File Attachment, and associated Records to up to 50 email recipients. As with the old form, this will be routed through our email servers vs. your own Outlook or email system.
(2) Here are a few tips to help you enter email recipients:
Use the built-in search feature to look up and select a contact. Once a contact has been selected, the contact’s name will display, but by hovering over the name with your mouse you will see the email address associated with that contact.
If the Note is for a Deal, you can add all of the associated Deal contacts at once. Simply click the “Add all Deal Contacts to the recipient list” link. You can then add additional contacts or remove any contacts from the list before sending.
Use the ‘Add Cc/Bcc’ to open up additional fields to copy or blind copy additional recipients.
You can also type any valid email address directly into the form.
(3) Signature: If you have a default email signature configured, you will see the name of that signature populated automatically. Creating or editing signatures is now handled through the User Settings menu. See below for more information on how to manage your signatures.
(4) Link to other records: Linking the Note to additional records is now easier. Simply select your record type and use the search feature to find and select your desired record. If you select a Contact, the associated Company will also be added.
(5) Open the read-only view: Clicking this option opens the dashboard view of the Note after you submit your changes.
Signatures
Email signatures are now managed via the User Settings menu on the Home page. Existing signatures are available for selection on the new Notes form. The Signature which was designated as your default will be selected automatically when you email a Note.
To manage your Signatures, open the User Settings menu and click on Signatures.

Existing Signatures will display on the bottom of the pop-up window and can be edited as needed. New Signatures can be added at the top of the window.
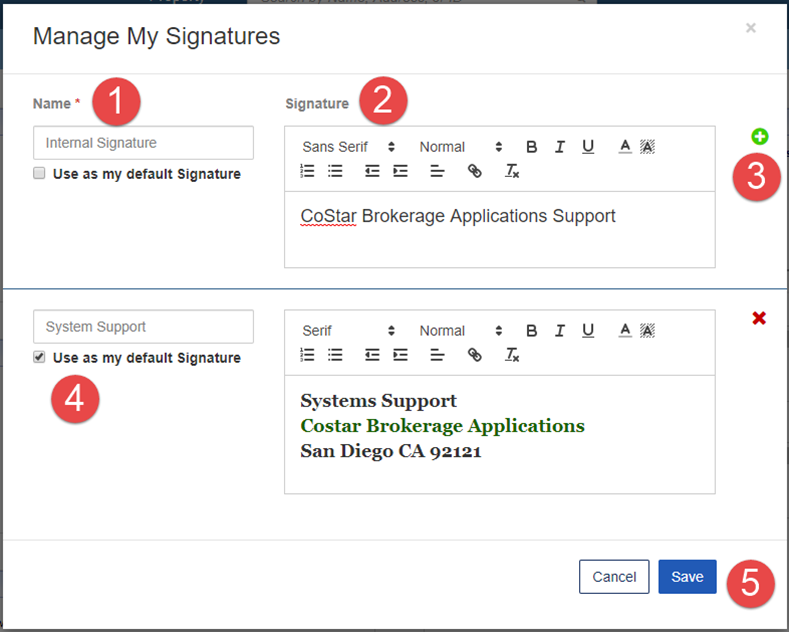
(1) Assign the new Signature a Name.
(2) Add the Signature itself.
(3) Click on the (+) icon to add the record to the list.
(4) Optional: Select the “Use as my default Signature” checkbox.
(5) When you’re finished, click Save to submit your changes.
You can select one default Signature, or you can leave no default selected. A default Signature will always be pre-selected on the Notes form so that it automatically populates in the email if you send the Note to one or more recipients.
Customize your Note/File Form
There are several ways to customize the new Note/File form for your company’s use. Use one or all of the below customizations to increase efficiency when creating or editing Notes.
“Customize this form”
Create the ideal Note/File form for your organization. These customizations will allow you to highlight the fields that are important, provide a message or hint as to how it should be filled out, or simplify the form by removing data points that you never use all together.
Please note: Required fields cannot be hidden.
Customize Drop Down Menus
Both the “Note Type” and “File Type” fields are customizable via Pulldown Administration function within the system. Here you are able to define the values as well as the sort order for each pulldown.
Show on Client Reports
The “Show on Client Reports” checkbox defaults to unchecked on the creation of a new Note. If you have a need to always have this box checked, our Support team can facilitate a system setting update to always have it checked on the creation of a new Note.
Always show the form expanded
When you first open the Note form (either new or edit), it opens in a minimized state, hiding the sections for emailing the Note or for linking it to other records. If you have a business need to always open the form fully expanded, our Support team can facilitate a system setting to update it to always open the form in its fully expanded state.
If you have any questions or would like to schedule a detailed training on this feature, please contact [email protected].
© 2023 CoStar Group
Attachments:
 image-20190913-141333.png (image/png)
 image-20190913-141950.png (image/png)
 image-20190913-142055.png (image/png)
 image-20190913-142122.png (image/png)
 image-20191024-222704.png (image/png)
image-20191024-222832.png (image/png)
image-20191024-222918.png (image/png)
image-20191024-222936.png (image/png)
image-20191024-222704.png (image/png)
image-20191024-222832.png (image/png)
image-20191024-222918.png (image/png)
image-20191024-222936.png (image/png)