In this tutorial, we will go over the requirements for In-House Vendors, applying a payment to multiple invoices, distribution of the payment amount, and overriding a split plan.
Instructions
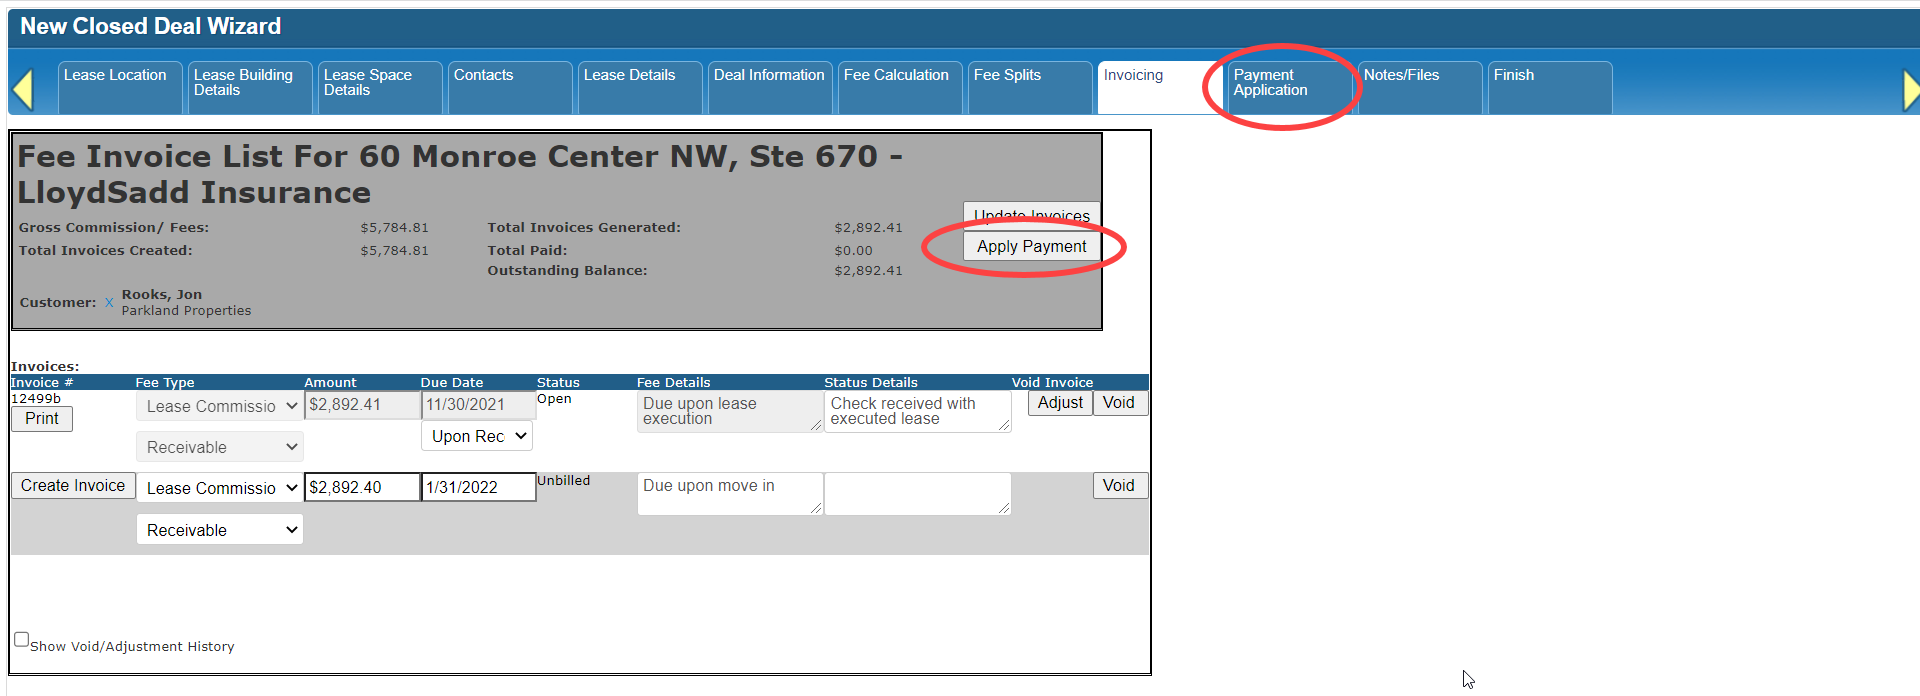
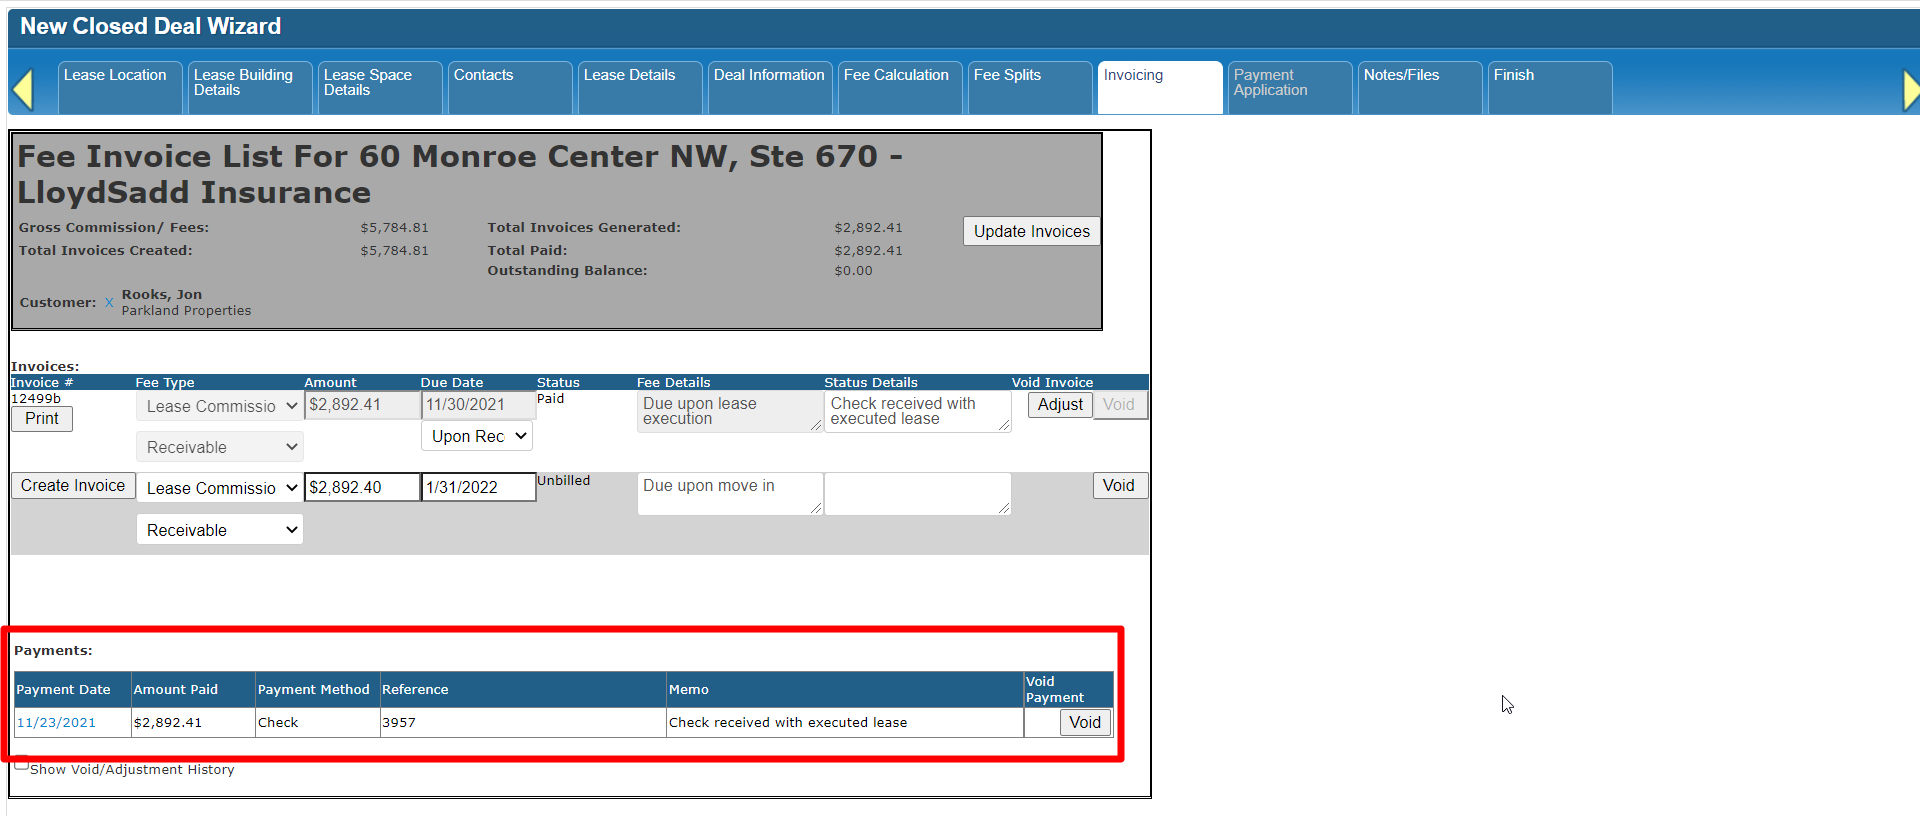
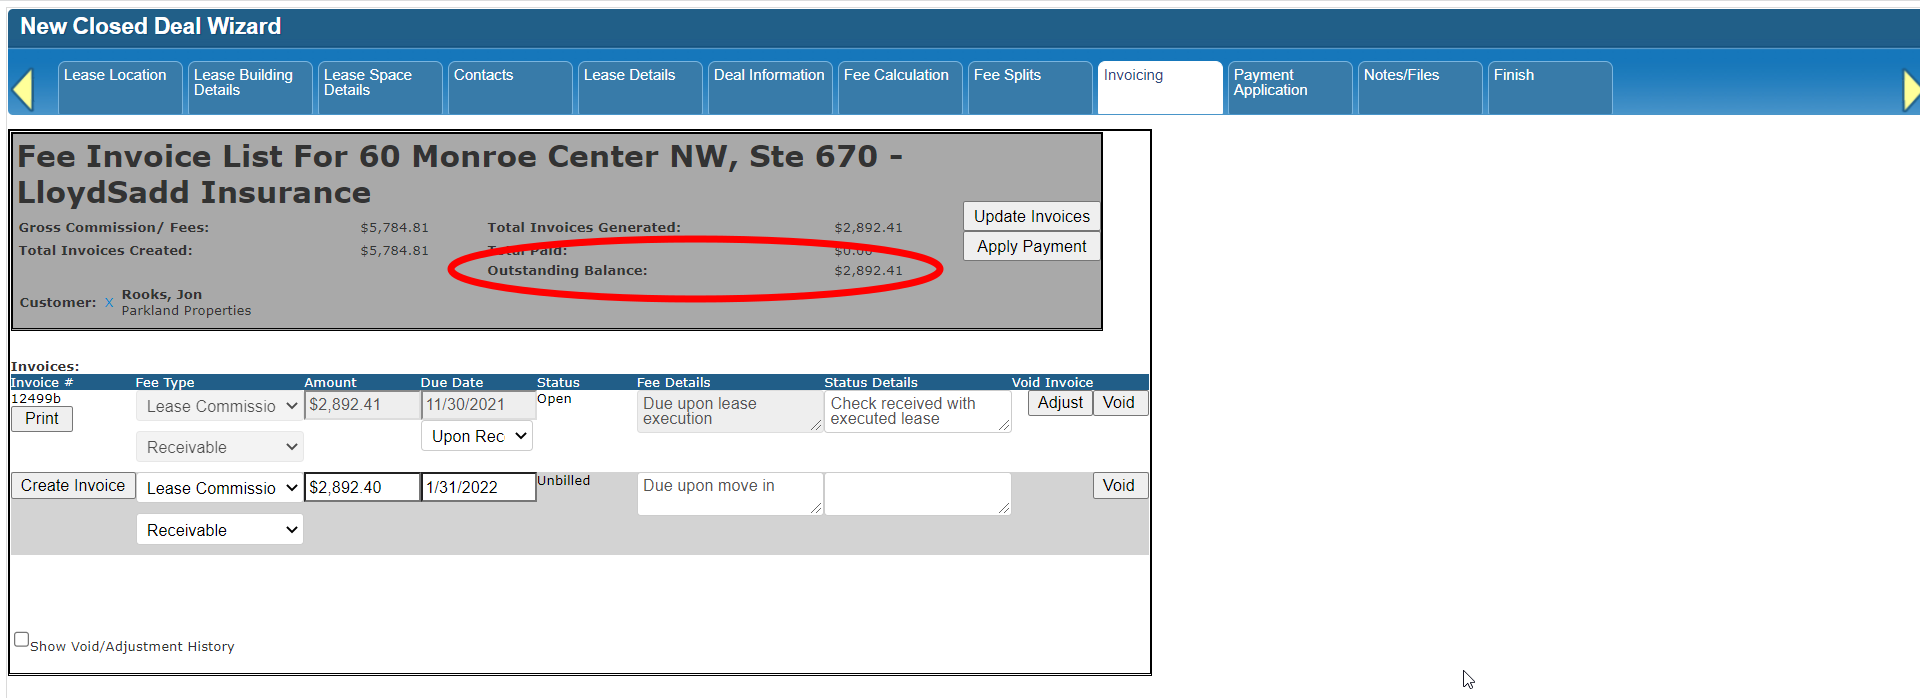
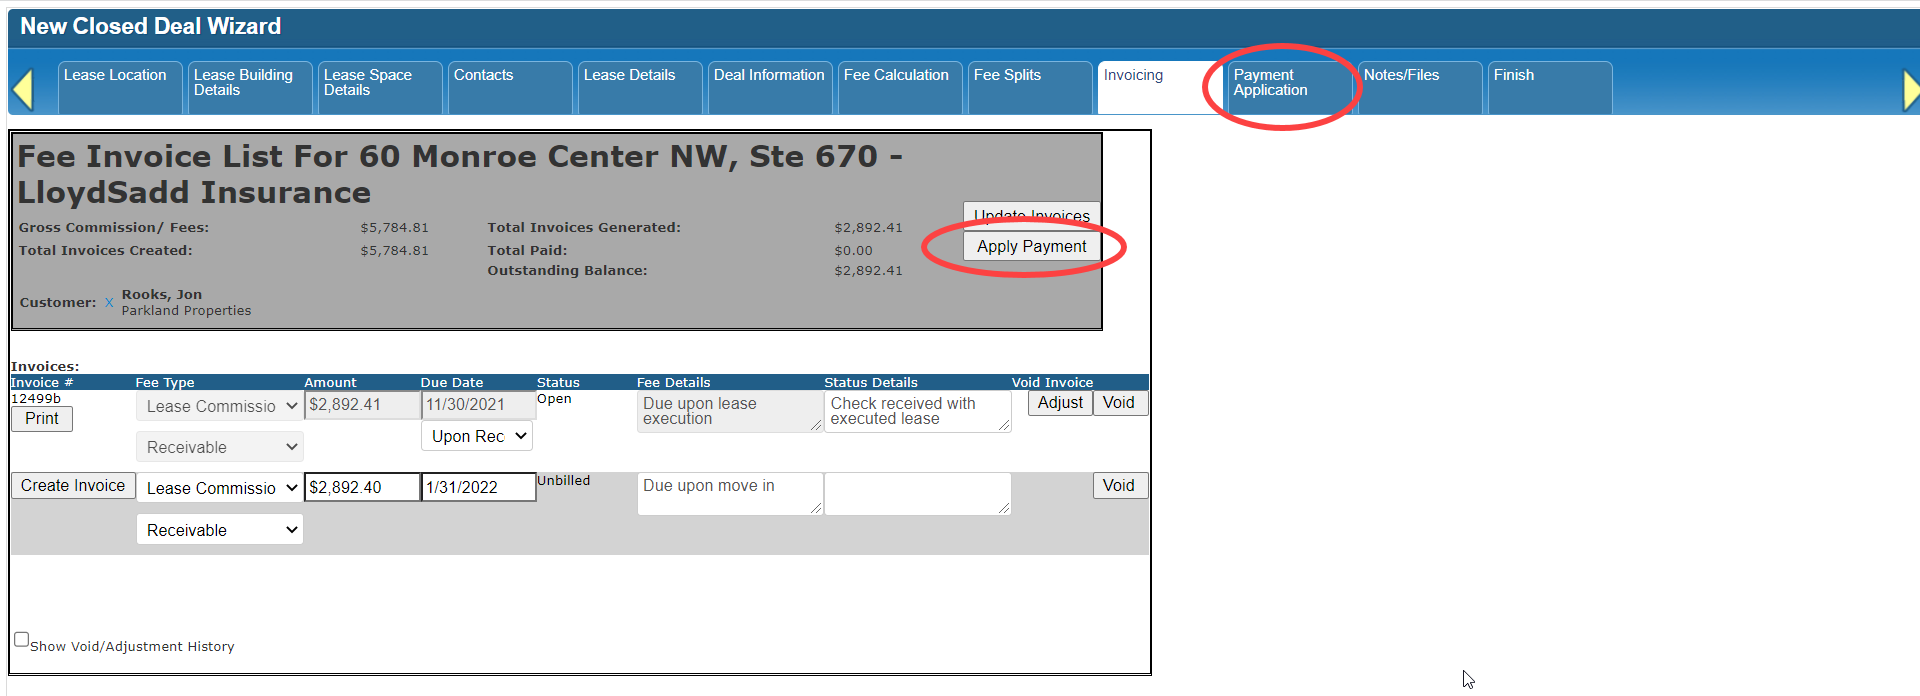
To open the Payment Application form from the Invoicing tab, either click on the Apply Payment button at the top, or click on the Payment Application tab itself.
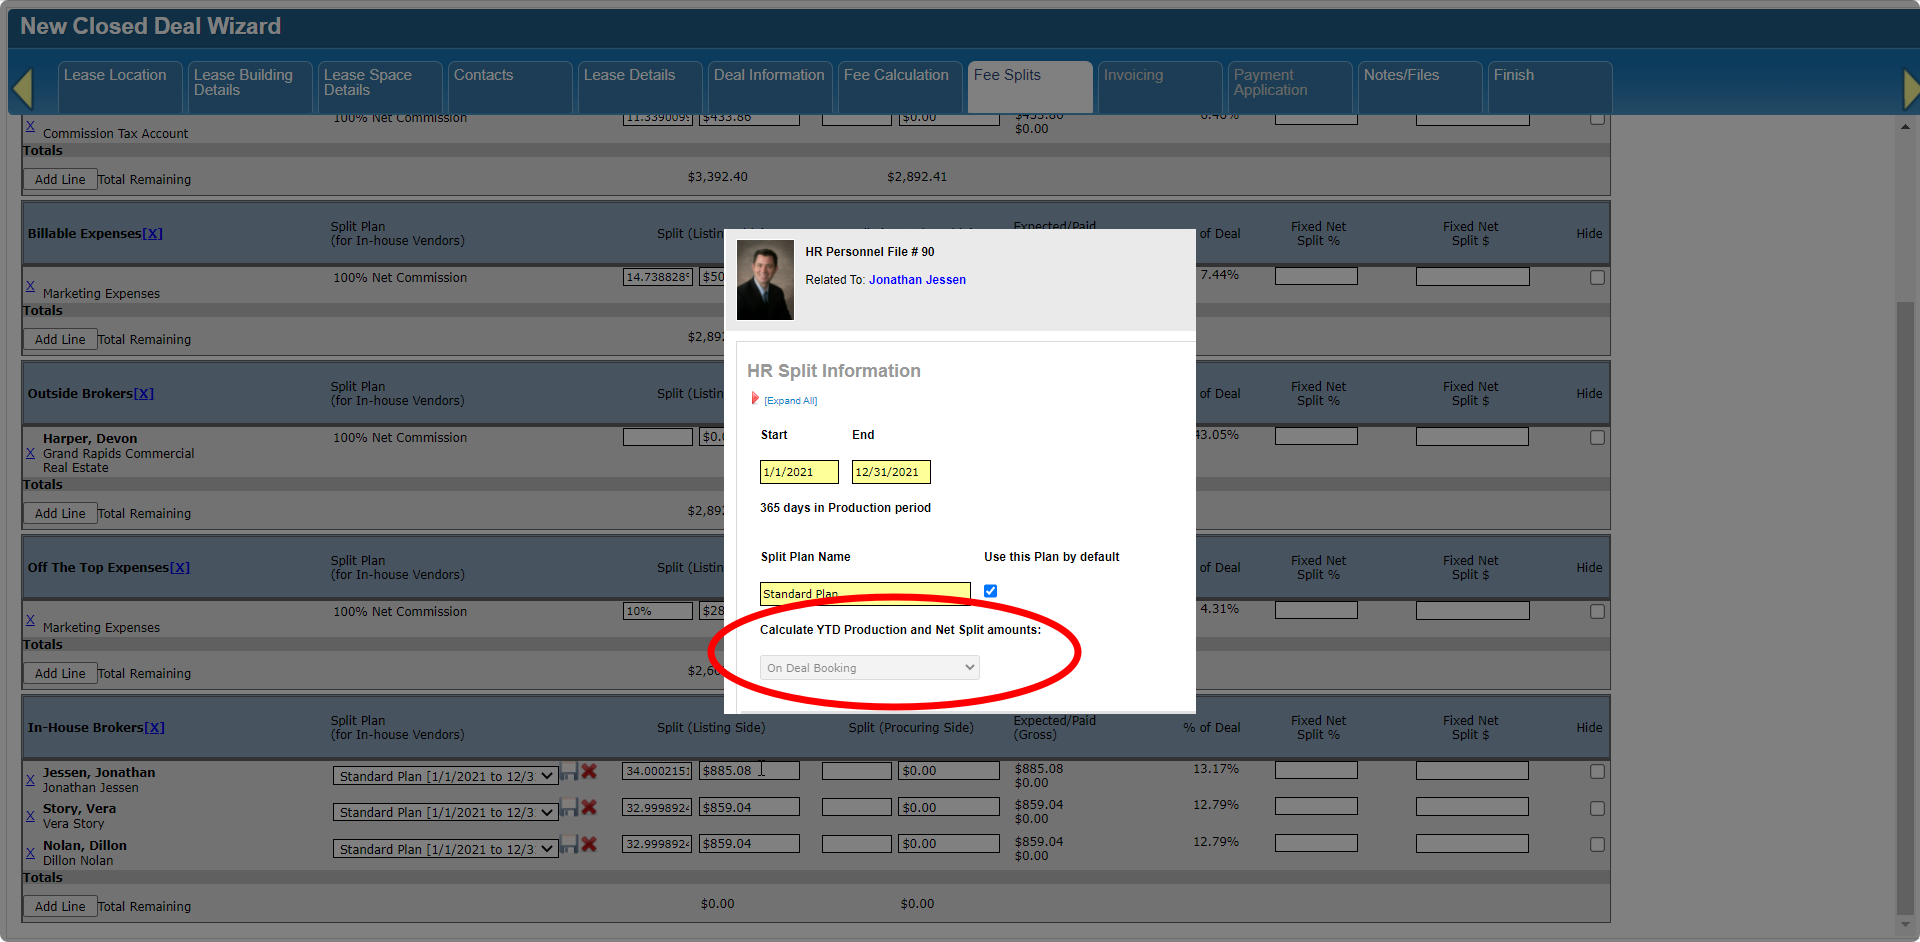
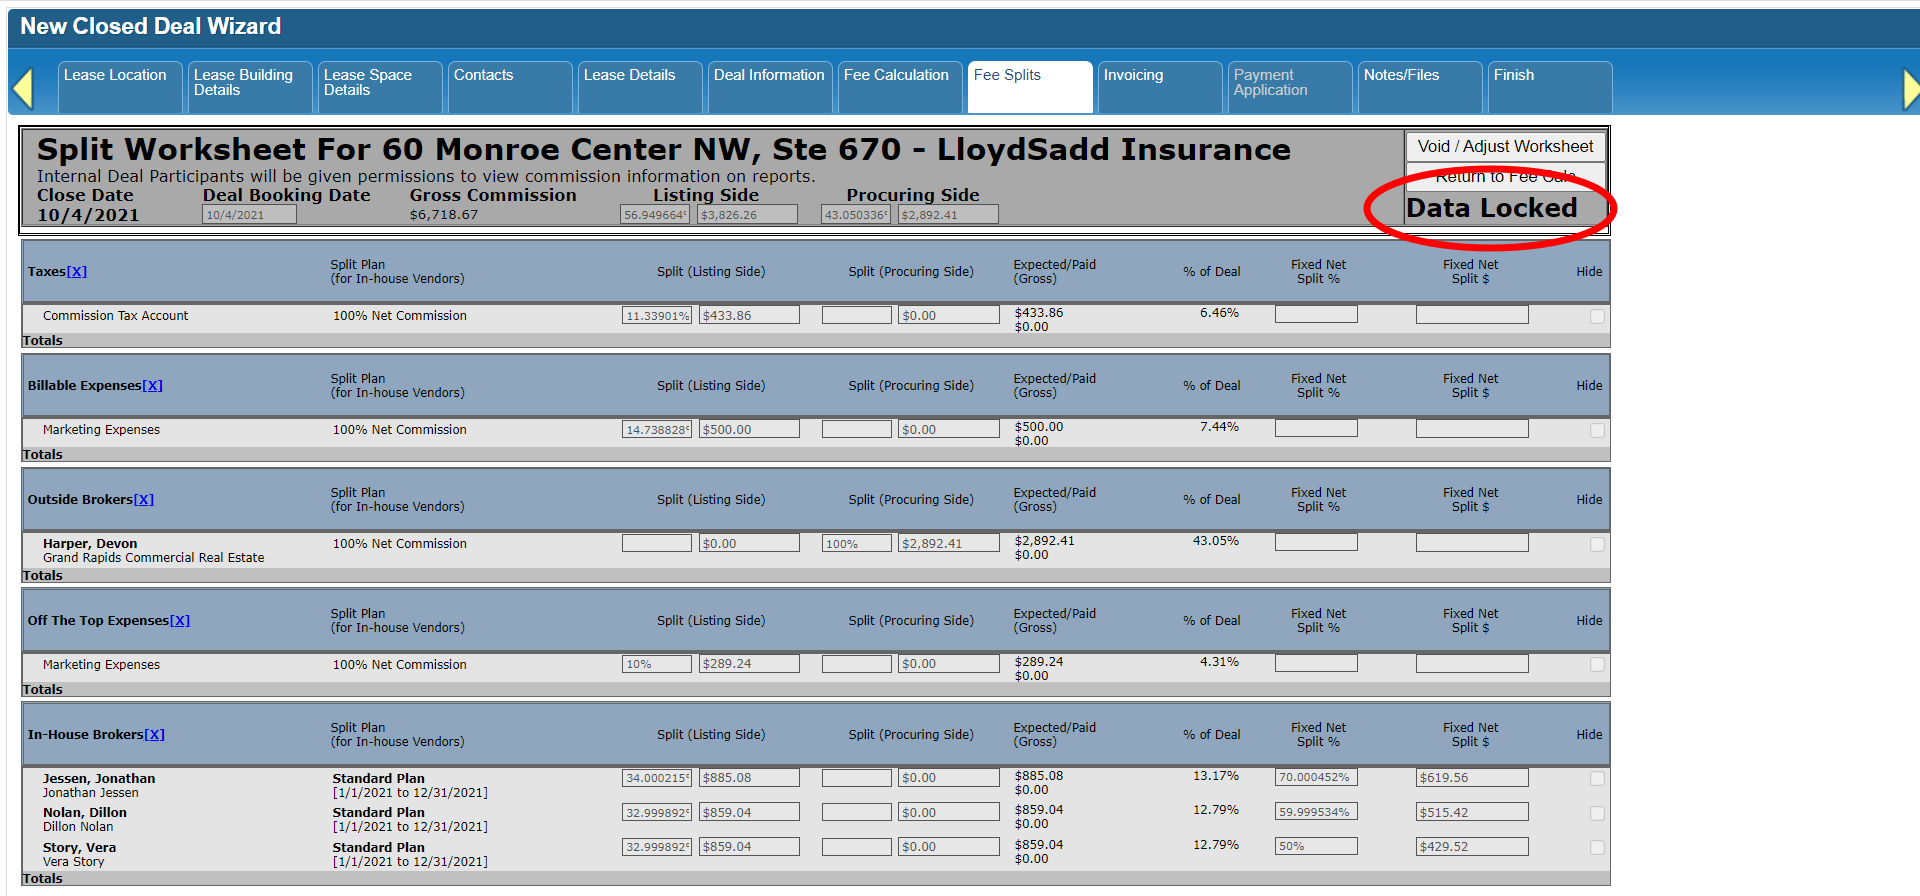
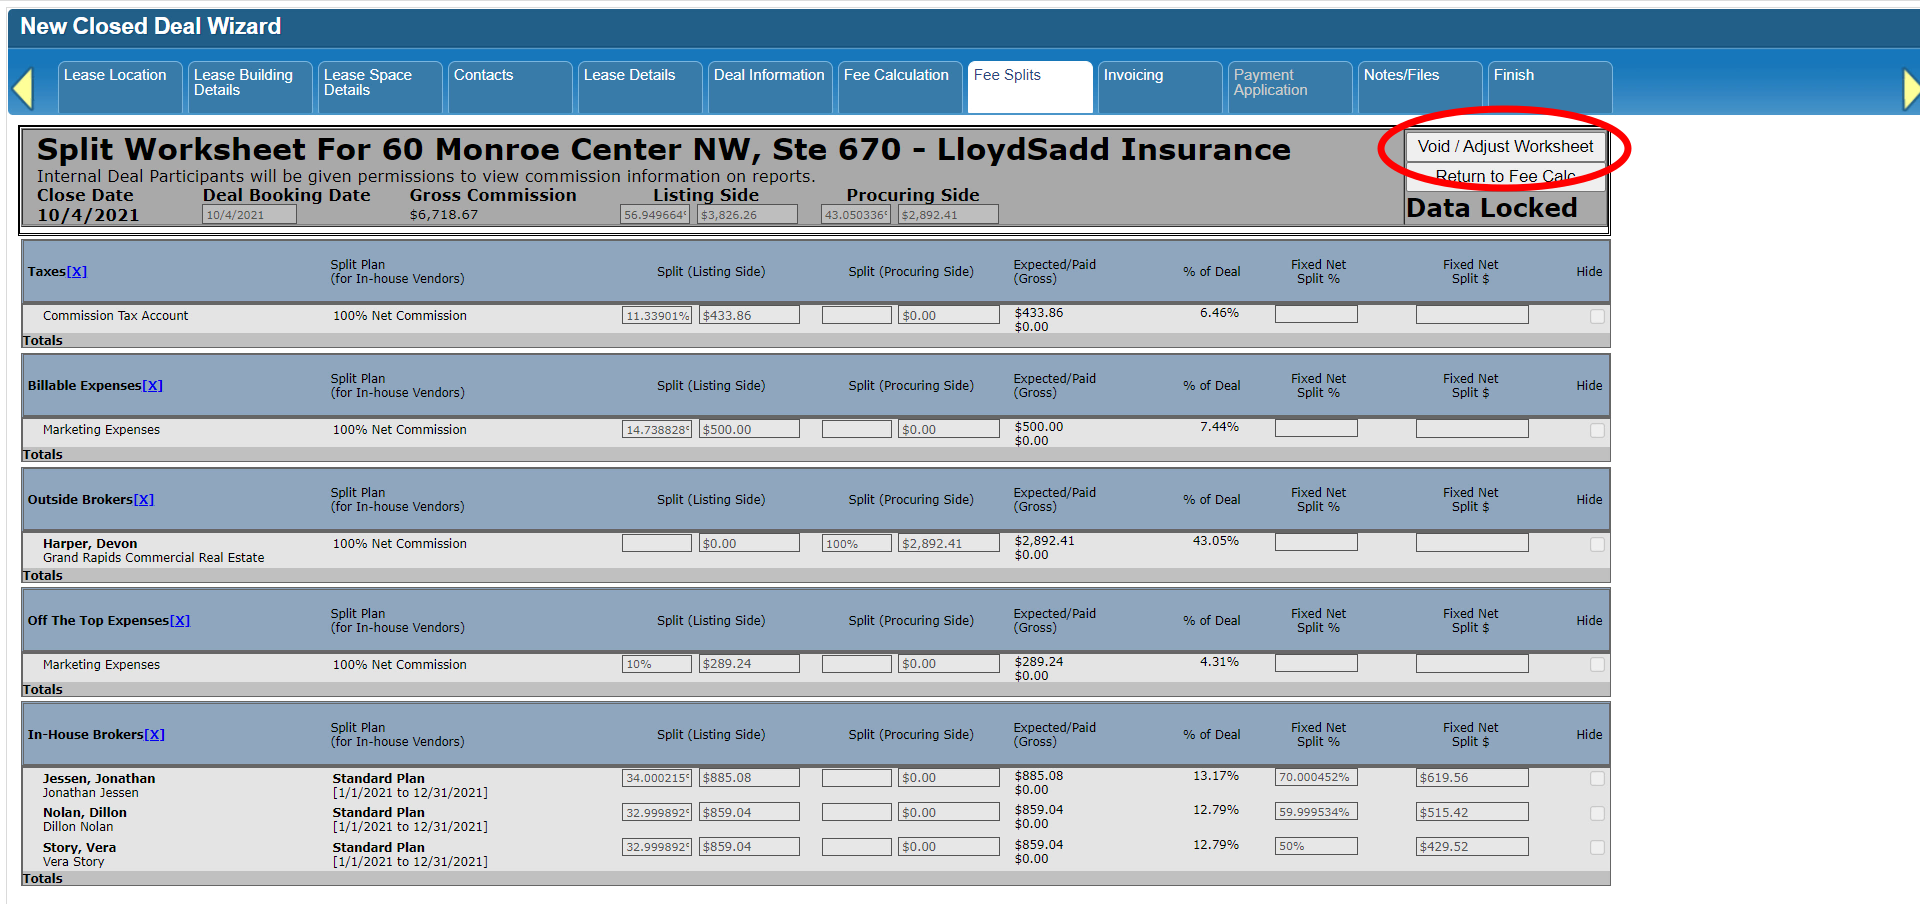
Before the form opens, the system will check to make sure all of the In-House Vendors listed on the Fee Splits form (i.e. all of the internal brokers who have been allocated a portion of the Total Fee amount) have a valid Split Plan.
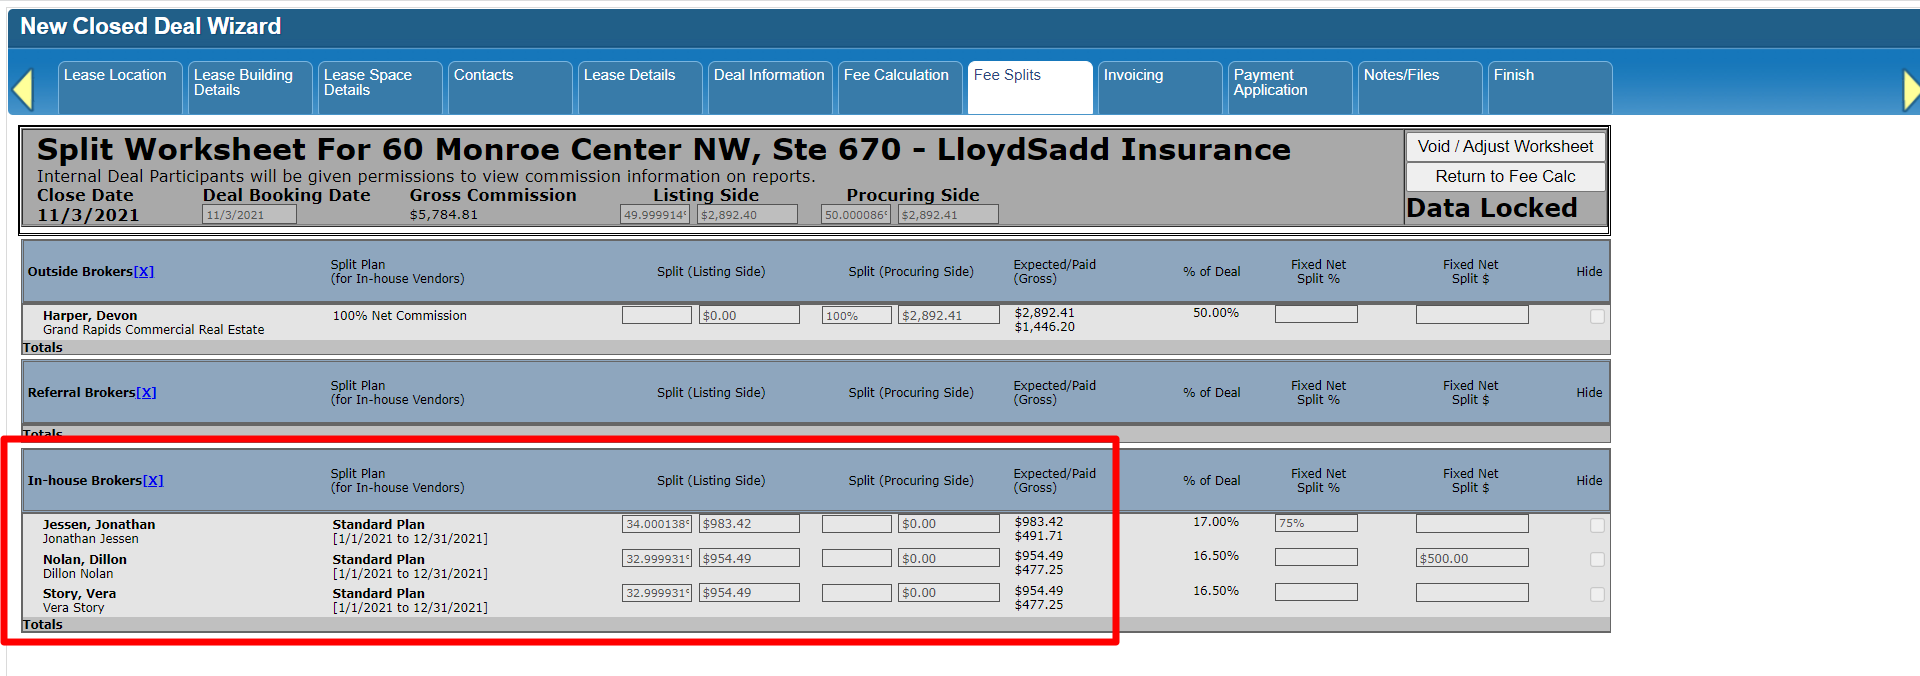
Split Plans are set up for each broker by your system administrator as part of their Personnel File record. Each internal broker should have at least one plan that encompasses today’s date and that has a defined Net Split percent for the brokers’ current production credit, or the gross fee amount they have earned so far this year.

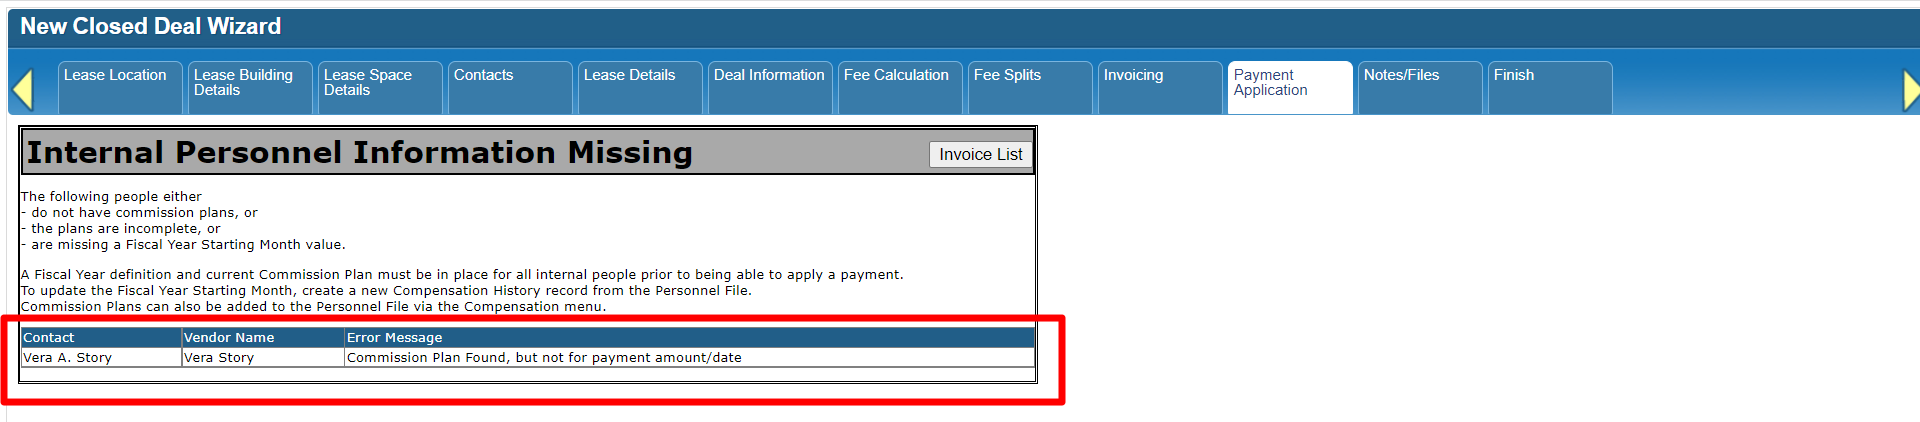
If one or both of those requirements are not met, the system will display a message listing which brokers have missing or invalid information, and exactly which details are missing.
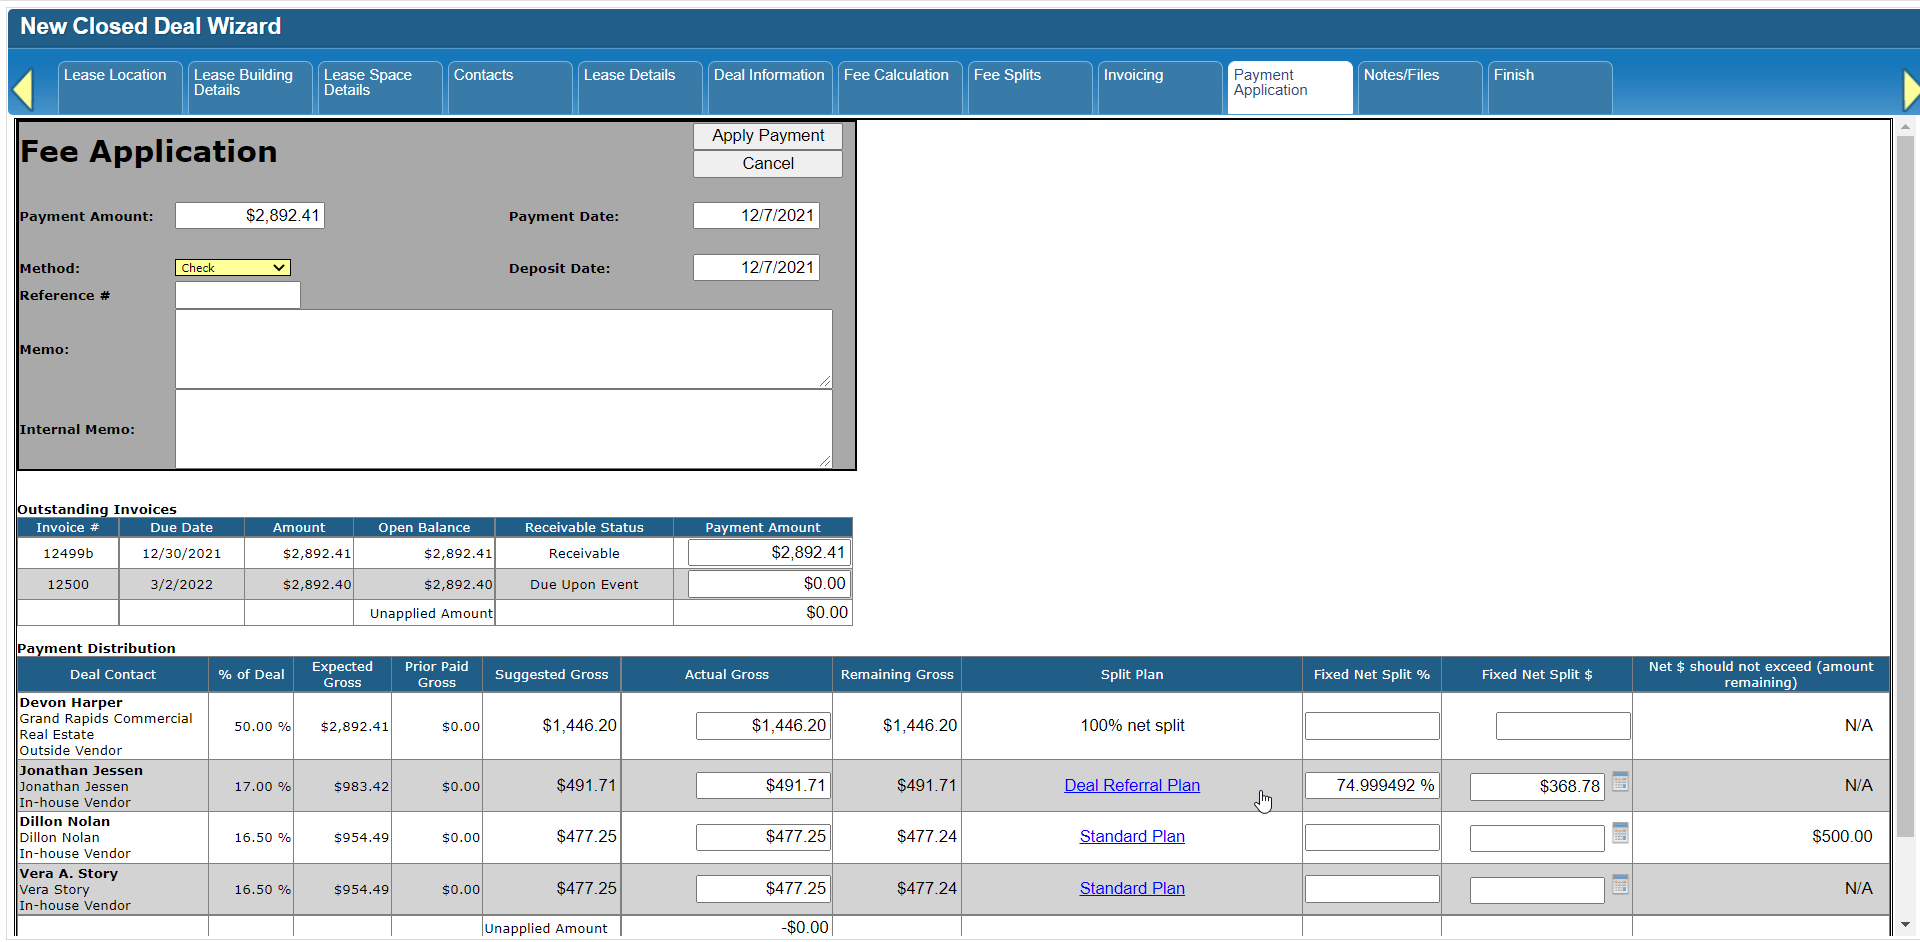
If all requirements are met, the form will open. At the top are fields that pertain to the entire payment. Some are pre-populated with default entries, such as today’s date or another default value.
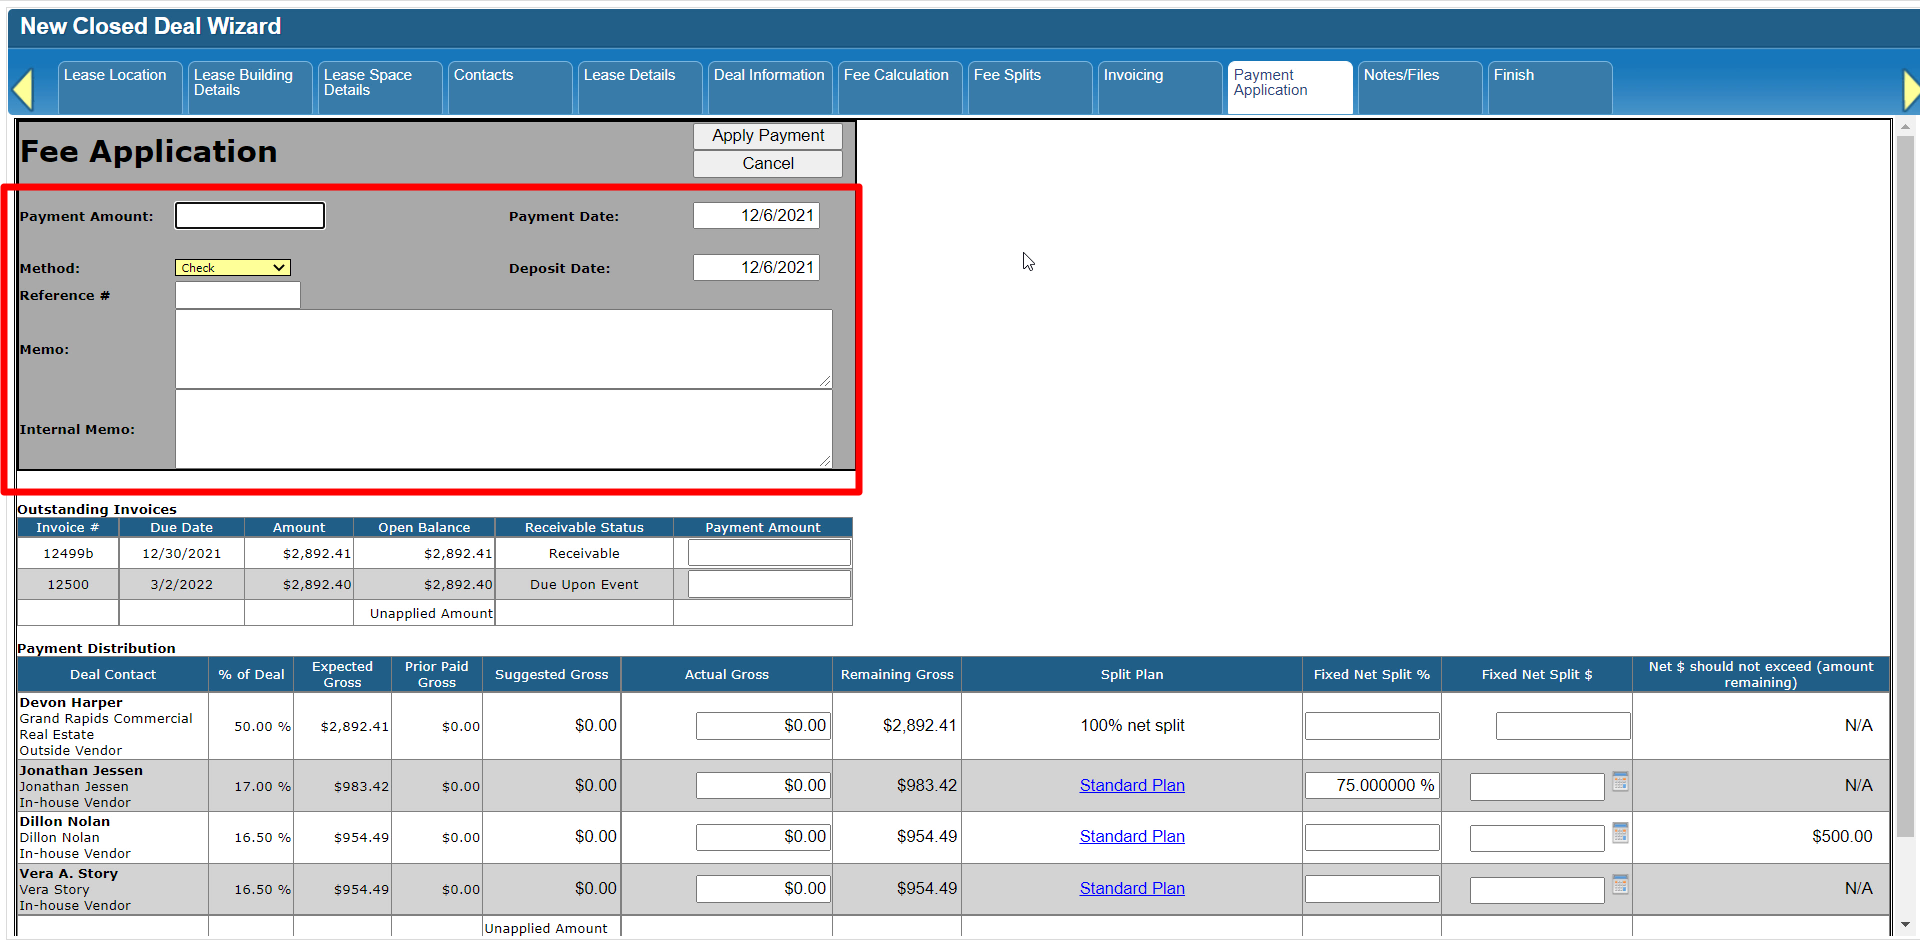
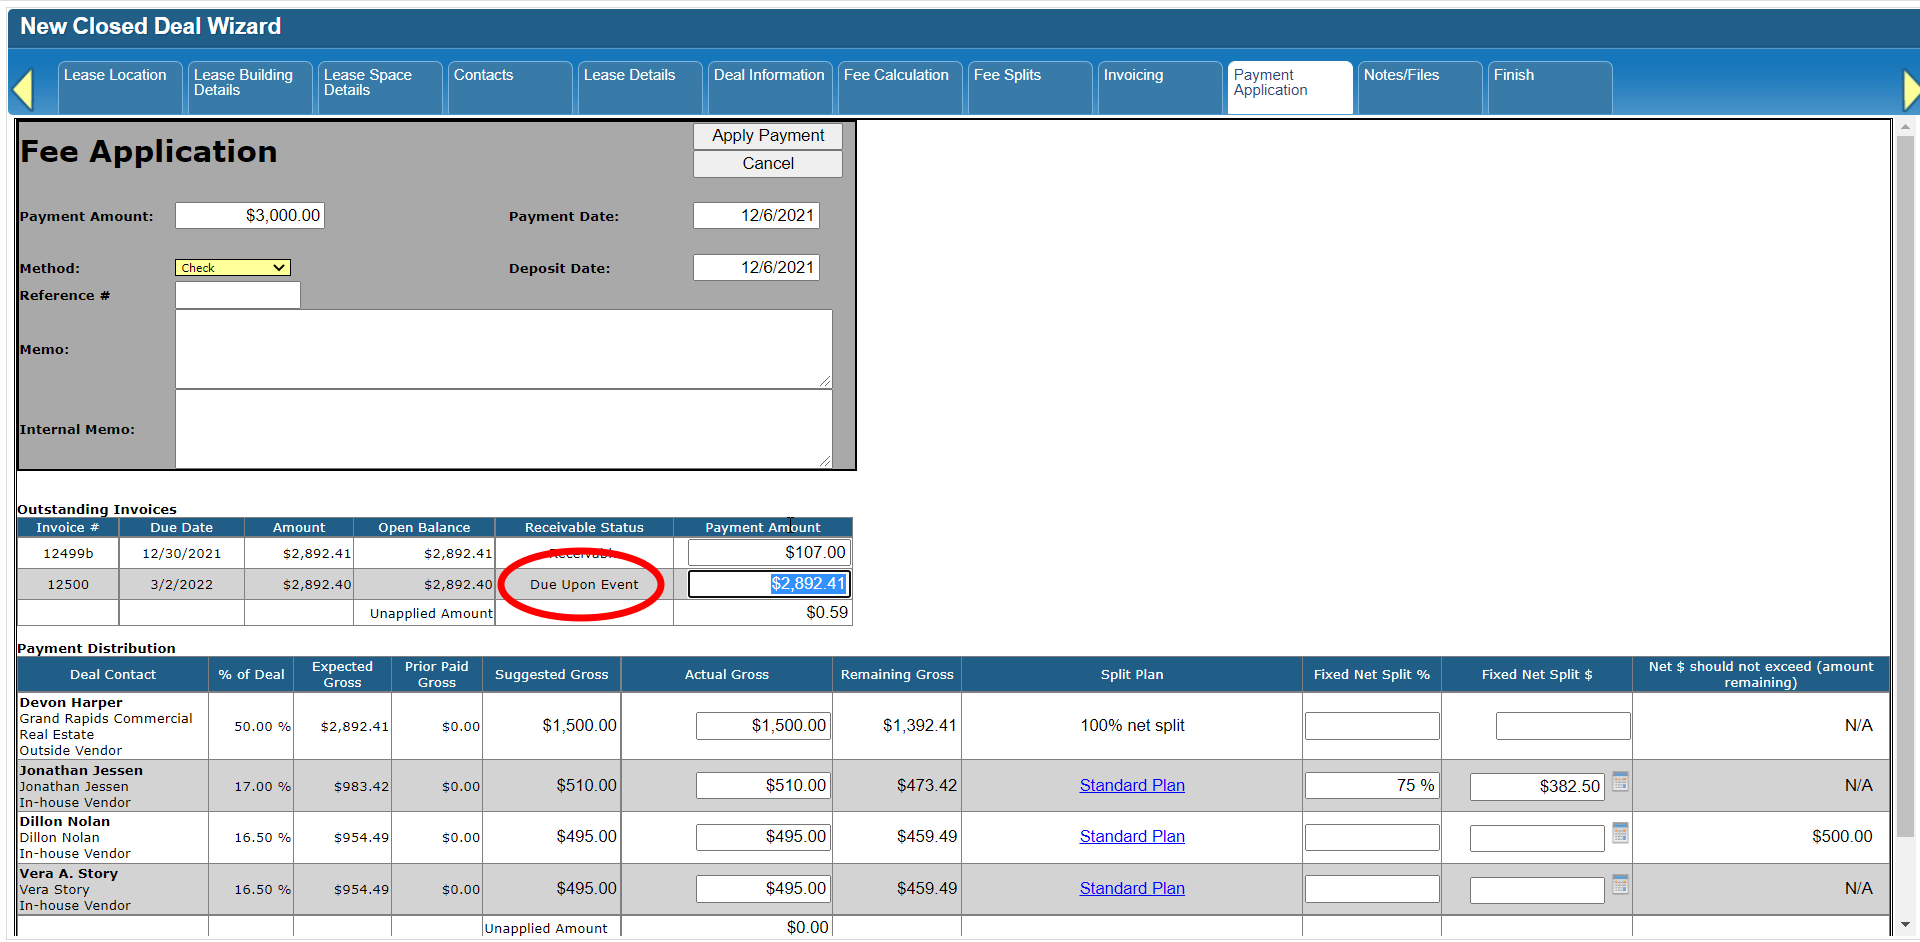
Below that is a list of invoices that are billed and have an outstanding balance.
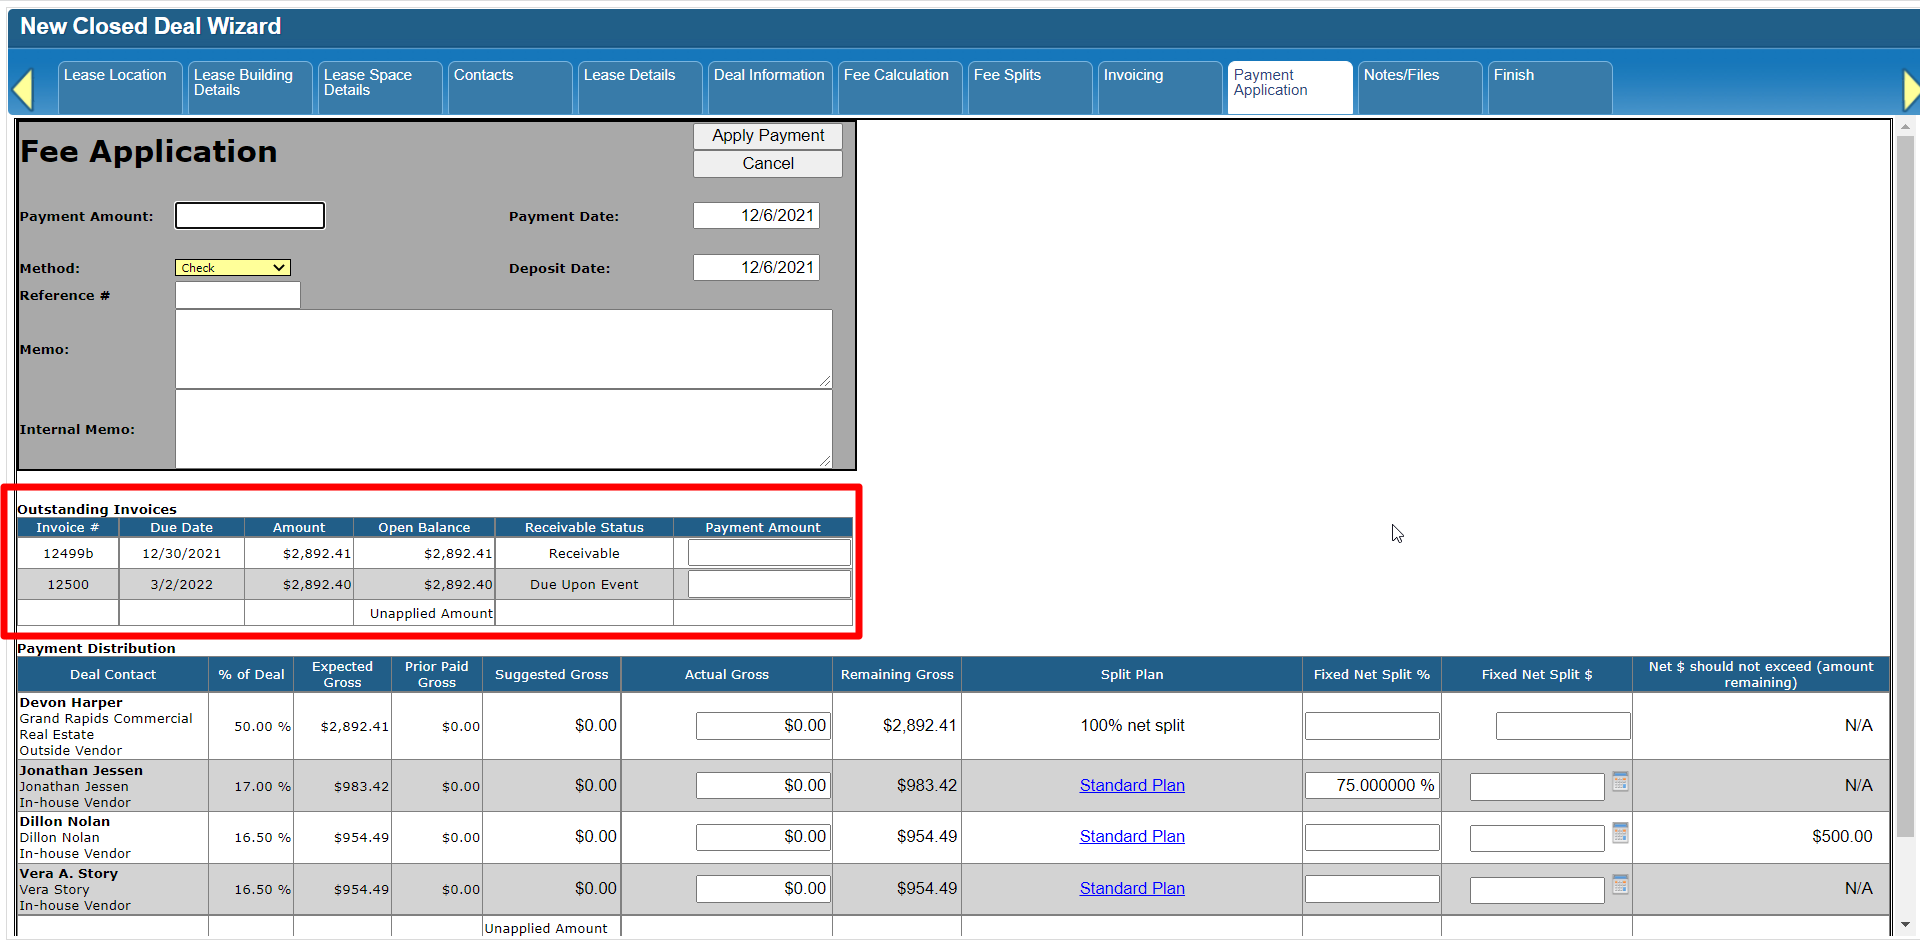
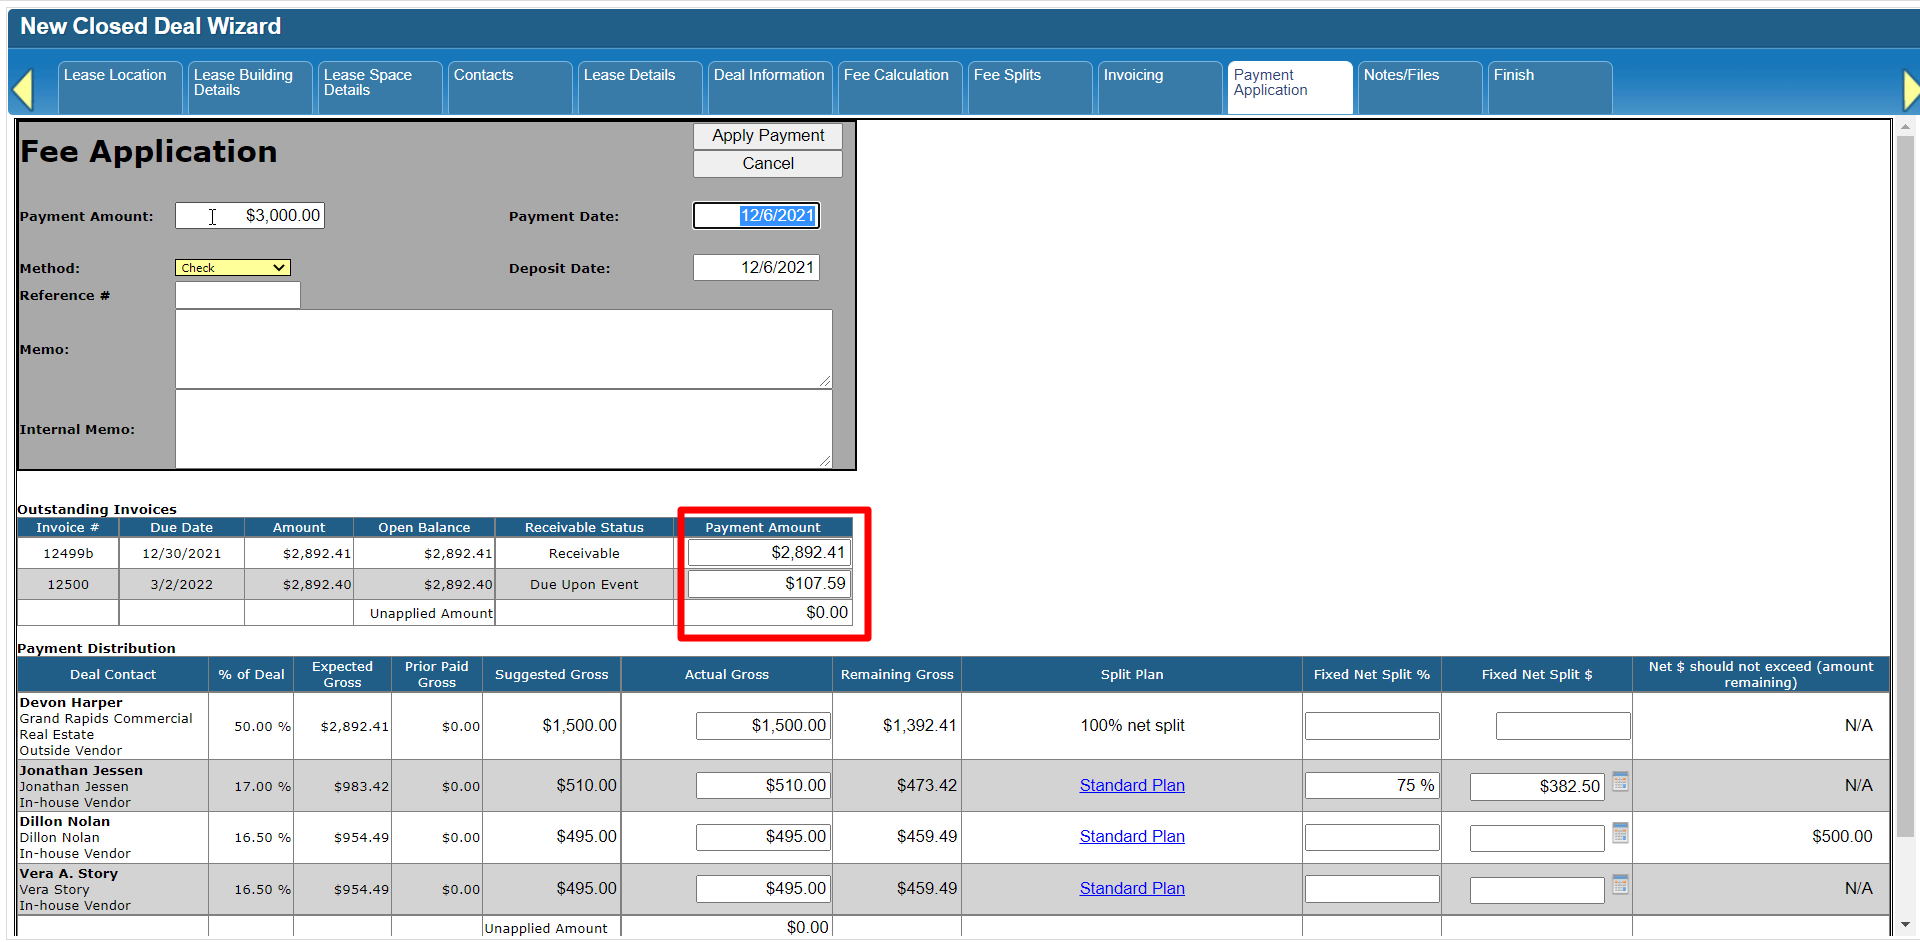
As you enter the Payment Amount, the system will automatically apply that amount across the invoices listed, in order of invoice Due Date. You can change that distribution manually if you need to pay the invoices in a different order.
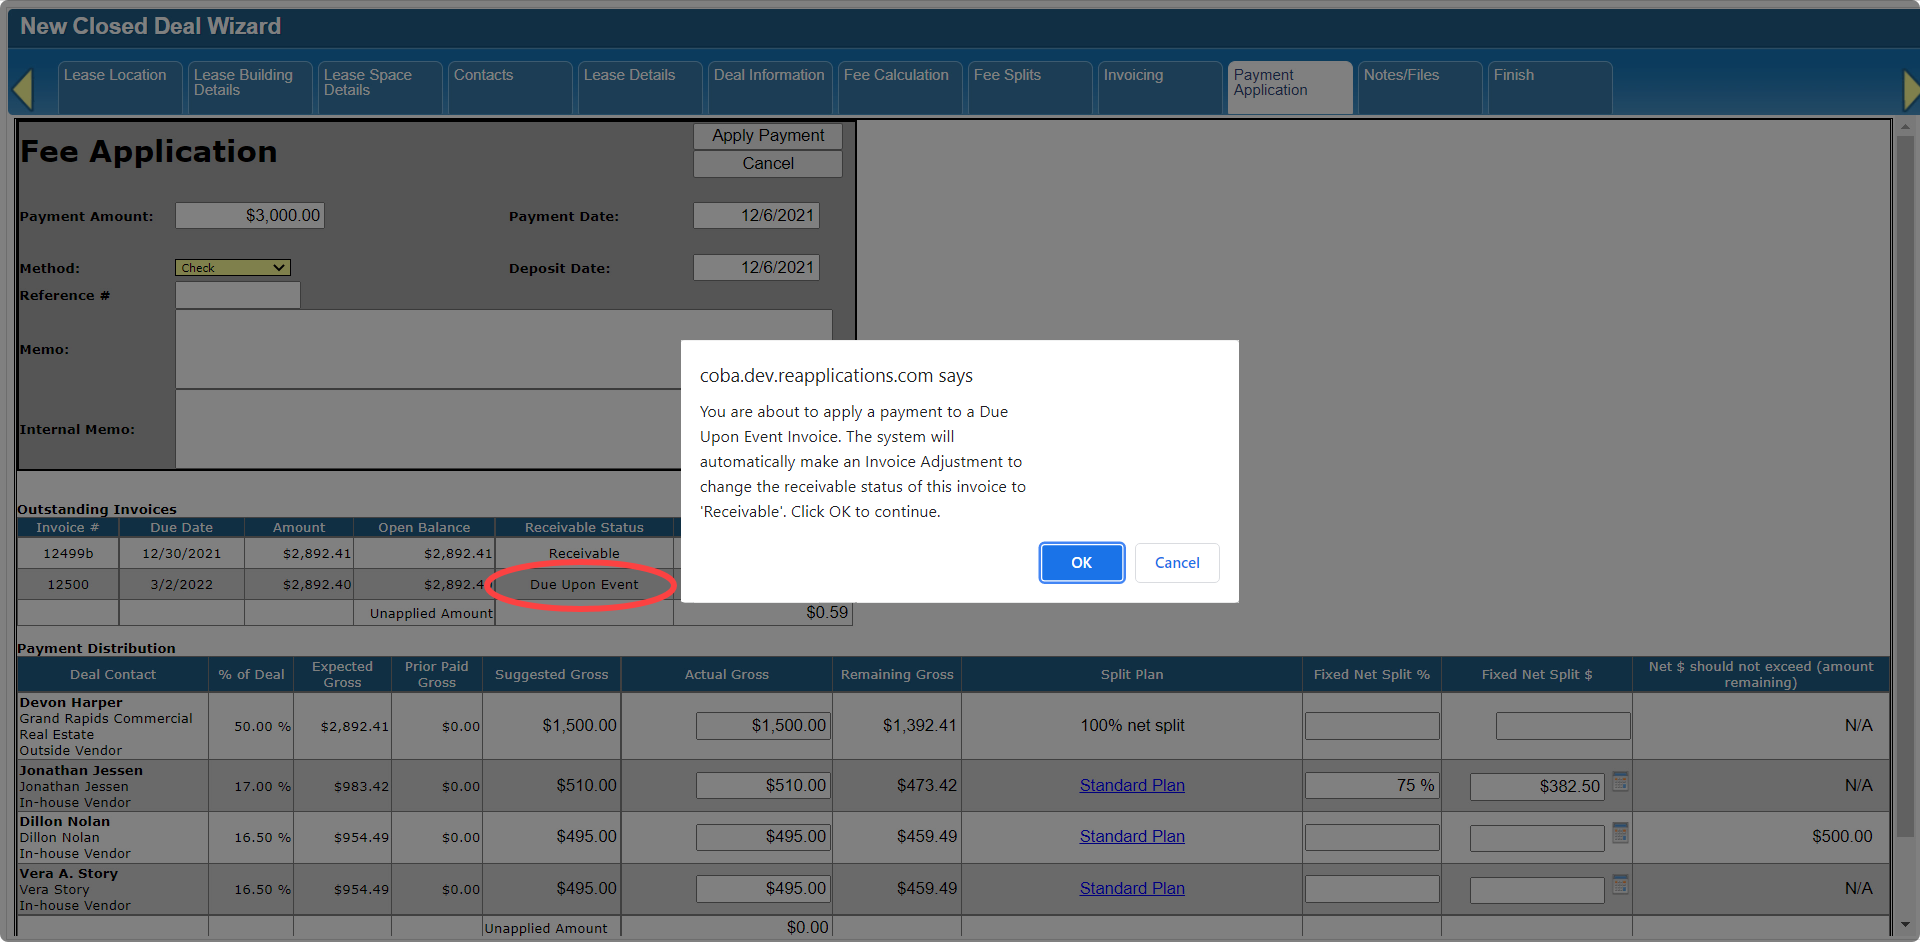
Any invoices that are currently marked as “Due Upon Event” will be adjusted to “Receivable” as part of the payment application process. This is generally only relevant for accrual-based accounting practices.
In the Payment Distribution section below the invoices list, you’ll see all of the Contacts and Vendors who have been allocated a portion of this deal’s fees with a summary of expected, paid, and remaining gross fee amounts.
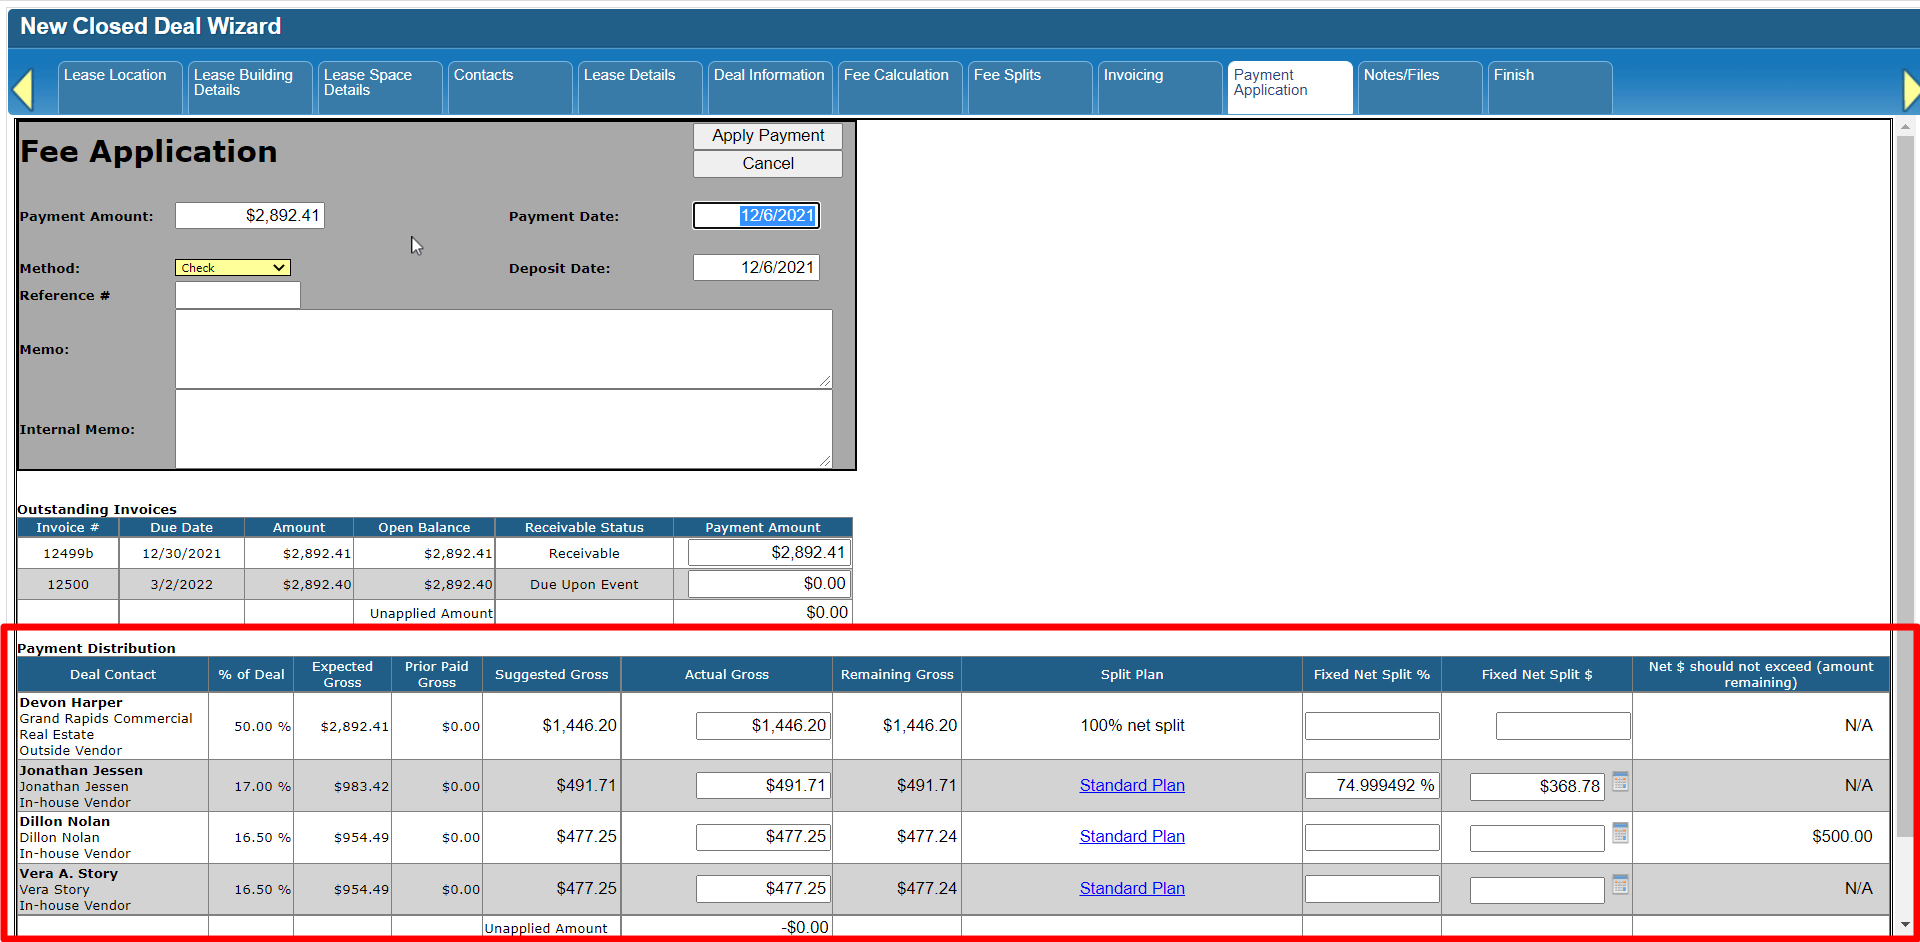
The system will calculate and fill in the suggested distribution for this payment. You can change that distribution manually – for example, if the outside broker is supposed to be paid in full first.
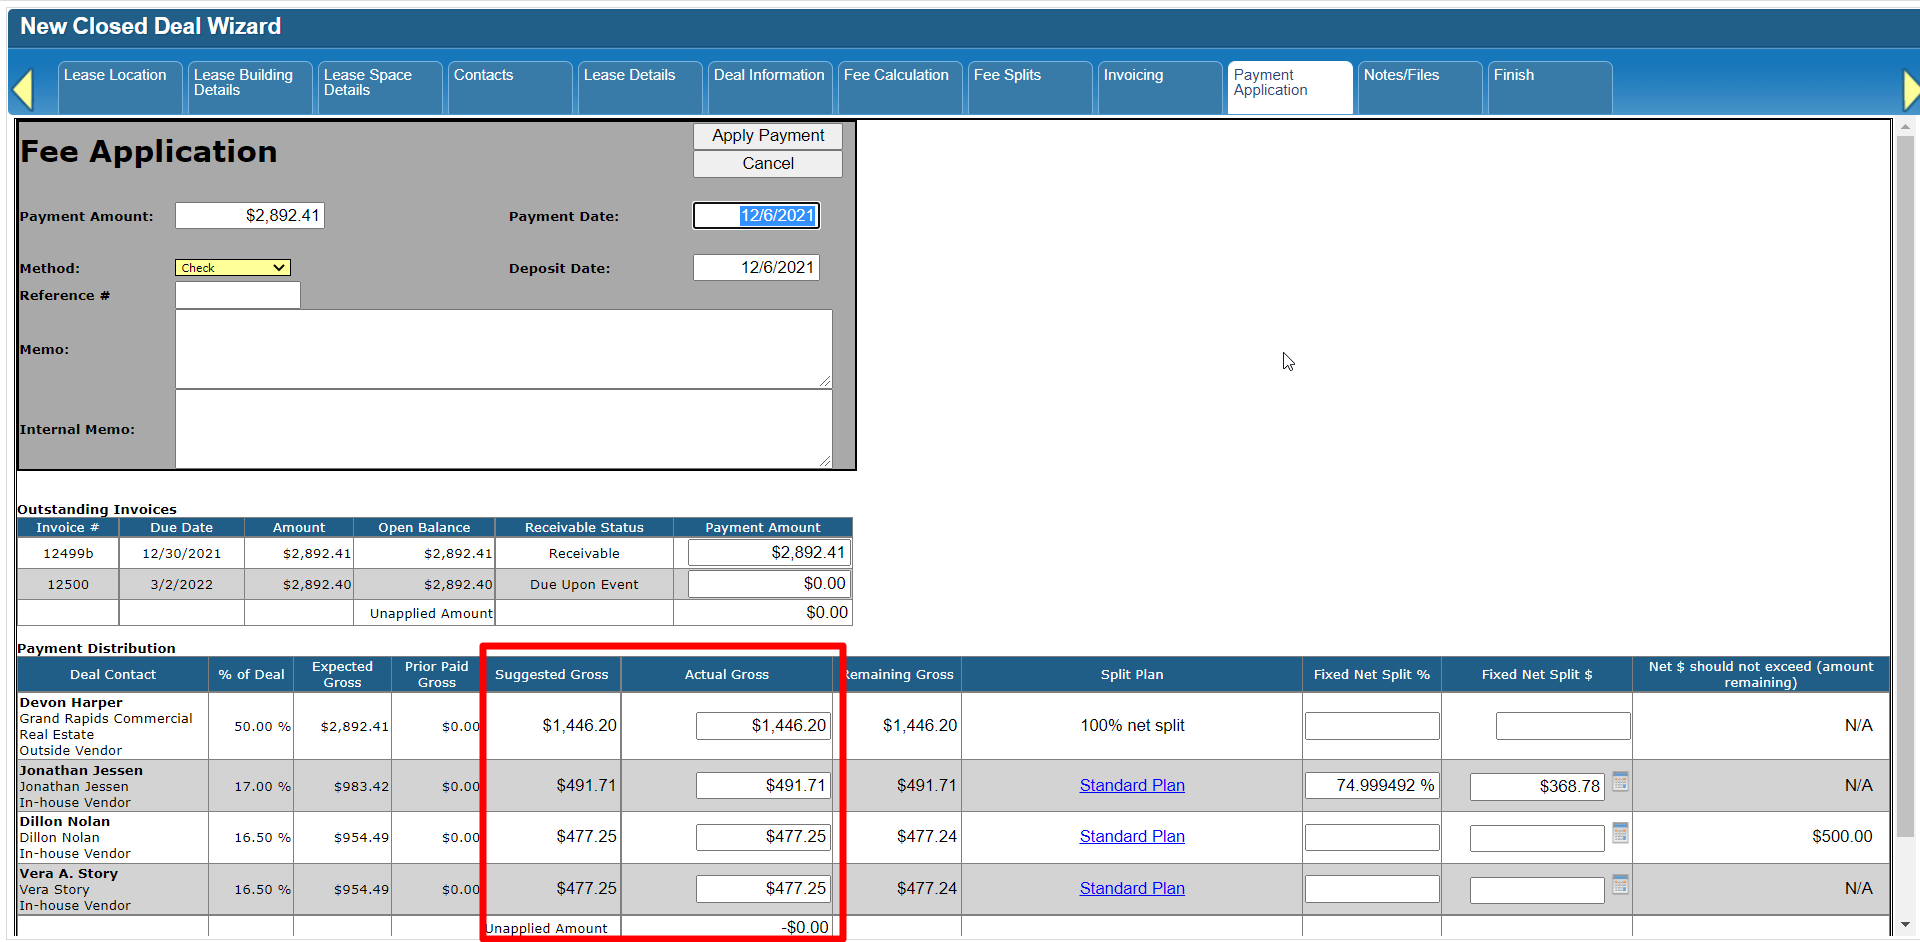
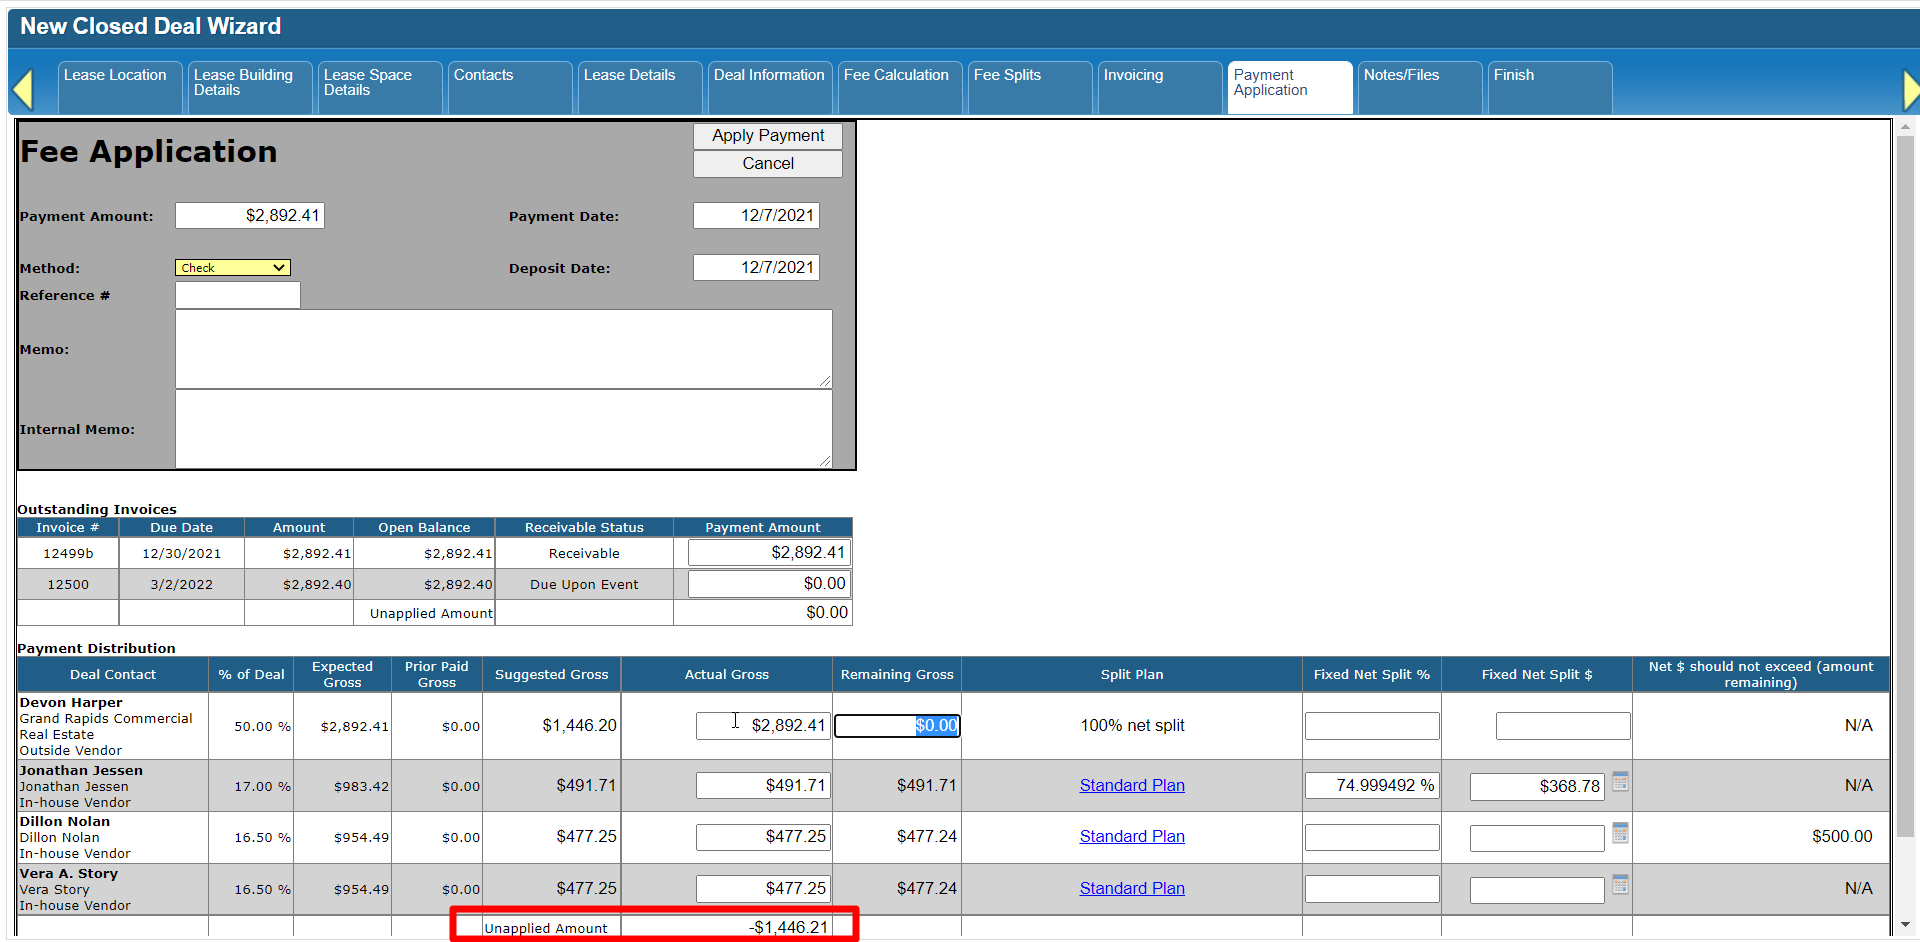
You will be required to make sure the entire payment amount is distributed before you can submit this form.
Although the Split Plan for each internal broker has already been defined on the Fee Splits tab, you may see a different Split Plan listed on this form for the same broker. That usually happens because the payment is being applied in a new year with a new Split Plan for that year.
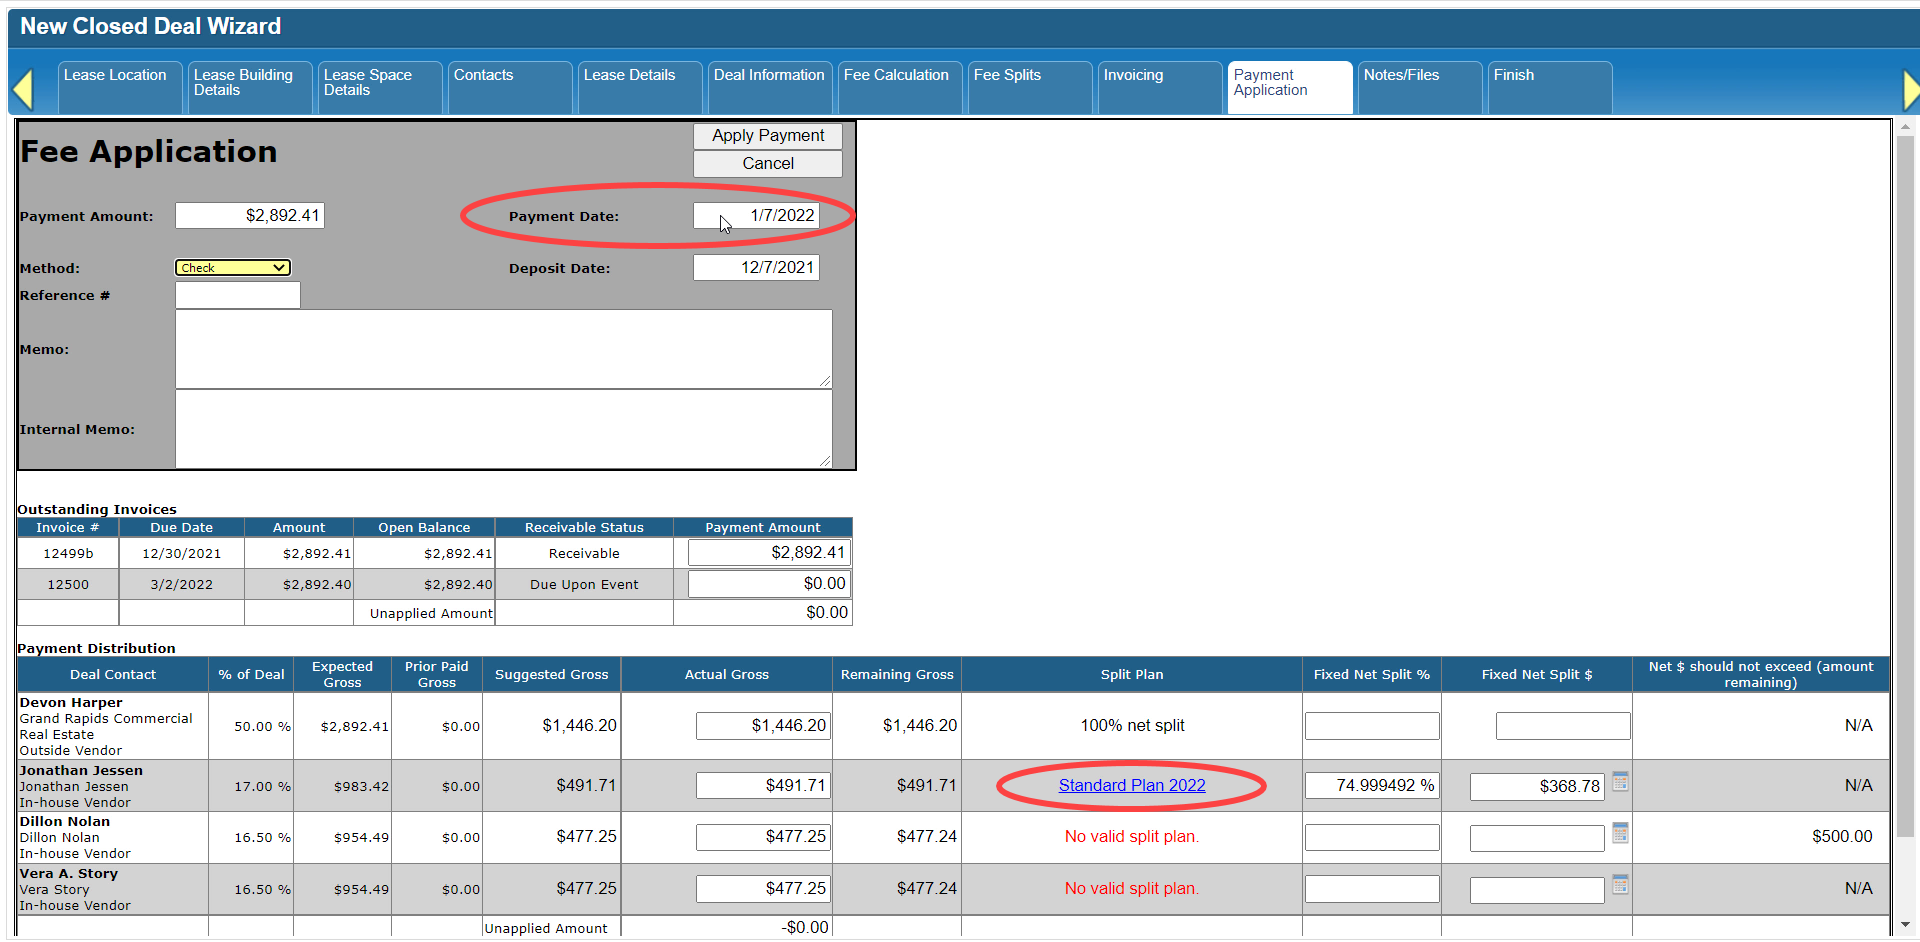
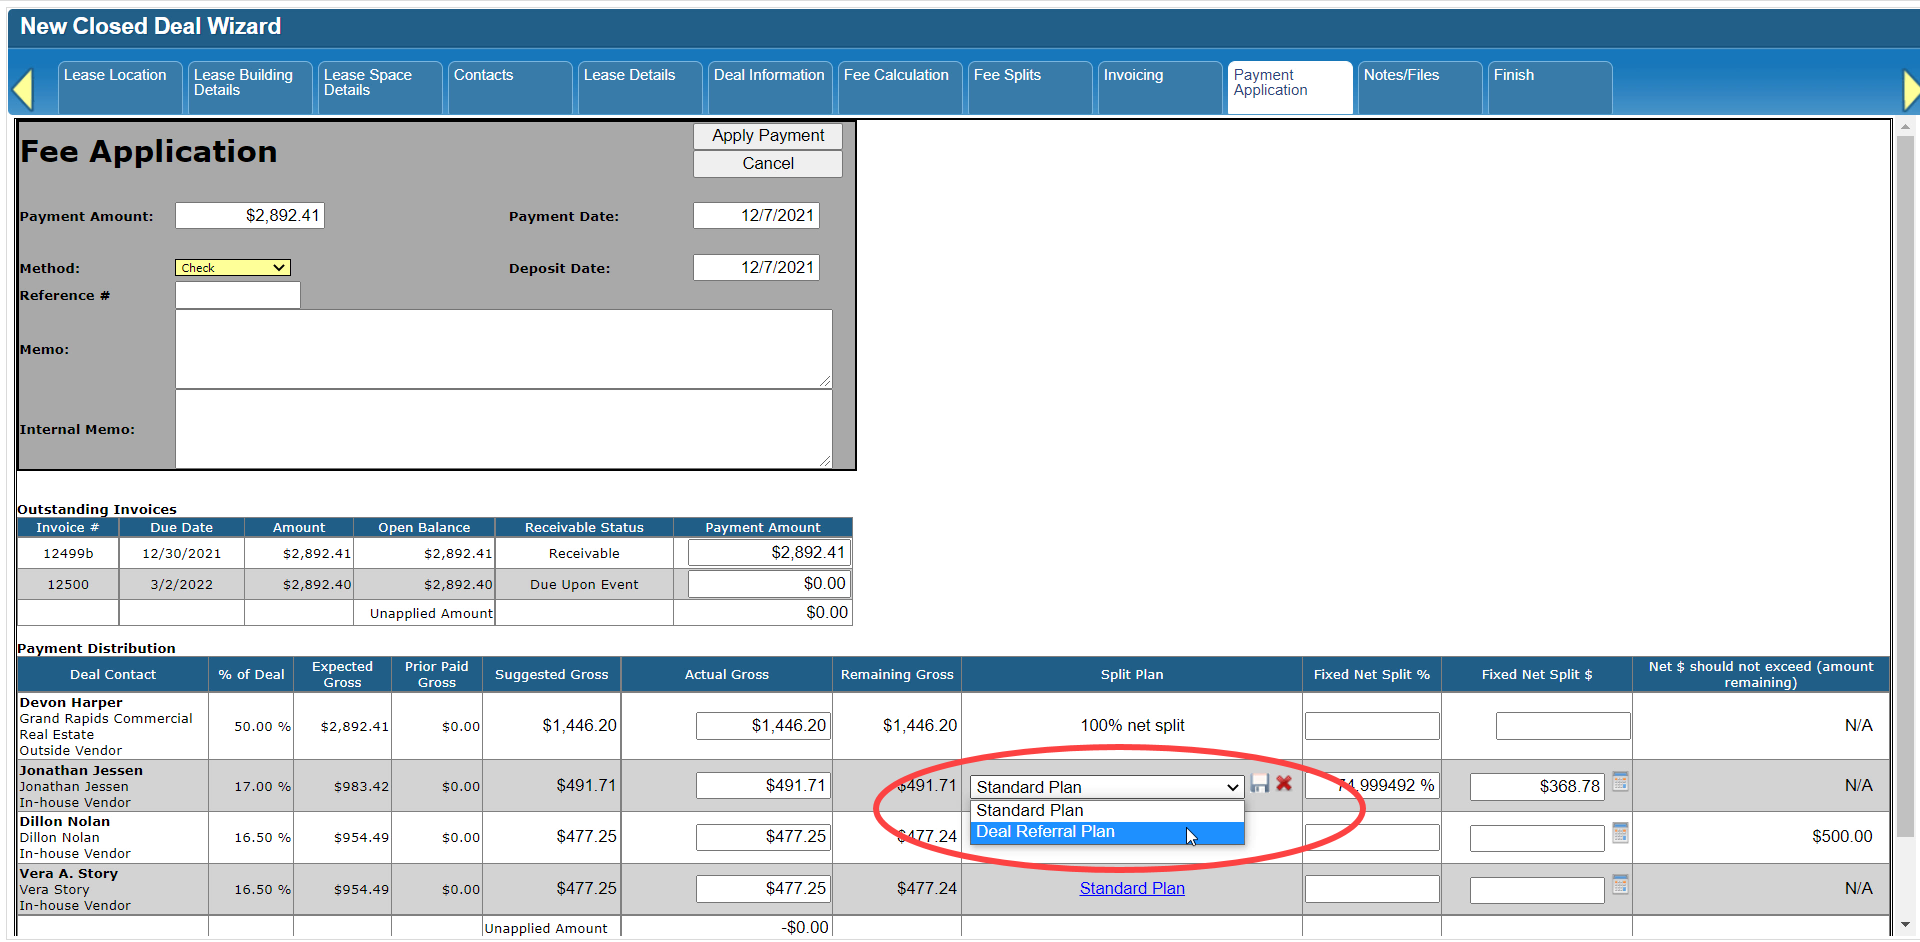
If you need to, you can change the Split Plan for this payment by clicking on the plan name.

Select from the list of plans that are valid for this Payment Date, then click on the Save icon. Clicking the [X] icon will cancel any changes.
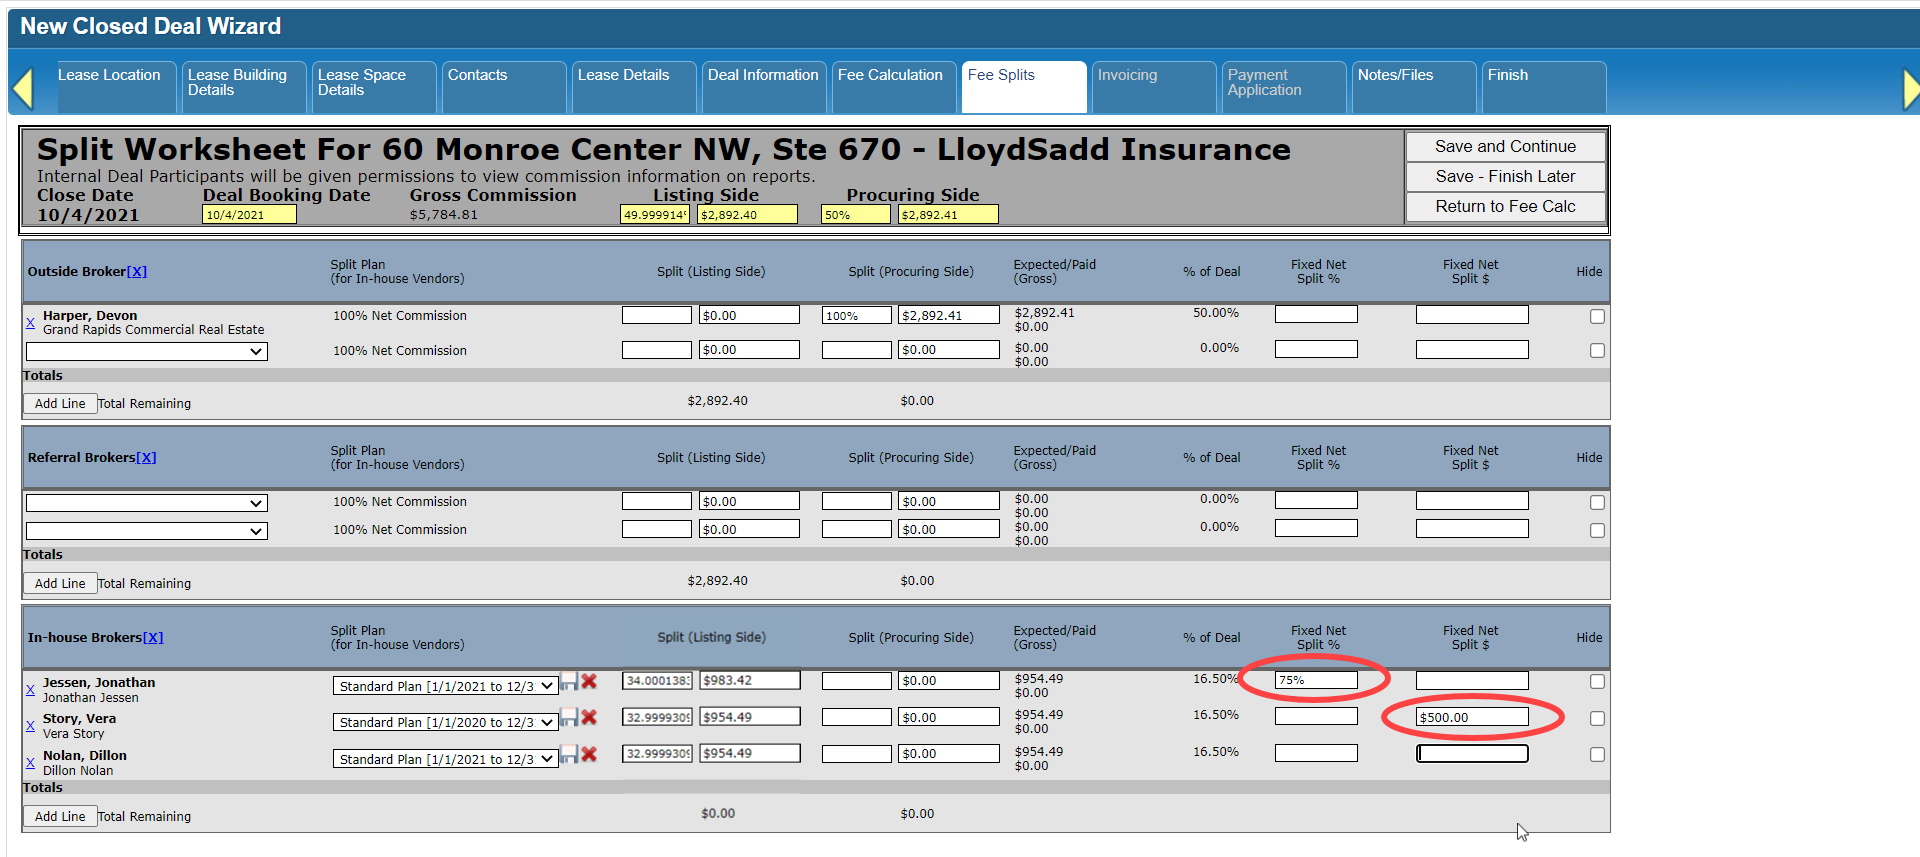
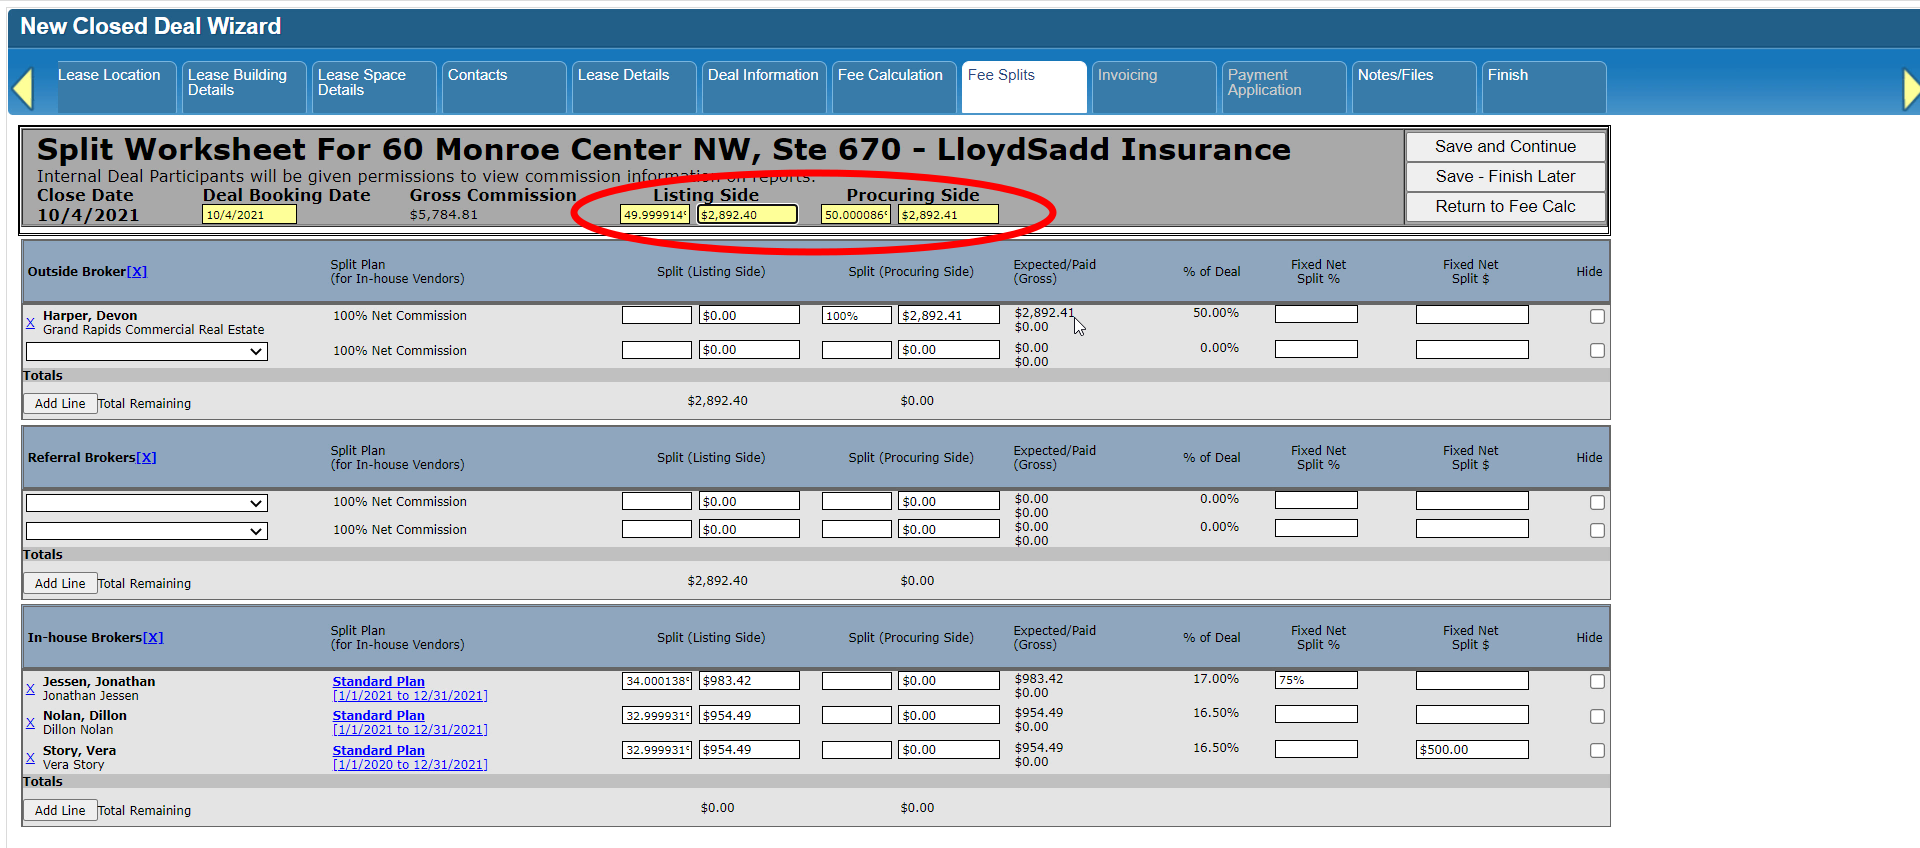
The Fixed Net Split fields allow you to override the calculation of the Net Split amount that the system normally performs once you submit a payment.
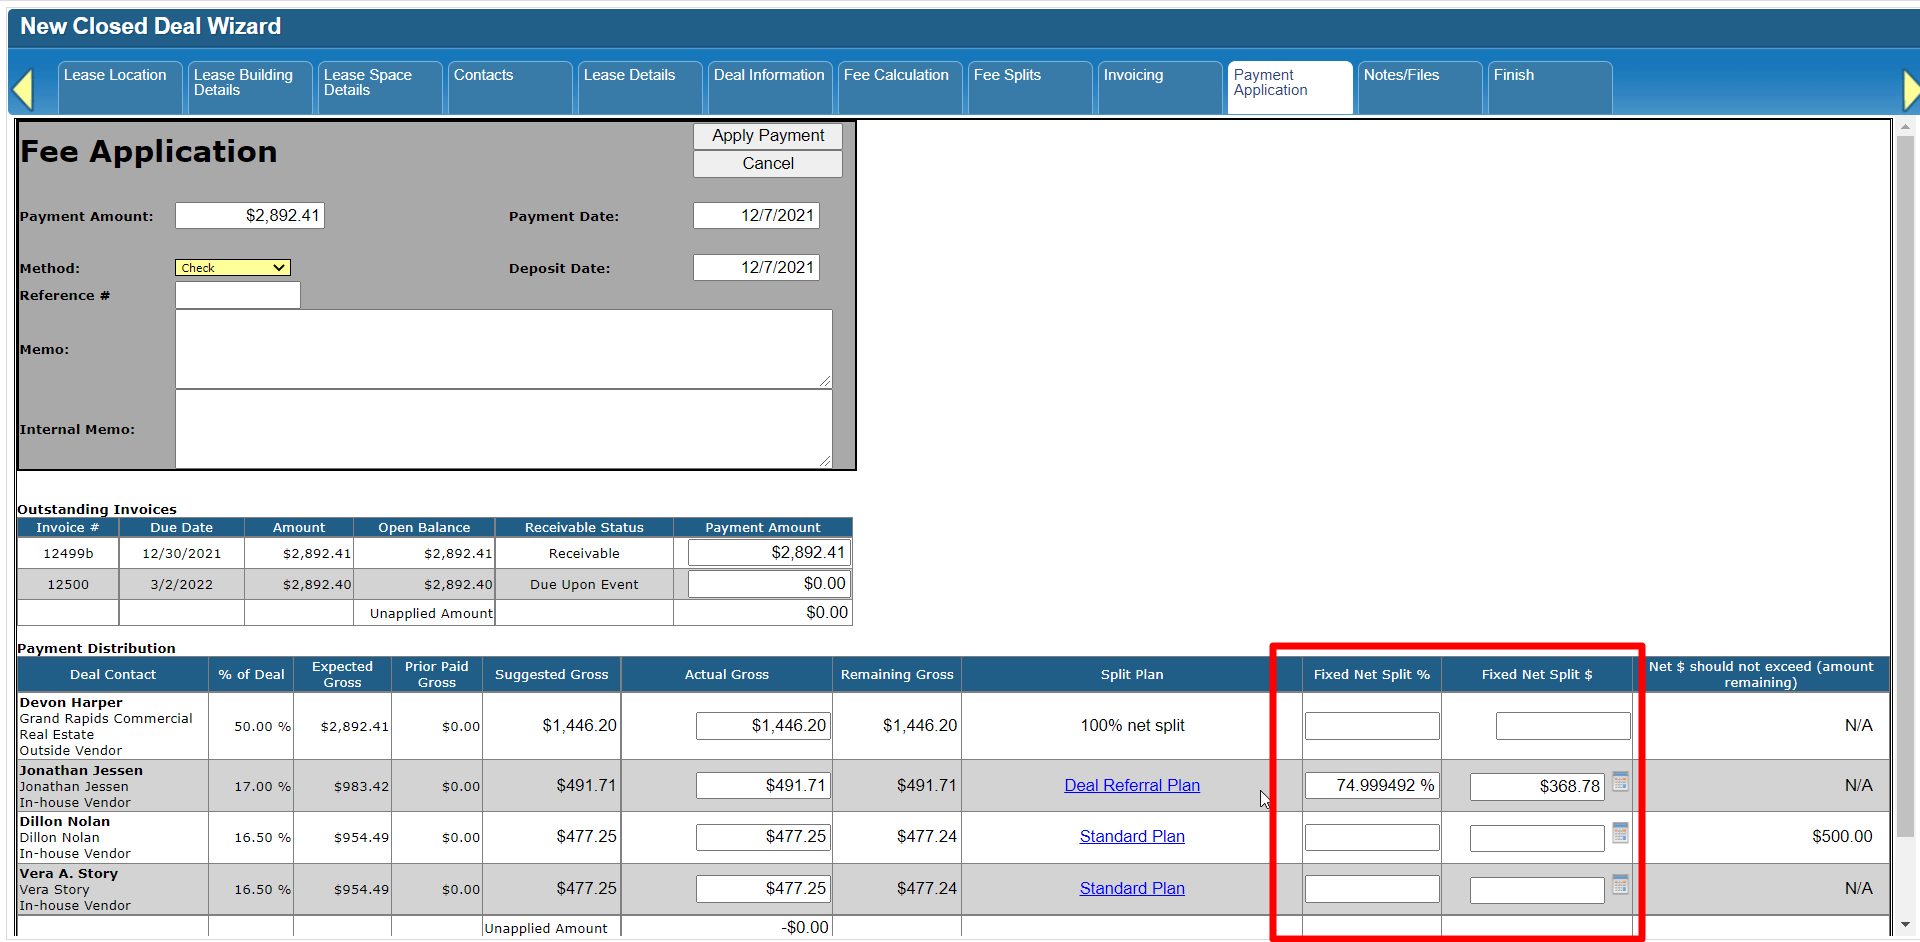
If you had populated the Fixed Net Split % field on the Fee Splits form for a vendor, it will already be filled in on the Payment Application form.
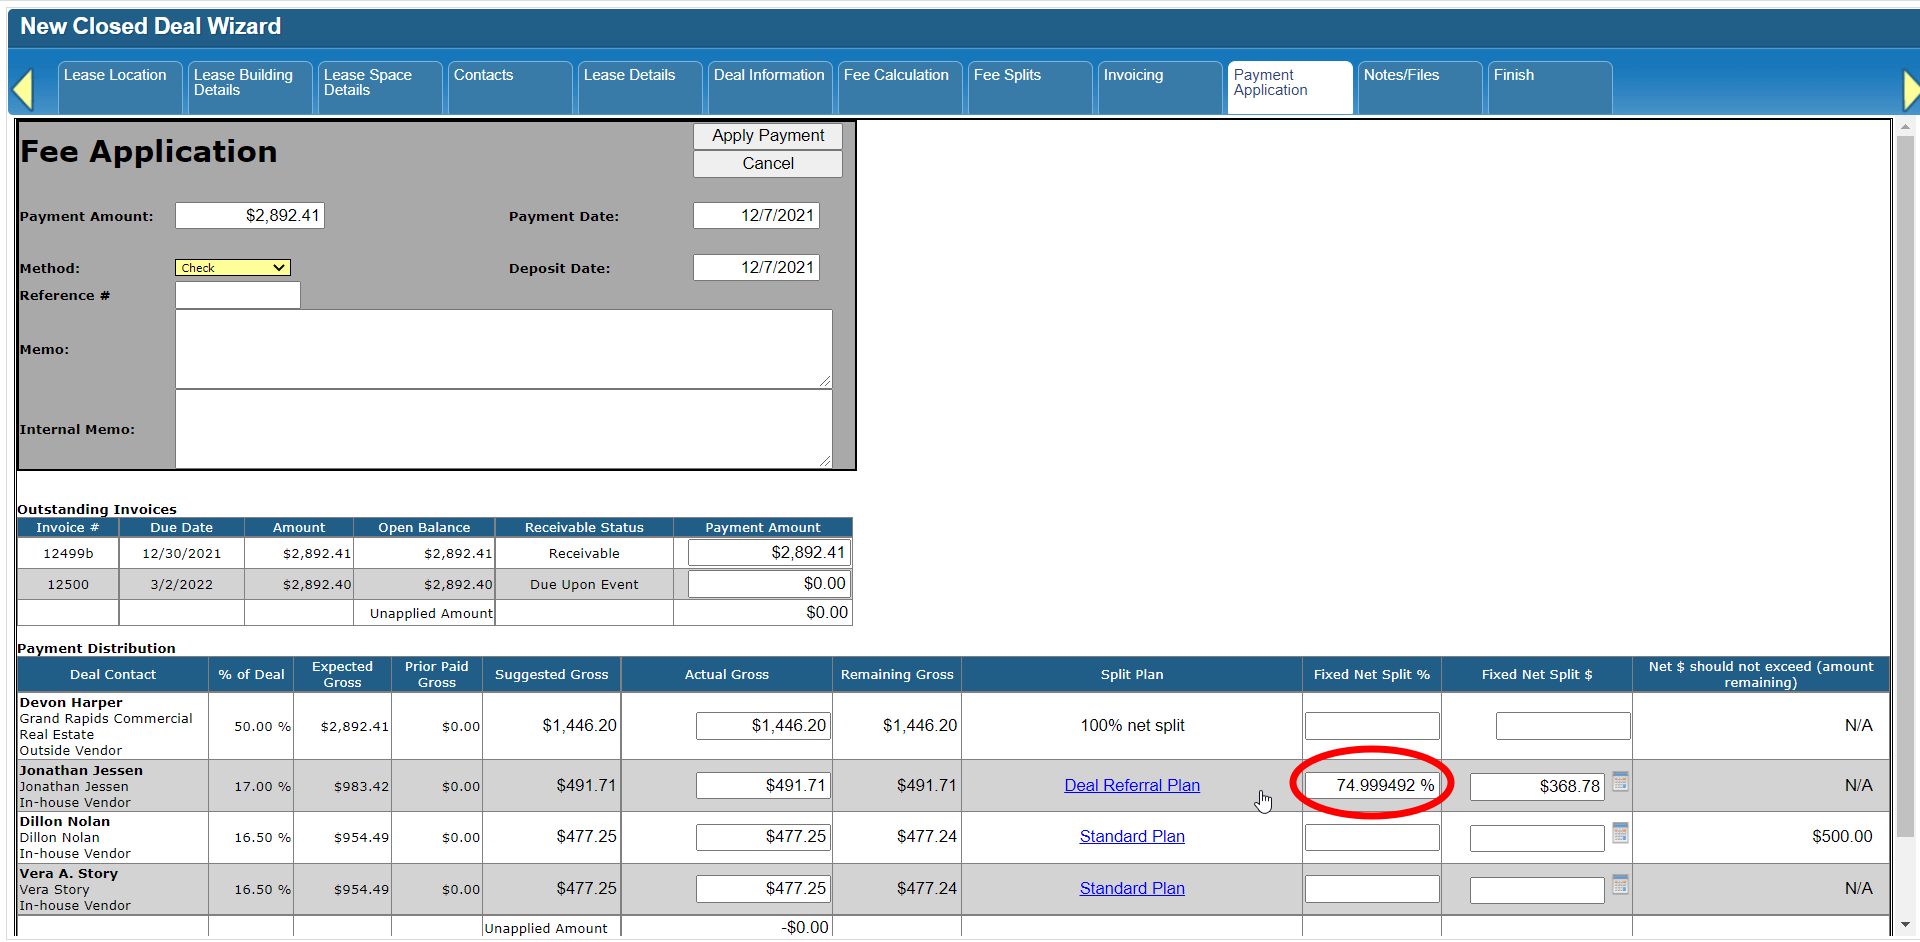
However, this form does not pre-populate the Fixed Net Split $ amount. If the Fixed Net Split $ field was populated for a vendor on the Fee Splits form, you’ll see how much of that amount is remaining to be paid, and you can decide how much of it to apply with this payment.
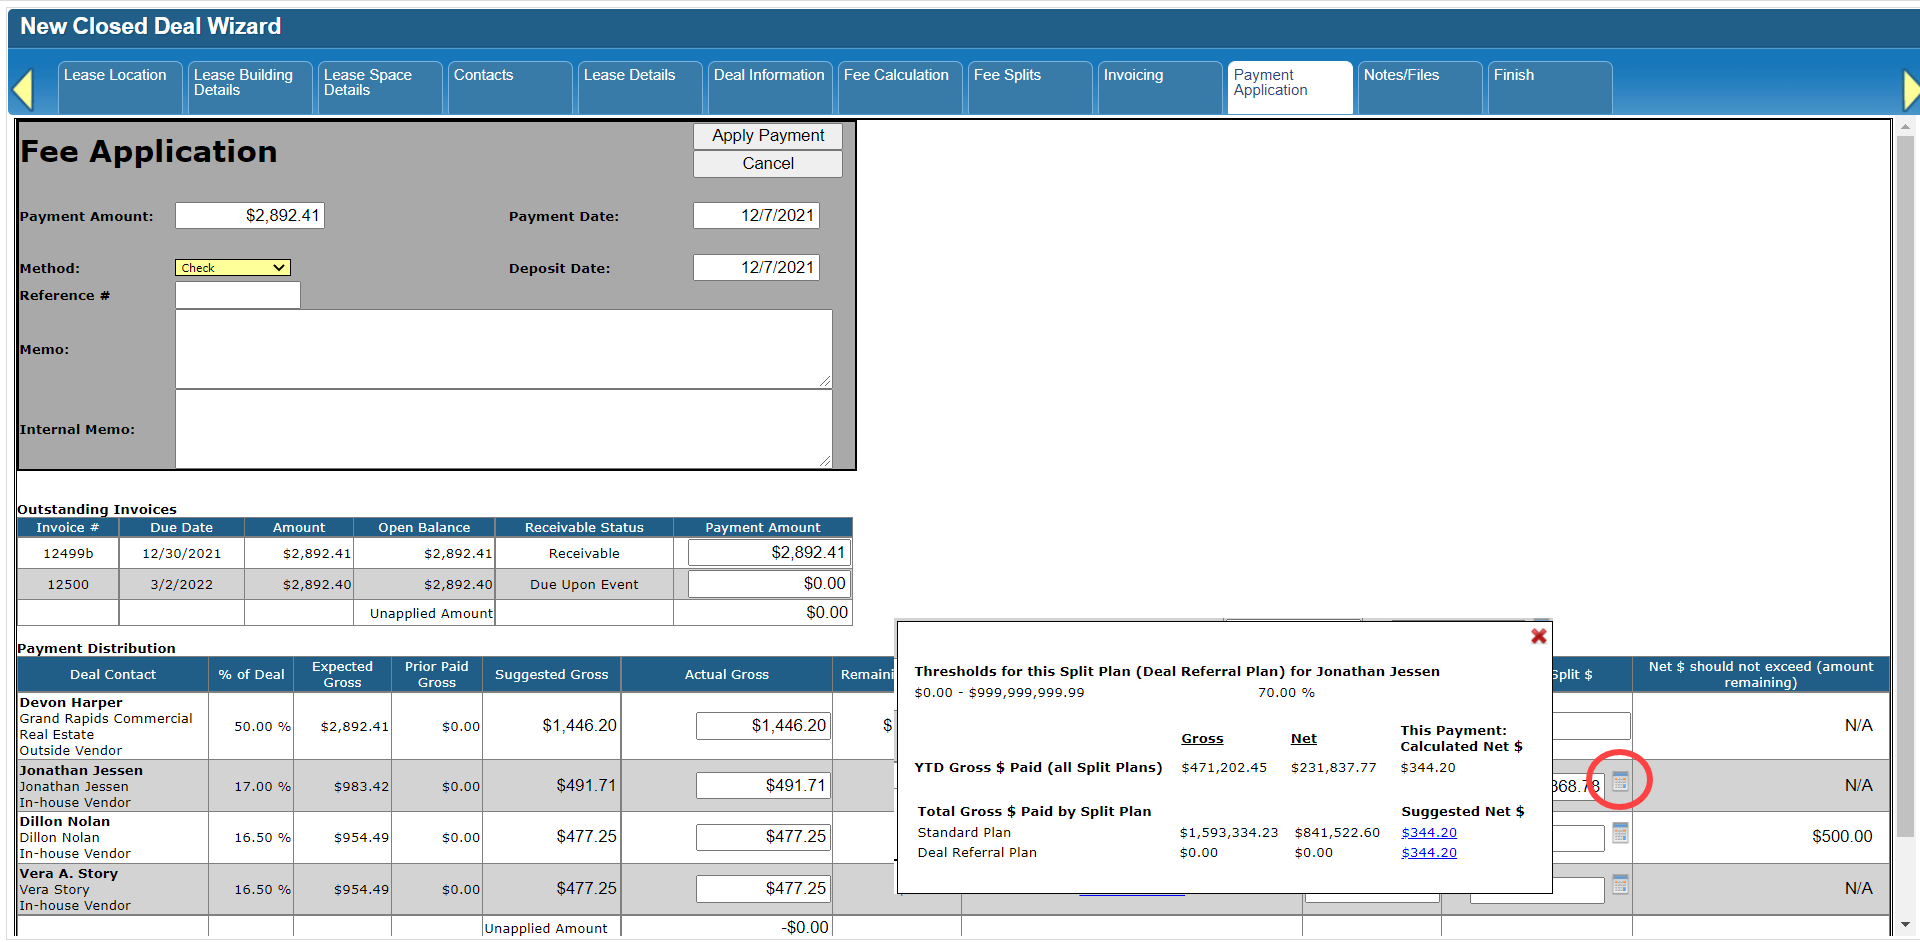
Click on the calculator icon if you want to see the details for a vendor’s Split Plan (or plans) and the Net Split amount the system will calculate if there aren’t any Fixed Net Splits for this payment and vendor.
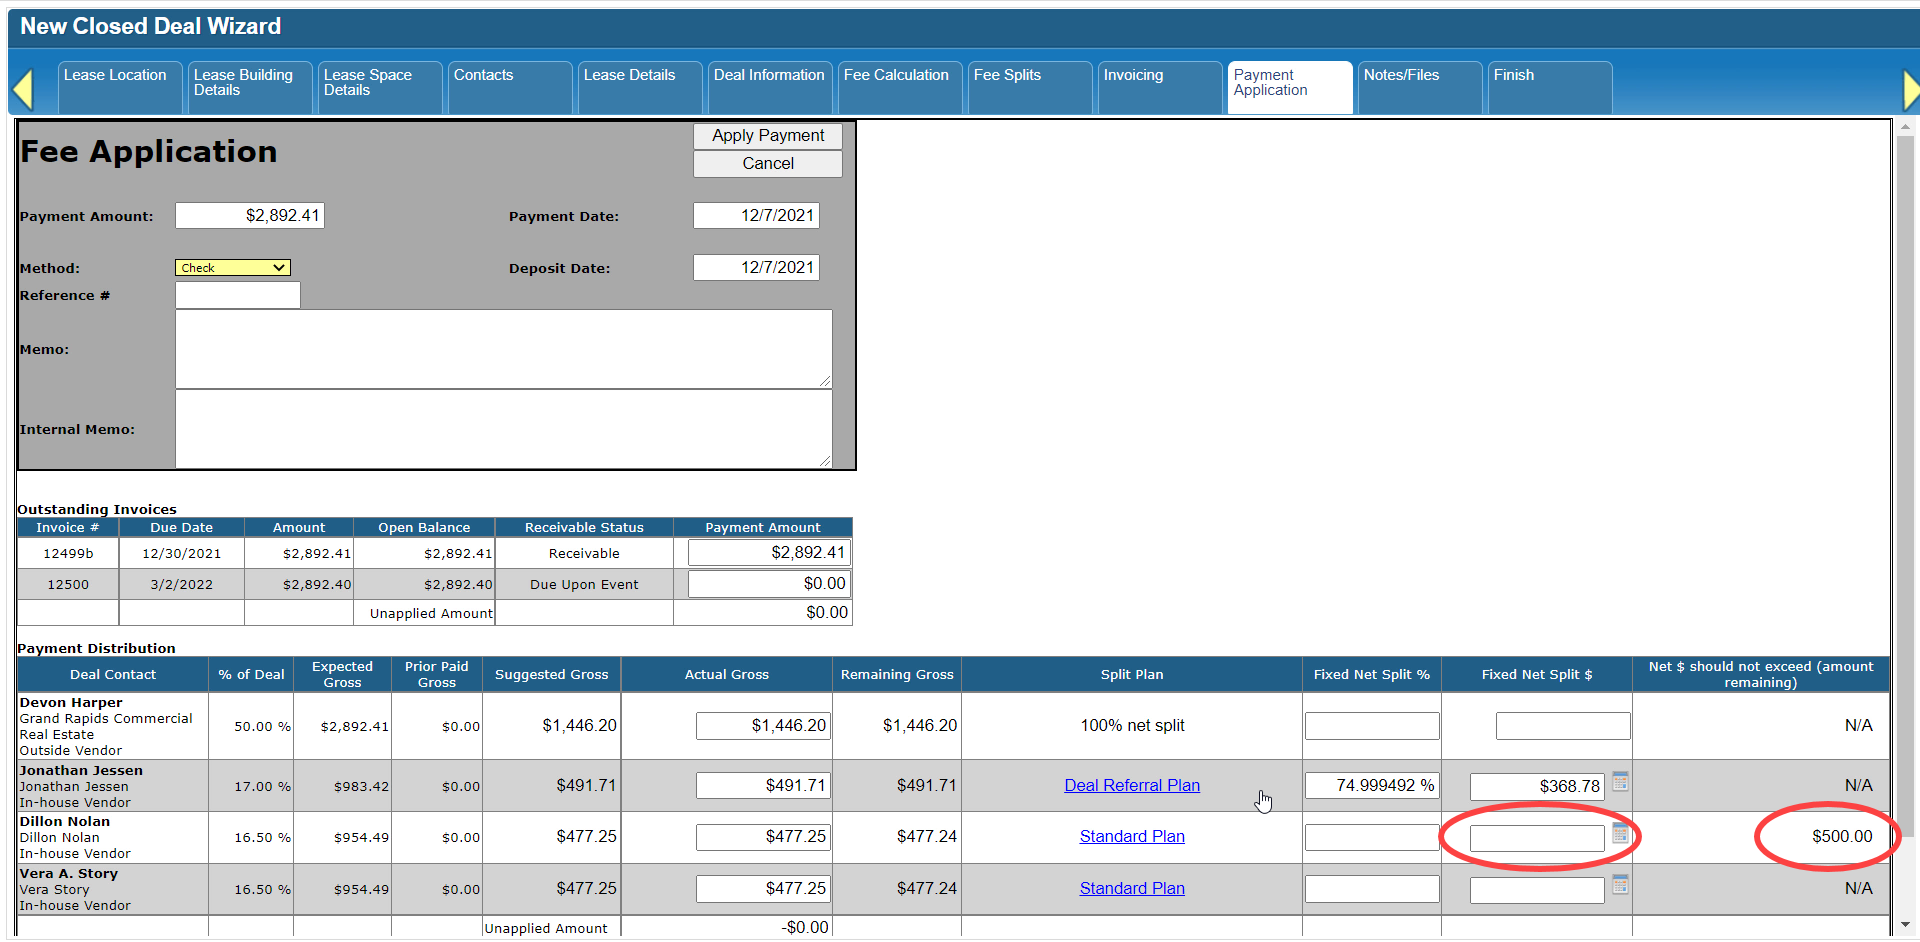
We will cover Net Deductions in a separate tutorial on setting up and applying Net Adjustments.

Once you have finished entering and confirming the details for this Payment, click on the Apply Payment button at the top.
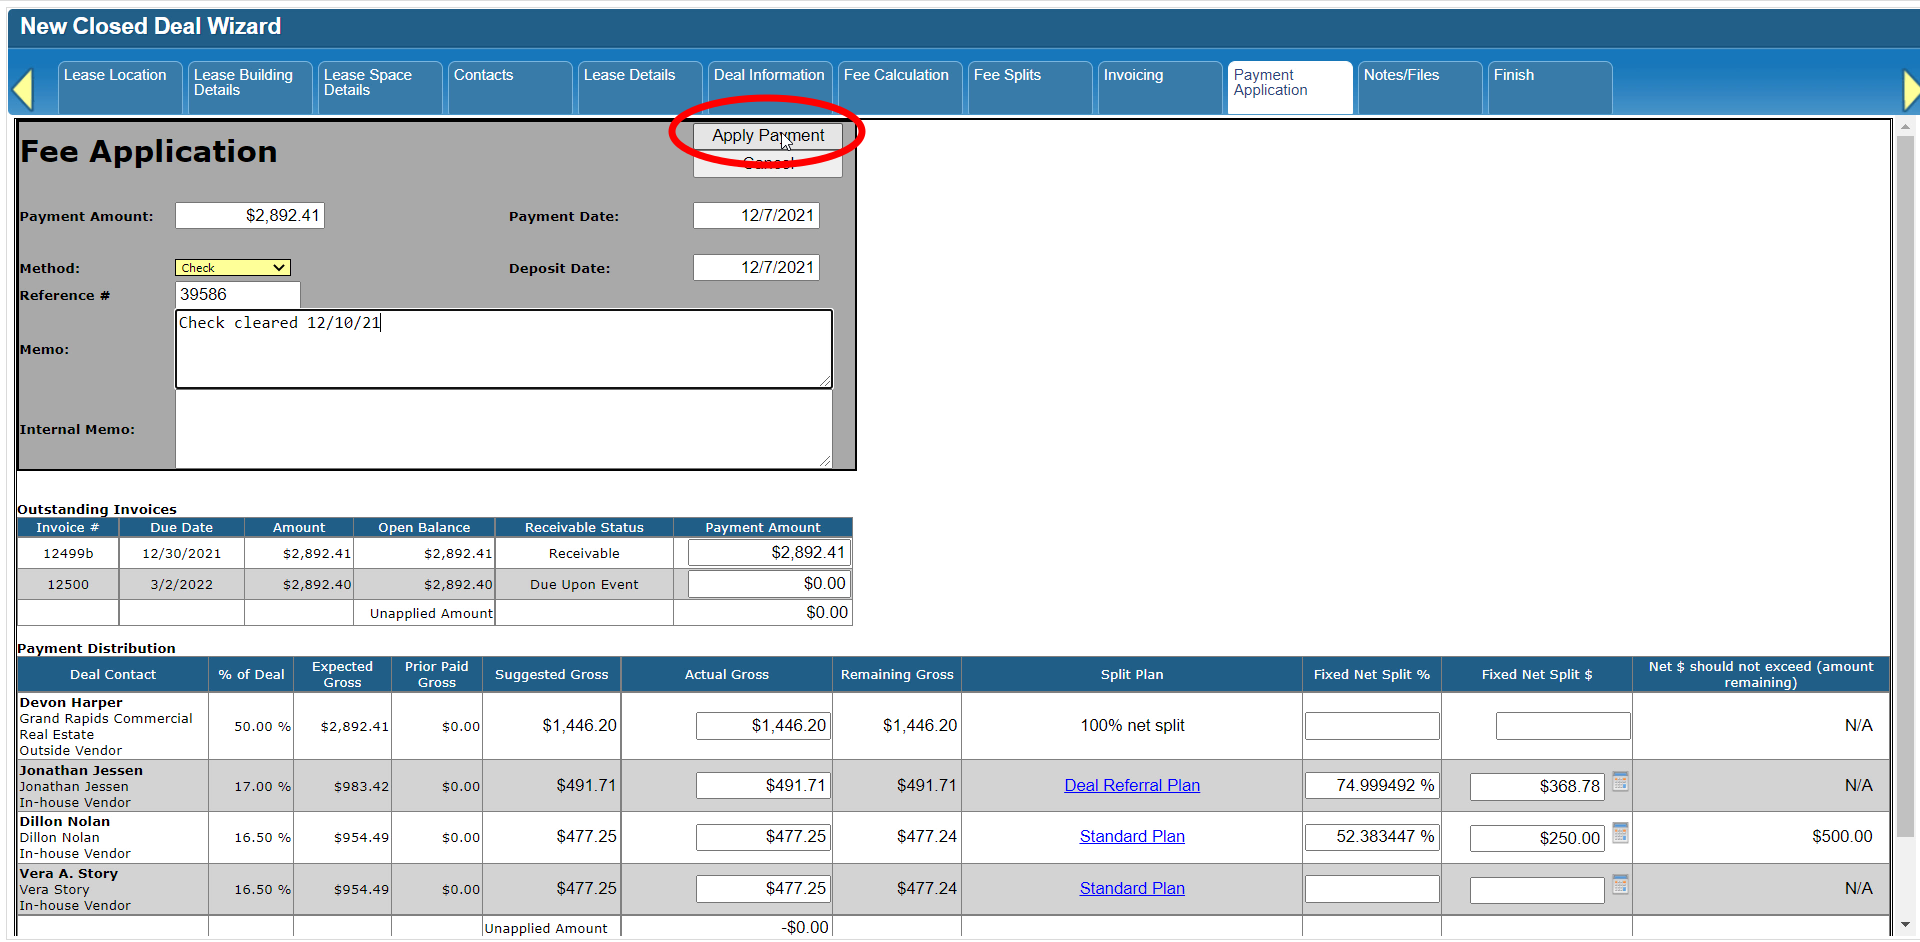
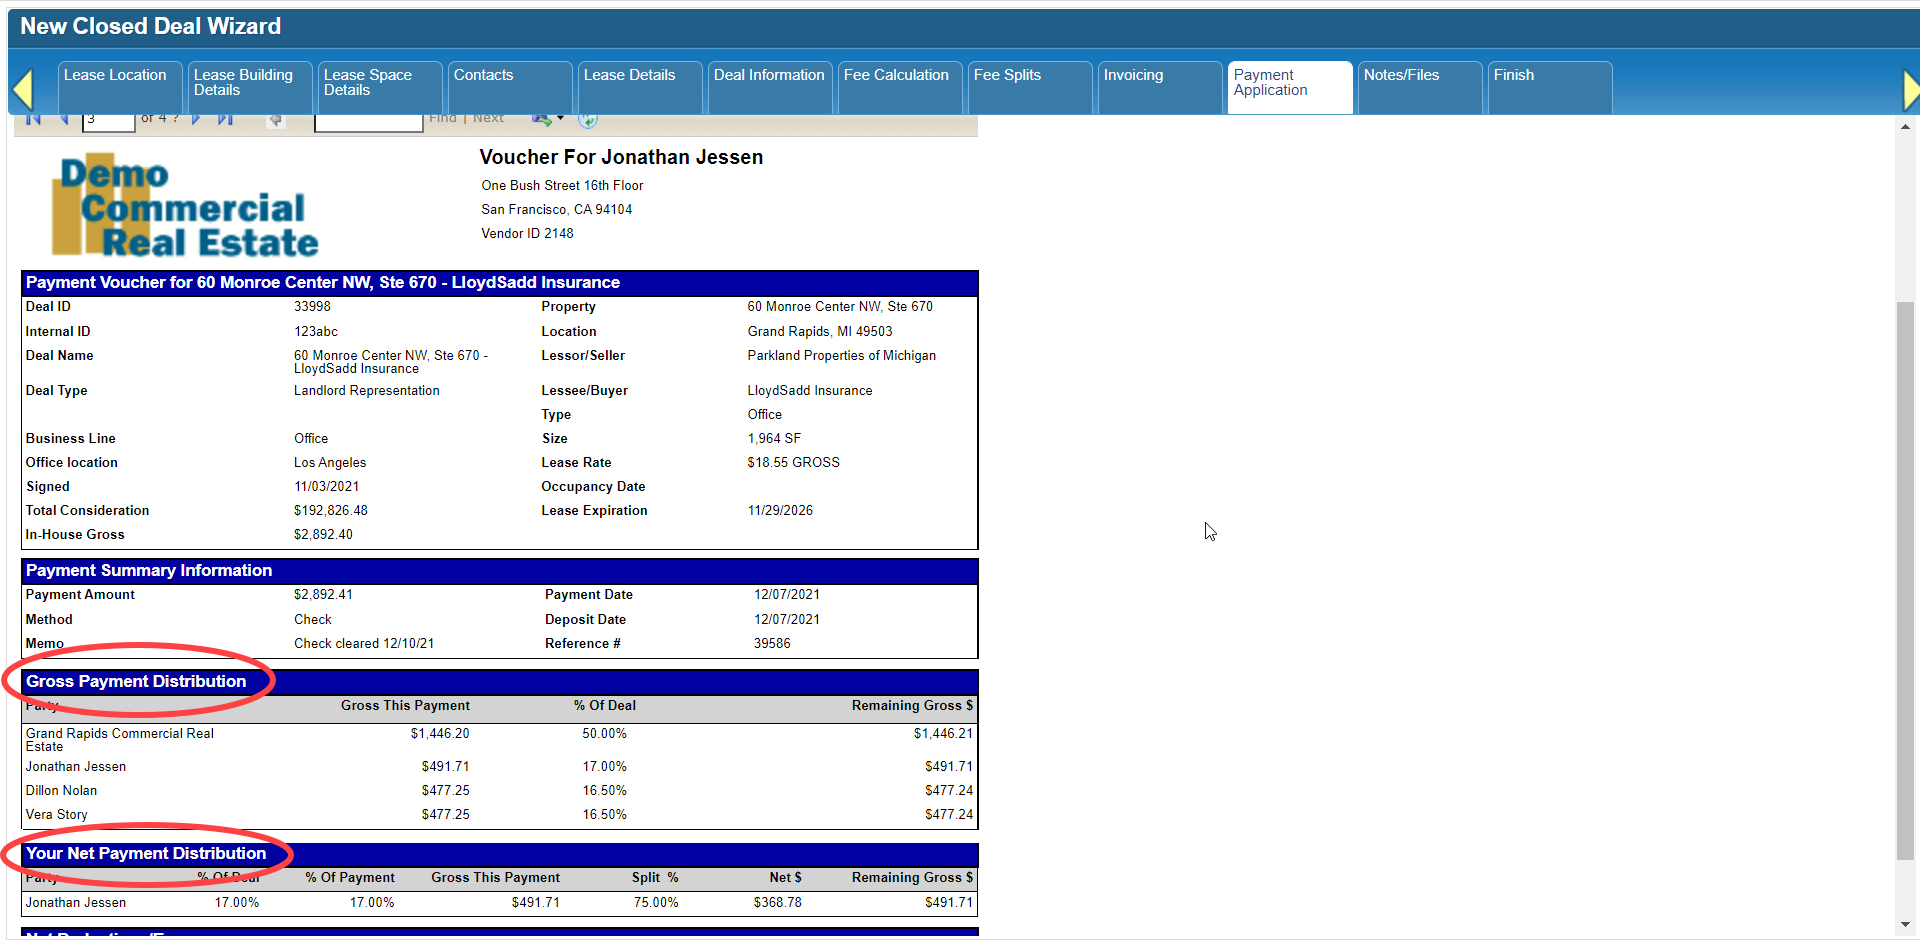
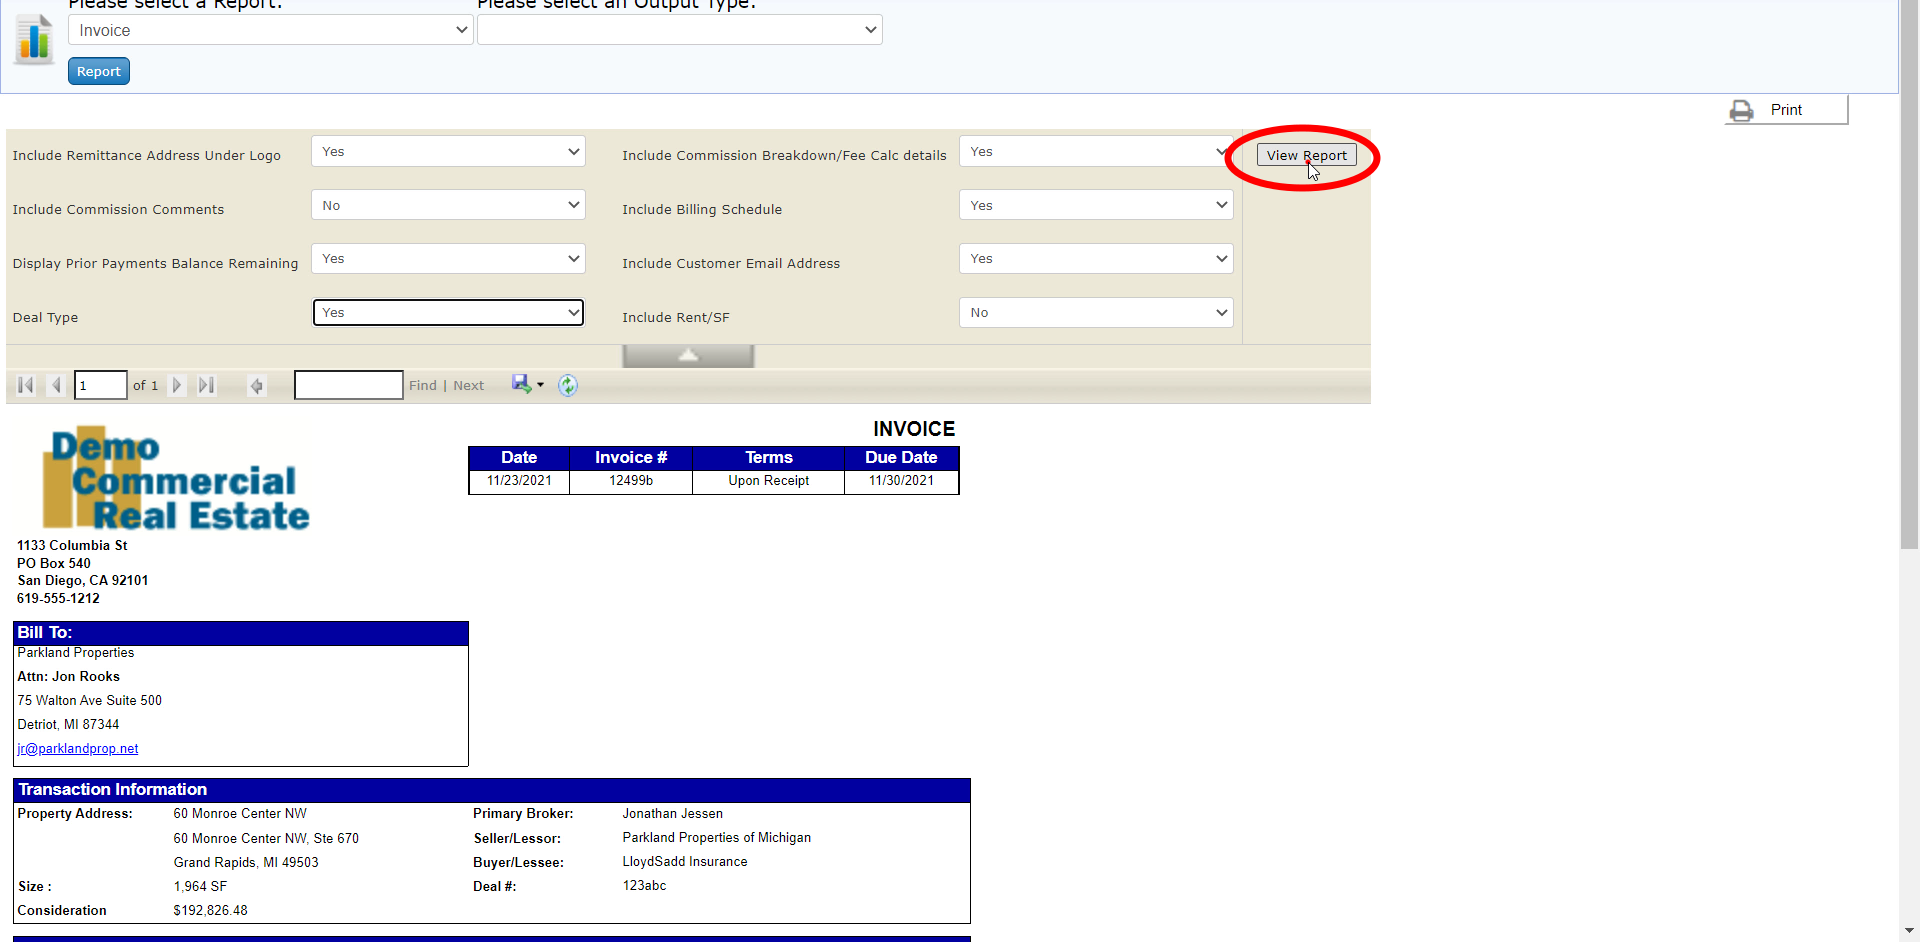
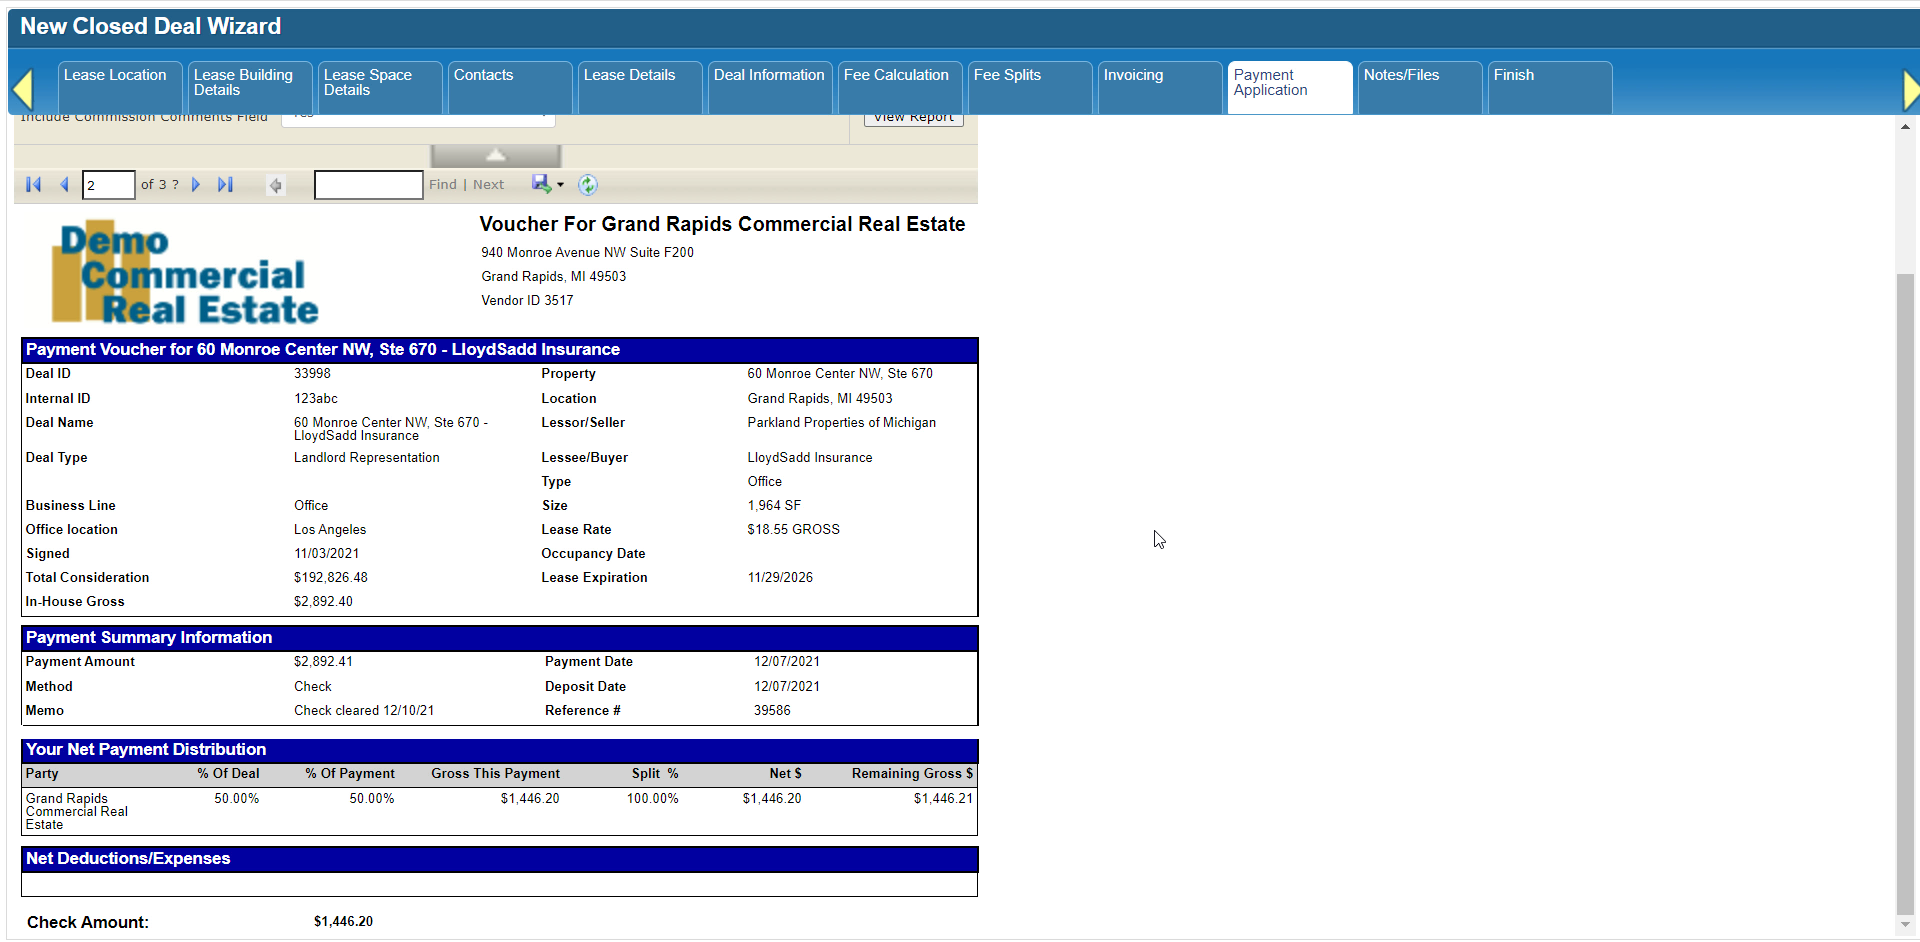
The system will perform any necessary calculations, distribute and store the gross and net split amounts among the recipients, and bring up a Fee Application report.
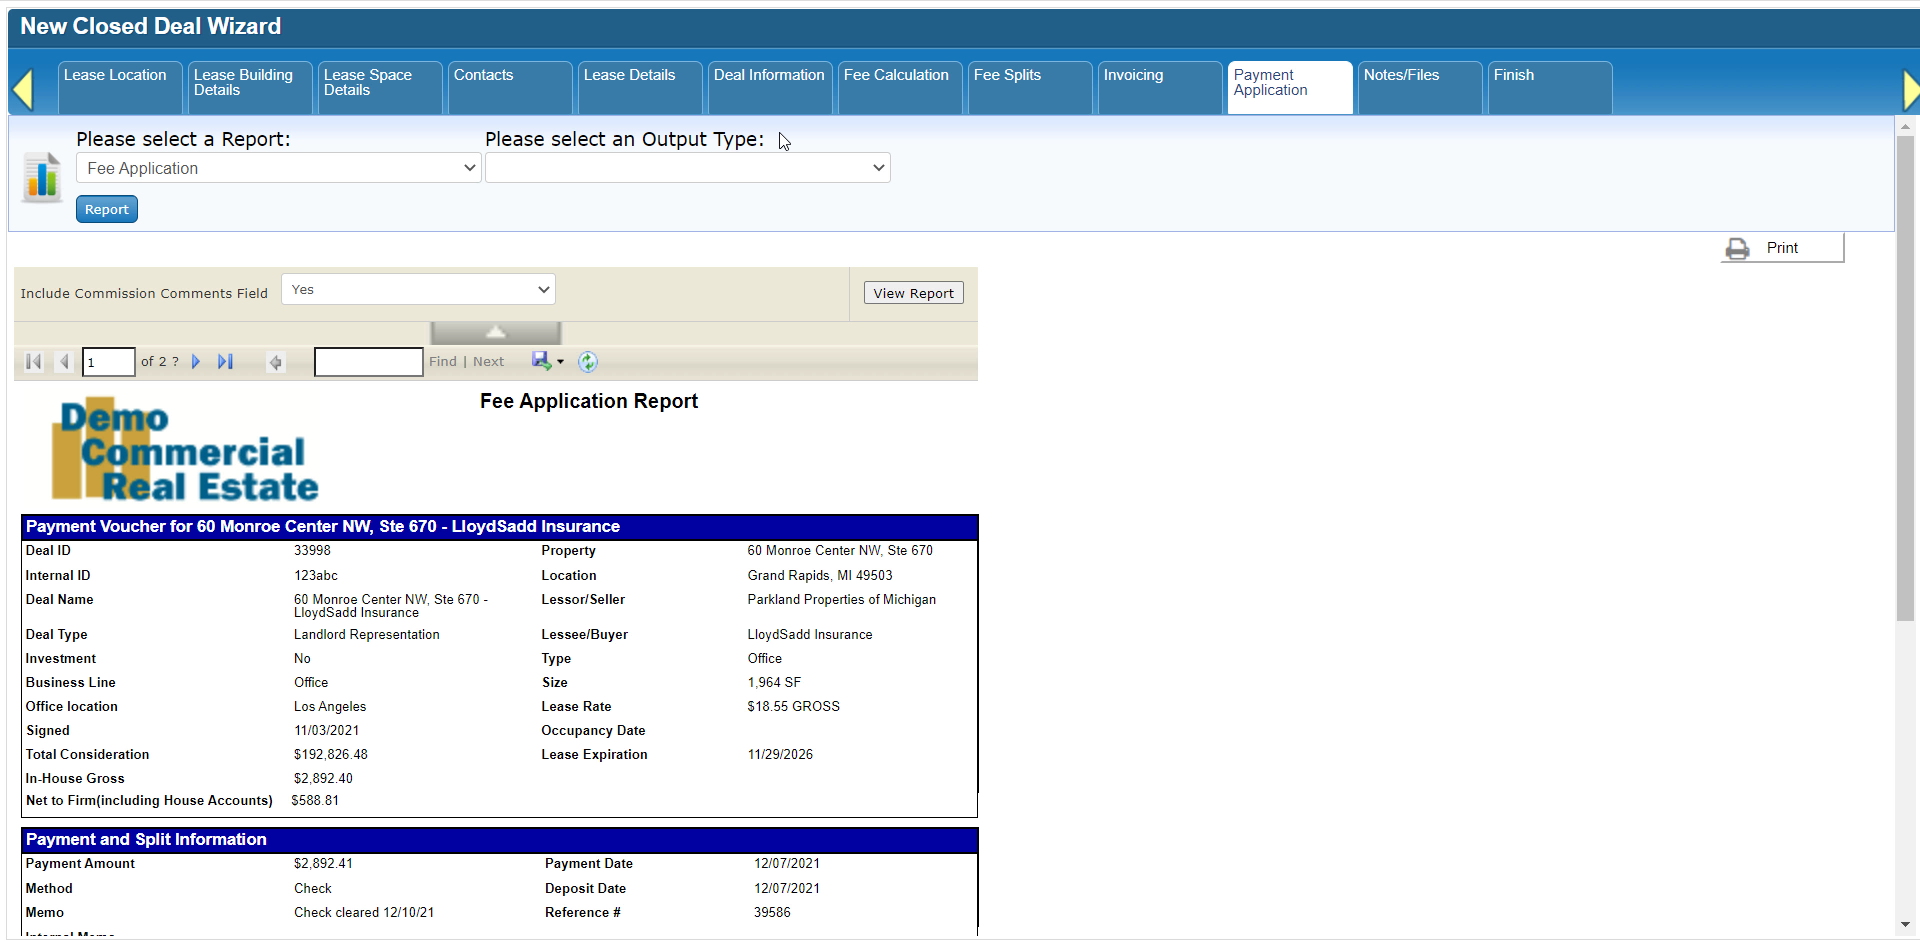
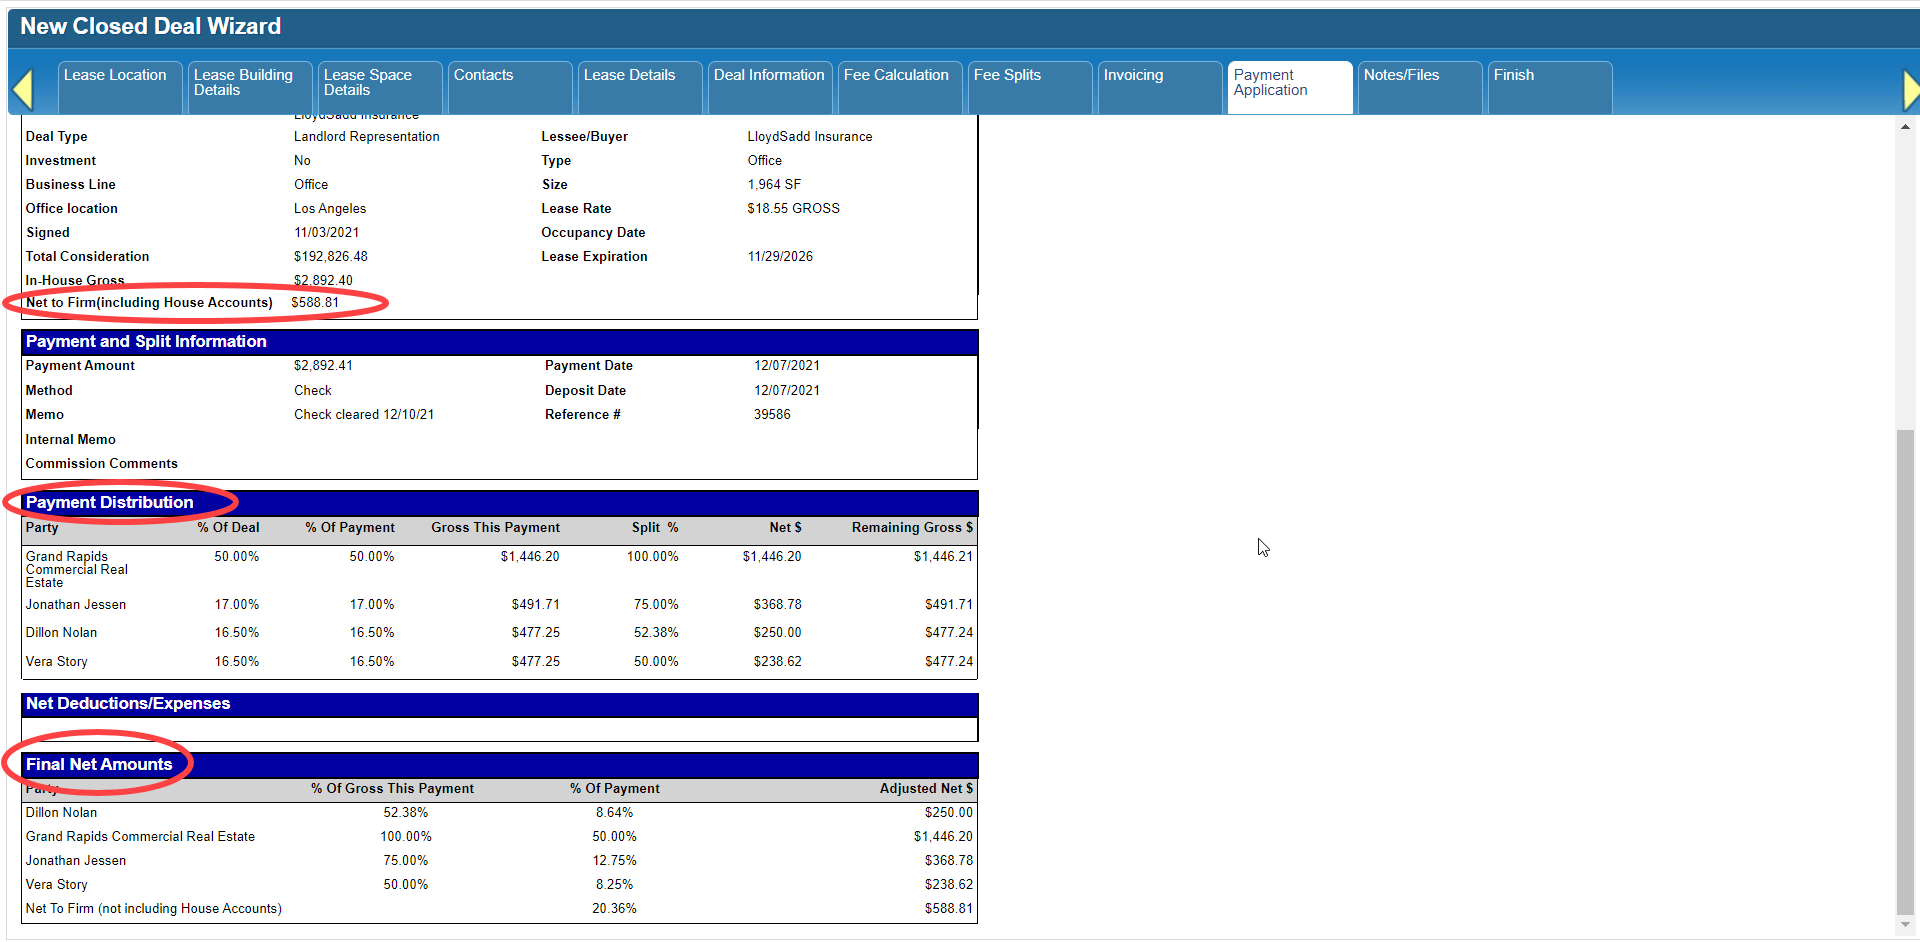
The first page of the Fee Application report includes all of the details for this payment, including gross and net amounts for each recipient as well as the Net To Firm amount. This page is for accounting and/or admin staff.
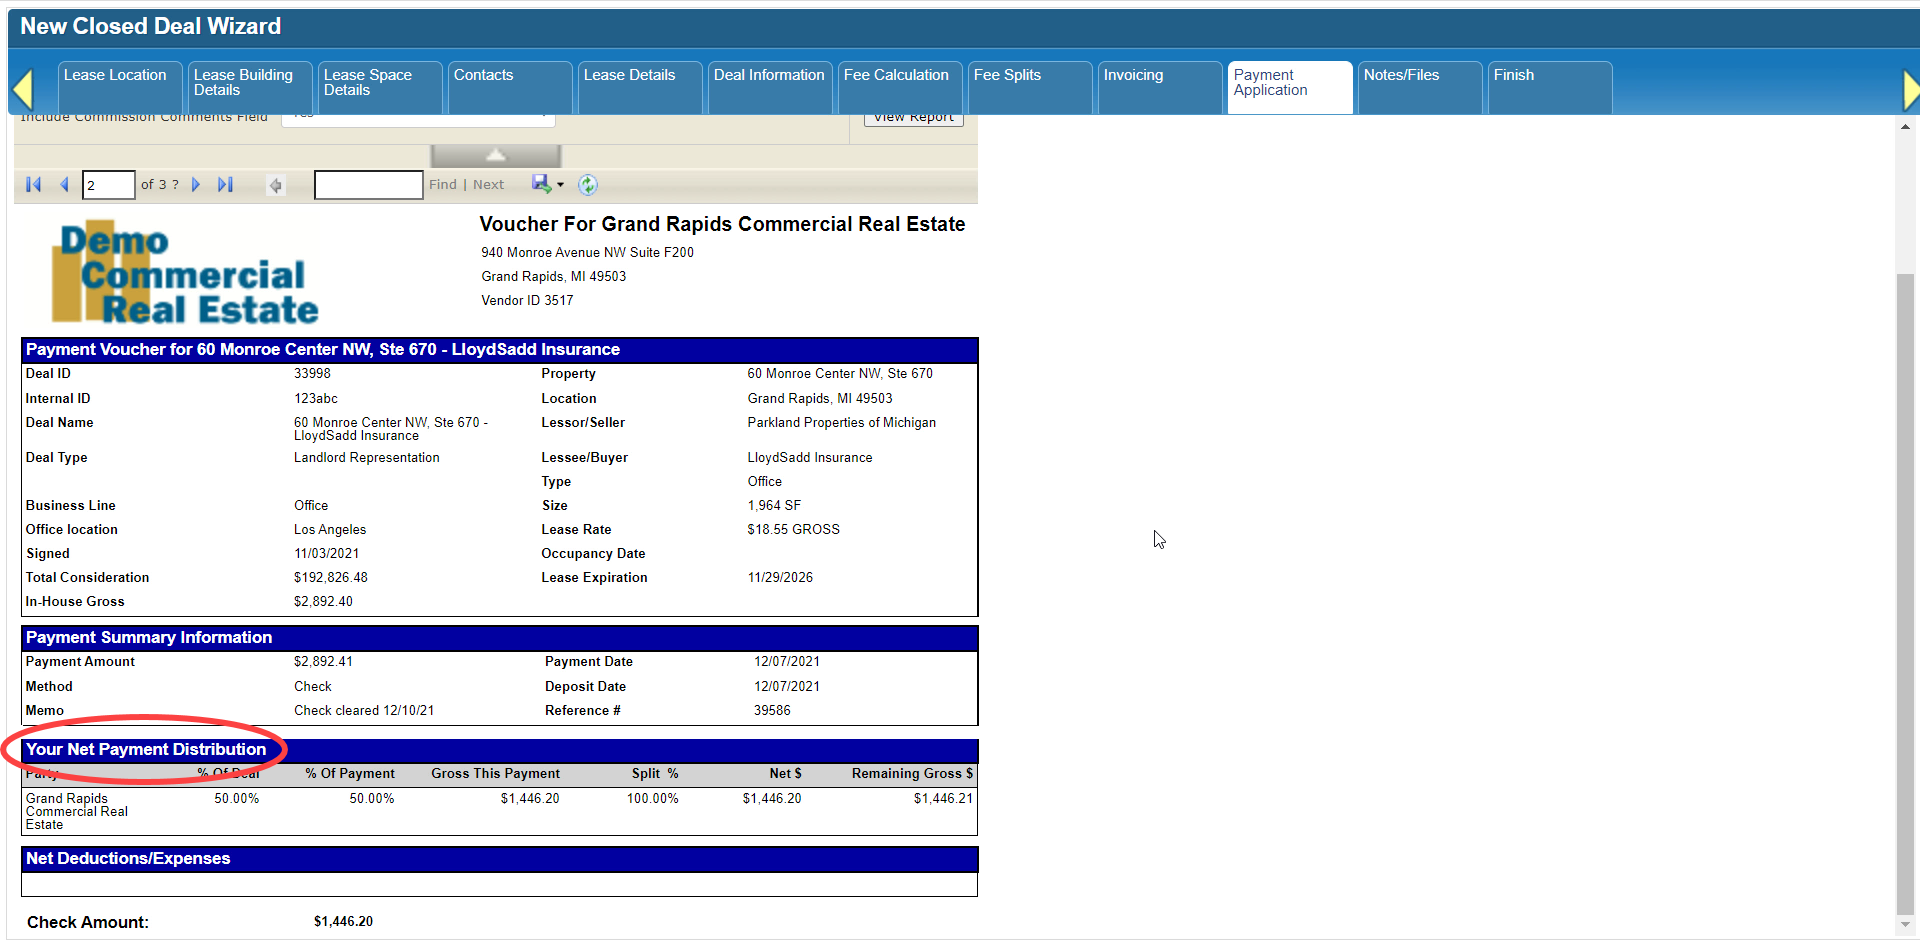
The following pages are designed to be sent to each recipient, with the full details for their own gross and net, but without any sensitive information they aren’t entitled to.
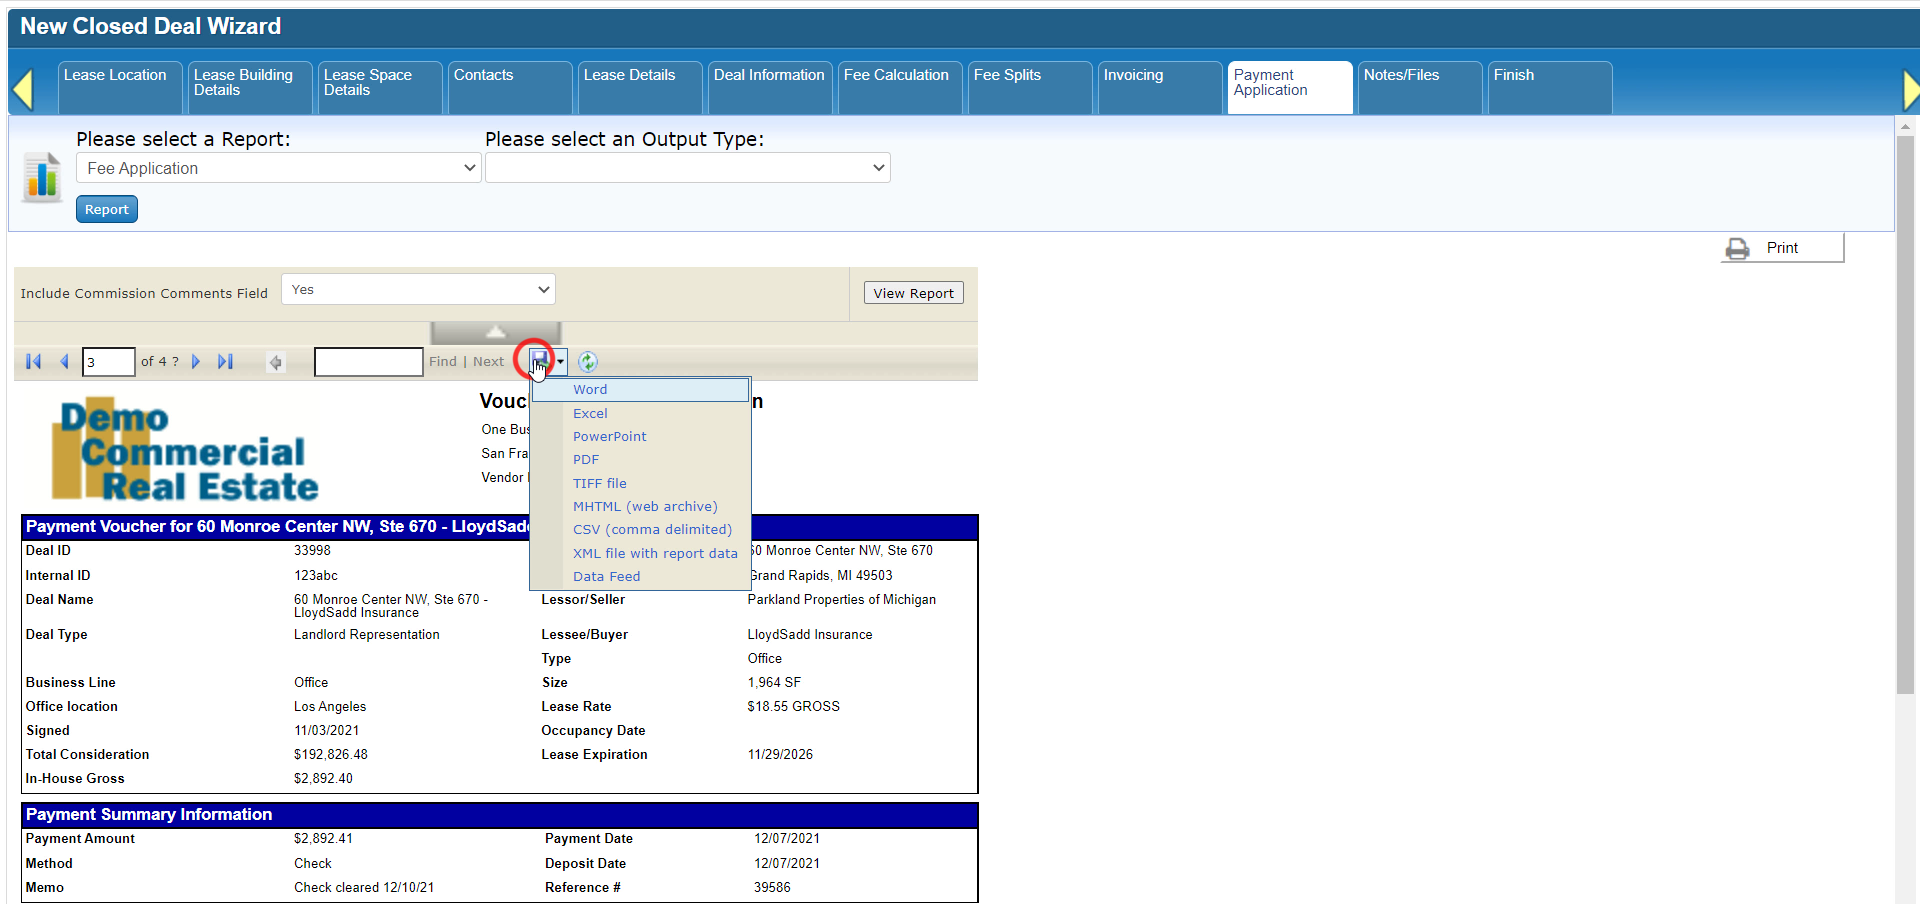
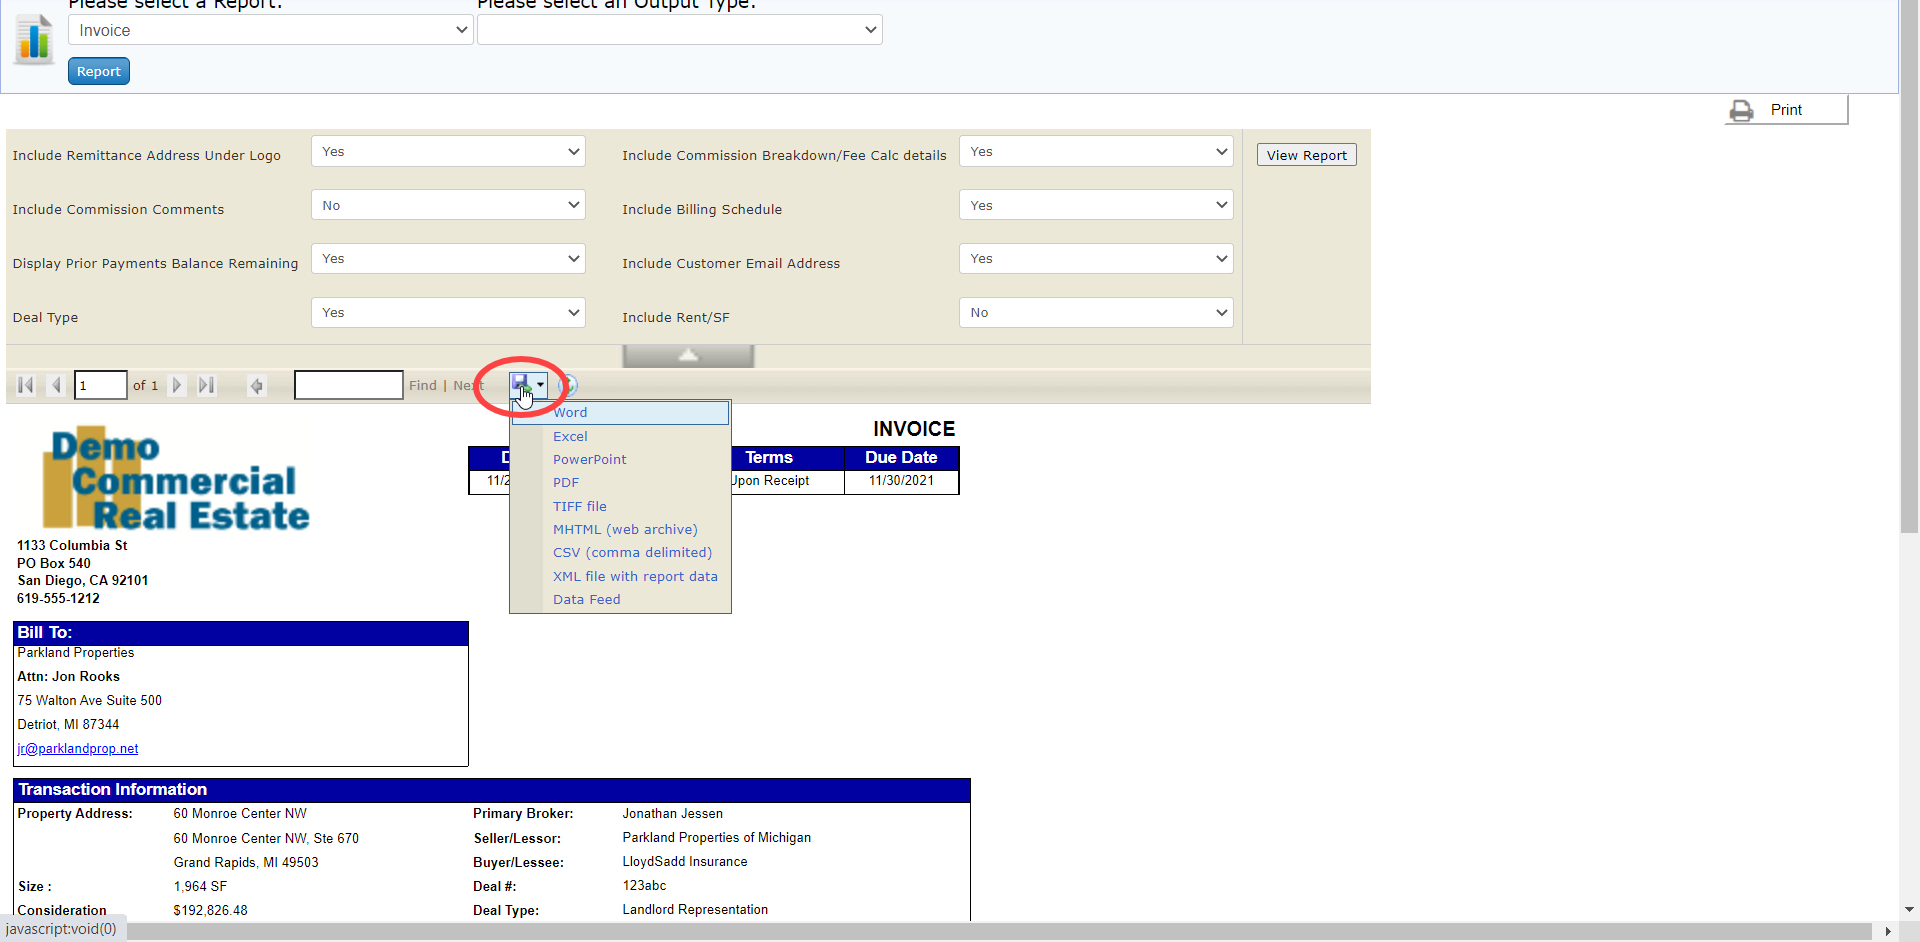
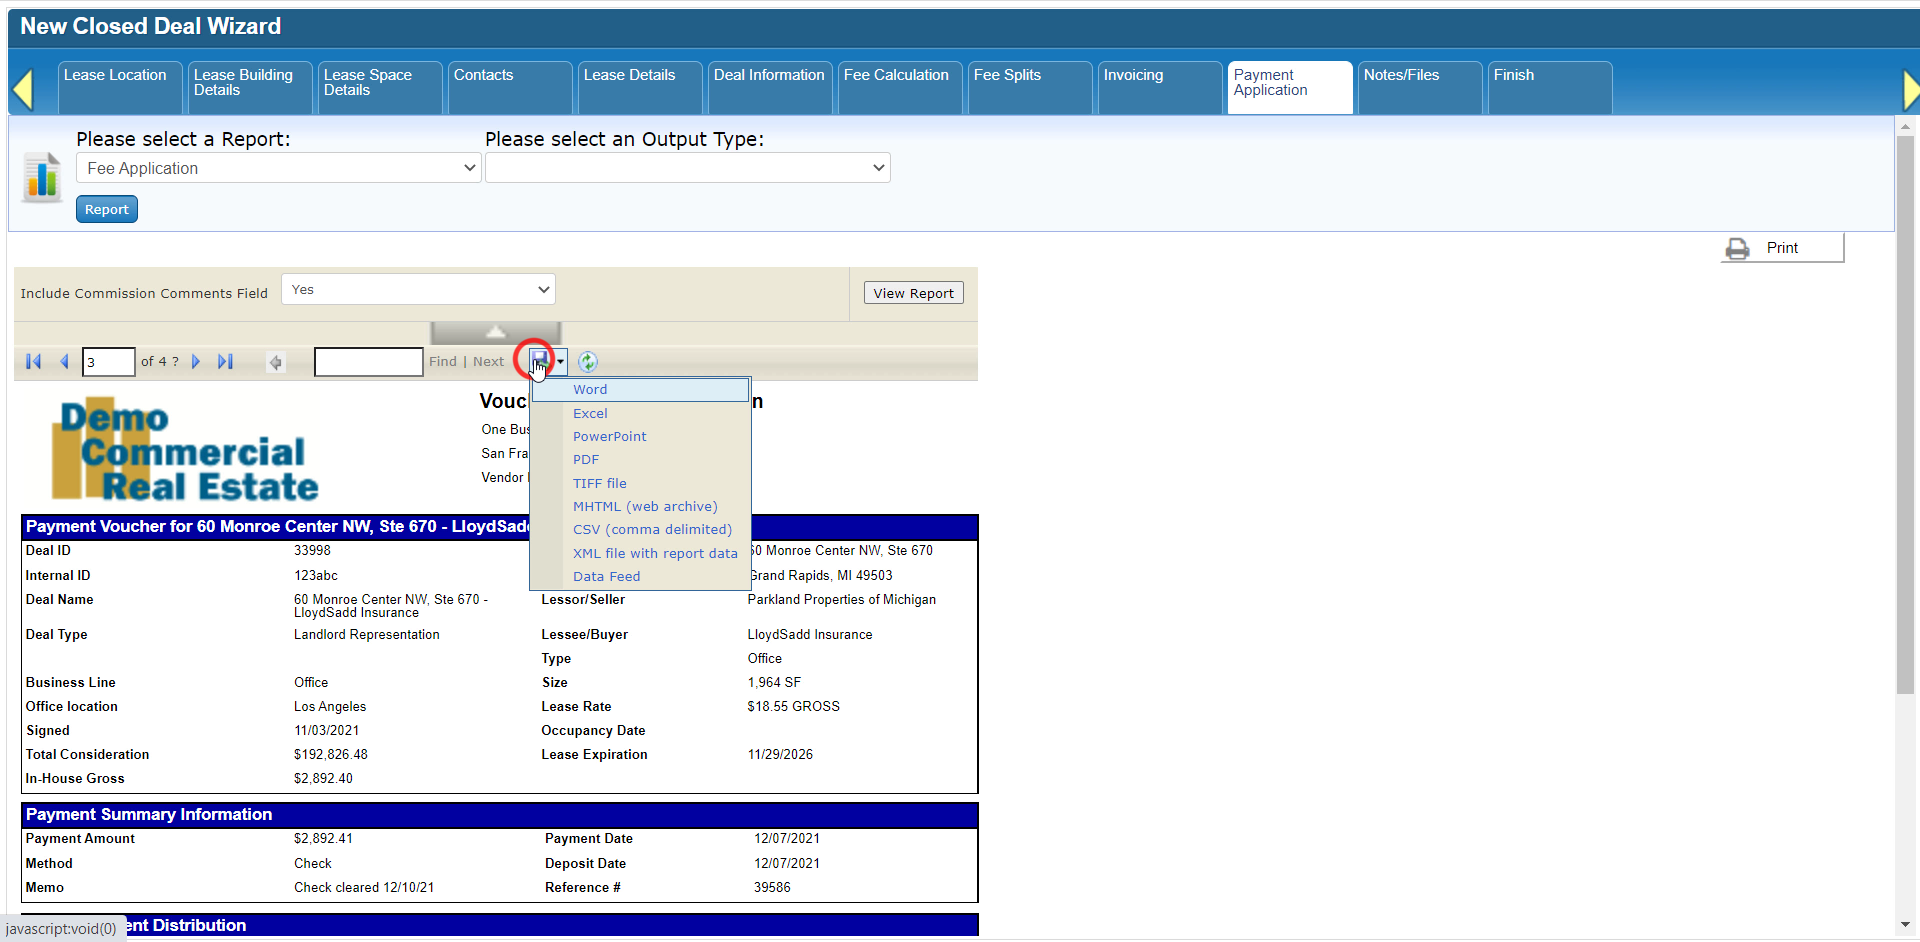
You can download this report in different formats and print or email it from there.
Click here to go to the next tutorial.
Related articles
- How to create a new Closed Deal: Part 2 - New Closed Deal Modal
- How to create a new Closed Deal: Part 3 - Workflow Navigation
- How to create a new Closed Deal: Part 4 - Property
- How to create a new Closed Deal: Part 5 - Space
- How to create a new Closed Deal: Part 6 - Contacts
- How to create a new Closed Deal: Part 7 - Lease Details
- How to create a new Closed Deal: Part 8 - Deal Information
- How to create a new Closed Deal: Part 9 - Fee Calculation
- How to create a new Closed Deal: Part 10 - Fee Splits
- How to create a new Closed Deal: Part 11 - Invoicing
- How to create a new Closed Deal: Part 12 - Payments
- How to create a new Closed Deal: Part 13 - Notes/Files
- How to create a new Closed Deal: Part 14 - Link Project
- How to create a new Closed Deal: Part 15 - Deal Share
- How to create a new Closed Deal: Part 16 - Billing Schedule
- How to create a new Closed Deal: Part 17 - Net Adjustments
- How to create a new Closed Deal: Part 18 - Annuity Schedule
- How to create a new Closed Deal: Part 19 - Sale Details
- How to create a new Closed Deal: Part 20 - Other Starting Points
© 2023 CoStar Group
Attachments:
 CBA - Entering a Closed Deal - 11 Invoicing (Time 0_05_17;29).png (image/png)
 CBA - Entering a Closed Deal - 11 Invoicing (Time 0_05_05;29).png (image/png)
 CBA - Entering a Closed Deal - 11 Invoicing (Time 0_04_58;18).png (image/png)
 CBA - Entering a Closed Deal - 11 Invoicing (Time 0_04_49;26).png (image/png)
 CBA - Entering a Closed Deal - 11 Invoicing (Time 0_04_34;19).png (image/png)
 CBA - Entering a Closed Deal - 11 Invoicing (Time 0_04_27;27).png (image/png)
 CBA - Entering a Closed Deal - 11 Invoicing (Time 0_04_16;19).png (image/png)
 CBA - Entering a Closed Deal - 11 Invoicing (Time 0_04_05;12).png (image/png)
 CBA - Entering a Closed Deal - 11 Invoicing (Time 0_03_57;27).png (image/png)
 CBA - Entering a Closed Deal - 11 Invoicing (Time 0_03_44;12).png (image/png)
 CBA - Entering a Closed Deal - 11 Invoicing (Time 0_03_41;15).png (image/png)
 CBA - Entering a Closed Deal - 11 Invoicing (Time 0_03_38;08).png (image/png)
 CBA - Entering a Closed Deal - 11 Invoicing (Time 0_03_30;19).png (image/png)
 CBA - Entering a Closed Deal - 11 Invoicing (Time 0_03_27;19).png (image/png)
 CBA - Entering a Closed Deal - 11 Invoicing (Time 0_03_07;01).png (image/png)
 CBA - Entering a Closed Deal - 11 Invoicing (Time 0_02_51;27)b.png (image/png)
 CBA - Entering a Closed Deal - 11 Invoicing (Time 0_02_51;27).png (image/png)
 CBA - Entering a Closed Deal - 11 Invoicing (Time 0_02_41;23).png (image/png)
 CBA - Entering a Closed Deal - 11 Invoicing (Time 0_02_28;27).png (image/png)
 CBA - Entering a Closed Deal - 11 Invoicing (Time 0_02_24;27).png (image/png)
 CBA - Entering a Closed Deal - 11 Invoicing (Time 0_02_17;23).png (image/png)
 CBA - Entering a Closed Deal - 11 Invoicing (Time 0_02_05;23).png (image/png)
 CBA - Entering a Closed Deal - 11 Invoicing (Time 0_01_57;12).png (image/png)
 CBA - Entering a Closed Deal - 11 Invoicing (Time 0_01_47;01).png (image/png)
 CBA - Entering a Closed Deal - 11 Invoicing (Time 0_01_38;20).png (image/png)
 CBA - Entering a Closed Deal - 11 Invoicing (Time 0_01_32;13).png (image/png)
 CBA - Entering a Closed Deal - 11 Invoicing (Time 0_01_17;06).png (image/png)
 CBA - Entering a Closed Deal - 11 Invoicing (Time 0_01_14;14).png (image/png)
 CBA - Entering a Closed Deal - 11 Invoicing (Time 0_01_06;10).png (image/png)
 CBA - Entering a Closed Deal - 11 Invoicing (Time 0_01_00;06).png (image/png)
 CBA - Entering a Closed Deal - 11 Invoicing (Time 0_00_53;21).png (image/png)
 CBA - Entering a Closed Deal - 11 Invoicing (Time 0_00_27;14).png (image/png)
 CBA - Entering a Closed Deal - 09 Fee Calculation (Time 0_03_40;27).png (image/png)
 CBA - Entering a Closed Deal - 09 Fee Calculation (Time 0_03_25;21).png (image/png)
 CBA - Entering a Closed Deal - 09 Fee Calculation (Time 0_03_19;09).png (image/png)
 CBA - Entering a Closed Deal - 09 Fee Calculation (Time 0_02_41;15).png (image/png)
 CBA - Entering a Closed Deal - 09 Fee Calculation (Time 0_02_26;19).png (image/png)
 CBA - Entering a Closed Deal - 09 Fee Calculation (Time 0_01_59;03).png (image/png)
 CBA - Entering a Closed Deal - 09 Fee Calculation (Time 0_01_45;20).png (image/png)
 CBA - Entering a Closed Deal - 09 Fee Calculation (Time 0_01_41;29).png (image/png)
 CBA - Entering a Closed Deal - 09 Fee Calculation (Time 0_01_31;07).png (image/png)
 CBA - Entering a Closed Deal - 09 Fee Calculation (Time 0_01_01;20).png (image/png)
 CBA - Entering a Closed Deal - 09 Fee Calculation (Time 0_00_19;20).png (image/png)
 CBA - Entering a Closed Deal - 09 Fee Calculation (Time 0_00_21;20).png (image/png)
 CBA - Entering a Closed Deal - 09 Fee Calculation (Time 0_00_28;17).png (image/png)
 CBA - Entering a Closed Deal - 09 Fee Calculation (Time 0_00_46;04).png (image/png)
 CBA - Entering a Closed Deal - 09 Fee Calculation (Time 0_00_50;07).png (image/png)
 CBA - Entering a Closed Deal - 07 Lease Details (Time 0_04_05;00).png (image/png)
 CBA - Entering a Closed Deal - 07 Lease Details (Time 0_03_58;14).png (image/png)
 CBA - Entering a Closed Deal - 07 Lease Details (Time 0_03_50;07).png (image/png)
 CBA - Entering a Closed Deal - 07 Lease Details (Time 0_03_28;24).png (image/png)
 CBA - Entering a Closed Deal - 07 Lease Details (Time 0_03_23;17).png (image/png)
 CBA - Entering a Closed Deal - 07 Lease Details (Time 0_03_10;18).png (image/png)
 CBA - Entering a Closed Deal - 07 Lease Details (Time 0_02_59;26).png (image/png)
 CBA - Entering a Closed Deal - 07 Lease Details (Time 0_02_40;00).png (image/png)
 CBA - Entering a Closed Deal - 07 Lease Details (Time 0_02_33;17).png (image/png)
 CBA - Entering a Closed Deal - 07 Lease Details (Time 0_02_08;29).png (image/png)
 CBA - Entering a Closed Deal - 07 Lease Details (Time 0_01_52;03).png (image/png)
 CBA - Entering a Closed Deal - 07 Lease Details (Time 0_01_30;17).png (image/png)
 CBA - Entering a Closed Deal - 07 Lease Details (Time 0_01_26;00).png (image/png)
 CBA - Entering a Closed Deal - 07 Lease Details (Time 0_01_03;21).png (image/png)
 CBA - Entering a Closed Deal - 07 Lease Details (Time 0_00_19;09).png (image/png)
 CBA - Entering a Closed Deal - 05 Space (Time 0_02_48;10).png (image/png)
 CBA - Entering a Closed Deal - 05 Space (Time 0_02_43;08).png (image/png)
 CBA - Entering a Closed Deal - 05 Space (Time 0_01_24;18).png (image/png)
 CBA - Entering a Closed Deal - 05 Space (Time 0_01_11;23).png (image/png)
 CBA - Entering a Closed Deal - 05 Space (Time 0_01_04;25).png (image/png)
 CBA - Entering a Closed Deal - 05 Space (Time 0_01_00;08).png (image/png)
 CBA - Entering a Closed Deal - 05 Space (Time 0_00_42;06).png (image/png)
 CBA - Entering a Closed Deal - 05 Space (Time 0_00_30;17).png (image/png)
 CBA - Entering a Closed Deal - 05 Space (Time 0_00_26;10).png (image/png)
 CBA - Entering a Closed Deal - 05 Space (Time 0_00_21;08).png (image/png)
 CBA - Entering a Closed Deal - 03 Workflow Navigation (Time 0_01_27;28).png (image/png)
 CBA - Entering a Closed Deal - 03 Workflow Navigation (Time 0_01_01;06).png (image/png)
 CBA - Entering a Closed Deal - 03 Workflow Navigation (Time 0_00_48;01).png (image/png)
 CBA - Entering a Closed Deal - 03 Workflow Navigation (Time 0_00_37;04).png (image/png)
 CBA - Entering a Closed Deal - 03 Workflow Navigation (Time 0_00_23;29).png (image/png)
 CBA - Entering a Closed Deal - 02 New Closed Deal Modal all (Time 0_00_31;29).png (image/png)
 CBA - Entering a Closed Deal - 02 New Closed Deal Modal all (Time 0_01_09;13).png (image/png)
 CBA - Entering a Closed Deal - 02 New Closed Deal Modal all (Time 0_01_44;04).png (image/png)
 CBA - Entering a Closed Deal - 02 New Closed Deal Modal all (Time 0_01_54;08).png (image/png)
 CBA - Entering a Closed Deal - 02 New Closed Deal Modal all (Time 0_02_02;26).png (image/png)
 CBA - Entering a Closed Deal - 02 New Closed Deal Modal all (Time 0_02_35;01).png (image/png)
 CBA - Entering a Closed Deal - 02 New Closed Deal Modal all (Time 0_02_43;16).png (image/png)
 CBA - Entering a Closed Deal - 02 New Closed Deal Modal all (Time 0_02_47;26).png (image/png)
 CBA - Entering a Closed Deal - 02 New Closed Deal Modal all (Time 0_02_30;26).png (image/png)
 CBA - Entering a Closed Deal - 02 New Closed Deal Modal all (Time 0_01_27;23).png (image/png)
 CBA - Entering a Closed Deal - 02 New Closed Deal Modal all (Time 0_02_59;26).png (image/png)
 CBA - Entering a Closed Deal - 02 New Closed Deal Modal all (Time 0_03_25;09).png (image/png)
 CBA - Entering a Closed Deal - 02 New Closed Deal Modal all (Time 0_03_28;13).png (image/png)
 CBA - Entering a Closed Deal - 02 New Closed Deal Modal all (Time 0_03_50;03).png (image/png)
 CBA - Entering a Closed Deal - 02 New Closed Deal Modal all (Time 0_04_18;08).png (image/png)
 CBA - Entering a Closed Deal - 02 New Closed Deal Modal all (Time 0_04_23;06).png (image/png)
 CBA - Entering a Closed Deal - 04 Property (Time 0_00_19;25).png (image/png)
 CBA - Entering a Closed Deal - 04 Property (Time 0_00_29;24).png (image/png)
 CBA - Entering a Closed Deal - 04 Property (Time 0_00_59;14).png (image/png)
 CBA - Entering a Closed Deal - 04 Property (Time 0_01_14;23).png (image/png)
 CBA - Entering a Closed Deal - 04 Property (Time 0_01_25;02).png (image/png)
 CBA - Entering a Closed Deal - 04 Property (Time 0_01_32;17).png (image/png)
 CBA - Entering a Closed Deal - 04 Property (Time 0_01_37;08).png (image/png)
 CBA - Entering a Closed Deal - 04 Property (Time 0_01_40;21).png (image/png)
 CBA - Entering a Closed Deal - 04 Property (Time 0_02_00;11).png (image/png)
 CBA - Entering a Closed Deal - 04 Property (Time 0_02_12;07).png (image/png)
 CBA - Entering a Closed Deal - 04 Property (Time 0_02_19;12).png (image/png)
 CBA - Entering a Closed Deal - 04 Property (Time 0_02_38;22).png (image/png)
 CBA - Entering a Closed Deal - 04 Property (Time 0_02_44;24).png (image/png)
 CBA - Entering a Closed Deal - 04 Property (Time 0_02_52;14).png (image/png)
 CBA - Entering a Closed Deal - 06 Contacts (Time 0_00_33;28).png (image/png)
 CBA - Entering a Closed Deal - 06 Contacts (Time 0_00_51;04).png (image/png)
 CBA - Entering a Closed Deal - 06 Contacts (Time 0_01_21;18).png (image/png)
 CBA - Entering a Closed Deal - 06 Contacts (Time 0_01_27;02).png (image/png)
 CBA - Entering a Closed Deal - 06 Contacts (Time 0_01_40;29).png (image/png)
 CBA - Entering a Closed Deal - 06 Contacts (Time 0_01_52;12).png (image/png)
 CBA - Entering a Closed Deal - 06 Contacts (Time 0_01_58;01).png (image/png)
 CBA - Entering a Closed Deal - 06 Contacts (Time 0_02_08;13).png (image/png)
 CBA - Entering a Closed Deal - 06 Contacts (Time 0_02_26;14).png (image/png)
 CBA - Entering a Closed Deal - 06 Contacts (Time 0_02_30;08).png (image/png)
 CBA - Entering a Closed Deal - 06 Contacts (Time 0_03_00;07).png (image/png)
 CBA - Entering a Closed Deal - 06 Contacts (Time 0_03_02;26).png (image/png)
 CBA - Entering a Closed Deal - 08 Deal Information (Time 0_00_24;04).png (image/png)
 CBA - Entering a Closed Deal - 08 Deal Information (Time 0_00_45;08).png (image/png)
 CBA - Entering a Closed Deal - 08 Deal Information (Time 0_00_52;05).png (image/png)
 CBA - Entering a Closed Deal - 08 Deal Information (Time 0_01_00;26).png (image/png)
 CBA - Entering a Closed Deal - 08 Deal Information (Time 0_01_27;04).png (image/png)
 CBA - Entering a Closed Deal - 08 Deal Information (Time 0_01_55;00).png (image/png)
 CBA - Entering a Closed Deal - 08 Deal Information (Time 0_02_14;05).png (image/png)
 CBA - Entering a Closed Deal - 08 Deal Information (Time 0_02_19;07).png (image/png)
 CBA - Entering a Closed Deal - 08 Deal Information (Time 0_02_38;14).png (image/png)
 CBA - Entering a Closed Deal - 08 Deal Information (Time 0_02_53;10).png (image/png)
 CBA - Entering a Closed Deal - 08 Deal Information (Time 0_02_55;26).png (image/png)
 CBA - Entering a Closed Deal - 08 Deal Information (Time 0_03_14;29).png (image/png)
 CBA - Entering a Closed Deal - 08 Deal Information (Time 0_03_28;25).png (image/png)
 CBA - Entering a Closed Deal - 10 Fee Splits (Time 0_00_33;01).png (image/png)
 CBA - Entering a Closed Deal - 10 Fee Splits (Time 0_00_37;03).png (image/png)
 CBA - Entering a Closed Deal - 10 Fee Splits (Time 0_00_50;20).png (image/png)
 CBA - Entering a Closed Deal - 10 Fee Splits (Time 0_01_03;21).png (image/png)
 CBA - Entering a Closed Deal - 10 Fee Splits (Time 0_01_20;05).png (image/png)
 CBA - Entering a Closed Deal - 10 Fee Splits (Time 0_01_28;02).png (image/png)
 CBA - Entering a Closed Deal - 10 Fee Splits (Time 0_01_42;05).png (image/png)
 CBA - Entering a Closed Deal - 10 Fee Splits (Time 0_01_50;02).png (image/png)
 CBA - Entering a Closed Deal - 10 Fee Splits (Time 0_02_02;04).png (image/png)
 CBA - Entering a Closed Deal - 10 Fee Splits (Time 0_02_09;19).png (image/png)
 CBA - Entering a Closed Deal - 10 Fee Splits (Time 0_02_31;29).png (image/png)
 CBA - Entering a Closed Deal - 10 Fee Splits (Time 0_02_48;16).png (image/png)
 CBA - Entering a Closed Deal - 10 Fee Splits (Time 0_03_01;27).png (image/png)
 CBA - Entering a Closed Deal - 10 Fee Splits (Time 0_03_06;25).png (image/png)
 CBA - Entering a Closed Deal - 10 Fee Splits (Time 0_03_19;23).png (image/png)
 CBA - Entering a Closed Deal - 10 Fee Splits (Time 0_03_43;16).png (image/png)
 CBA - Entering a Closed Deal - 10 Fee Splits (Time 0_03_49;06).png (image/png)
 CBA - Entering a Closed Deal - 10 Fee Splits (Time 0_03_53;24).png (image/png)
 CBA - Entering a Closed Deal - 10 Fee Splits (Time 0_04_14;16).png (image/png)
 CBA - Entering a Closed Deal - 10 Fee Splits (Time 0_04_14;16)b.png (image/png)
 CBA - Entering a Closed Deal - 10 Fee Splits (Time 0_04_19;14).png (image/png)
 CBA - Entering a Closed Deal - 10 Fee Splits (Time 0_04_30;05).png (image/png)
 CBA - Entering a Closed Deal - 10 Fee Splits (Time 0_04_36;24).png (image/png)
 CBA - Entering a Closed Deal - 10 Fee Splits (Time 0_04_55;09).png (image/png)
 CBA - Entering a Closed Deal - 10 Fee Splits (Time 0_05_23;03).png (image/png)
 CBA - Entering a Closed Deal - 10 Fee Splits (Time 0_05_49;19).png (image/png)
 CBA - Entering a Closed Deal - 10 Fee Splits (Time 0_06_13;20).png (image/png)
 CBA - Entering a Closed Deal - 10 Fee Splits (Time 0_06_21;08).png (image/png)
 CBA - Entering a Closed Deal - 10 Fee Splits (Time 0_06_28;14).png (image/png)
 CBA - Entering a Closed Deal - 10 Fee Splits (Time 0_06_41;22).png (image/png)
 CBA - Entering a Closed Deal - 10 Fee Splits (Time 0_06_54;27).png (image/png)
 CBA - Entering a Closed Deal - 10 Fee Splits (Time 0_07_01;18).png (image/png)
 CBA - Entering a Closed Deal - 10 Fee Splits (Time 0_07_05;27).png (image/png)
 CBA - Entering a Closed Deal - 10 Fee Splits (Time 0_07_11;20).png (image/png)
 CBA - Entering a Closed Deal - 10 Fee Splits (Time 0_07_17;26).png (image/png)
 CBA - Entering a Closed Deal - 10 Fee Splits (Time 0_07_19;24).png (image/png)
 CBA - Entering a Closed Deal - 10 Fee Splits (Time 0_07_25;17).png (image/png)
 CBA - Entering a Closed Deal - 10 Fee Splits (Time 0_07_51;07).png (image/png)
 CBA - Entering a Closed Deal - 10 Fee Splits (Time 0_08_09;09).png (image/png)
 CBA - Entering a Closed Deal - 10 Fee Splits (Time 0_08_24;02).png (image/png)
 CBA - Entering a Closed Deal - 10 Fee Splits (Time 0_08_29;09).png (image/png)
 CBA - Entering a Closed Deal - 10 Fee Splits (Time 0_08_39;23).png (image/png)
 CBA - Entering a Closed Deal - 10 Fee Splits (Time 0_08_56;13).png (image/png)
 CBA - Entering a Closed Deal - 10 Fee Splits (Time 0_09_01;07).png (image/png)
 CBA - Entering a Closed Deal - 11 Invoicing (Time 0_04_49;26).png (image/png)
CBA - Entering a Closed Deal - 12 Payment (Time 0_00_42;22).png (image/png)
CBA - Entering a Closed Deal - 12 Payment (Time 0_00_57;13).png (image/png)
CBA - Entering a Closed Deal - 12 Payment (Time 0_01_16;20).png (image/png)
CBA - Entering a Closed Deal - 12 Payment (Time 0_01_27;13).png (image/png)
CBA - Entering a Closed Deal - 12 Payment (Time 0_01_39;28).png (image/png)
CBA - Entering a Closed Deal - 12 Payment (Time 0_01_48;26).png (image/png)
CBA - Entering a Closed Deal - 12 Payment (Time 0_02_02;21).png (image/png)
CBA - Entering a Closed Deal - 11 Invoicing (Time 0_04_49;26).png (image/png)
CBA - Entering a Closed Deal - 12 Payment (Time 0_00_42;22).png (image/png)
CBA - Entering a Closed Deal - 12 Payment (Time 0_00_57;13).png (image/png)
CBA - Entering a Closed Deal - 12 Payment (Time 0_01_16;20).png (image/png)
CBA - Entering a Closed Deal - 12 Payment (Time 0_01_27;13).png (image/png)
CBA - Entering a Closed Deal - 12 Payment (Time 0_01_39;28).png (image/png)
CBA - Entering a Closed Deal - 12 Payment (Time 0_01_48;26).png (image/png)
CBA - Entering a Closed Deal - 12 Payment (Time 0_02_02;21).png (image/png)
 CBA - Entering a Closed Deal - 12 Payment (Time 0_02_06;19).png (image/png)
CBA - Entering a Closed Deal - 12 Payment (Time 0_02_17;16).png (image/png)
CBA - Entering a Closed Deal - 12 Payment (Time 0_02_32;10).png (image/png)
CBA - Entering a Closed Deal - 12 Payment (Time 0_02_46;02).png (image/png)
CBA - Entering a Closed Deal - 12 Payment (Time 0_03_00;15).png (image/png)
CBA - Entering a Closed Deal - 12 Payment (Time 0_03_15;06).png (image/png)
CBA - Entering a Closed Deal - 12 Payment (Time 0_03_18;23).png (image/png)
CBA - Entering a Closed Deal - 12 Payment (Time 0_03_29;27).png (image/png)
CBA - Entering a Closed Deal - 12 Payment (Time 0_03_44;25).png (image/png)
CBA - Entering a Closed Deal - 12 Payment (Time 0_03_57;09).png (image/png)
CBA - Entering a Closed Deal - 12 Payment (Time 0_02_06;19).png (image/png)
CBA - Entering a Closed Deal - 12 Payment (Time 0_02_17;16).png (image/png)
CBA - Entering a Closed Deal - 12 Payment (Time 0_02_32;10).png (image/png)
CBA - Entering a Closed Deal - 12 Payment (Time 0_02_46;02).png (image/png)
CBA - Entering a Closed Deal - 12 Payment (Time 0_03_00;15).png (image/png)
CBA - Entering a Closed Deal - 12 Payment (Time 0_03_15;06).png (image/png)
CBA - Entering a Closed Deal - 12 Payment (Time 0_03_18;23).png (image/png)
CBA - Entering a Closed Deal - 12 Payment (Time 0_03_29;27).png (image/png)
CBA - Entering a Closed Deal - 12 Payment (Time 0_03_44;25).png (image/png)
CBA - Entering a Closed Deal - 12 Payment (Time 0_03_57;09).png (image/png)
 CBA - Entering a Closed Deal - 12 Payment (Time 0_03_57;09).png (image/png)
CBA - Entering a Closed Deal - 12 Payment (Time 0_03_57;09)b.png (image/png)
CBA - Entering a Closed Deal - 12 Payment (Time 0_04_22;24).png (image/png)
CBA - Entering a Closed Deal - 12 Payment (Time 0_04_34;28).png (image/png)
CBA - Entering a Closed Deal - 12 Payment (Time 0_04_47;09).png (image/png)
CBA - Entering a Closed Deal - 12 Payment (Time 0_04_54;23).png (image/png)
CBA - Entering a Closed Deal - 12 Payment (Time 0_05_05;16).png (image/png)
CBA - Entering a Closed Deal - 12 Payment (Time 0_03_57;09).png (image/png)
CBA - Entering a Closed Deal - 12 Payment (Time 0_03_57;09)b.png (image/png)
CBA - Entering a Closed Deal - 12 Payment (Time 0_04_22;24).png (image/png)
CBA - Entering a Closed Deal - 12 Payment (Time 0_04_34;28).png (image/png)
CBA - Entering a Closed Deal - 12 Payment (Time 0_04_47;09).png (image/png)
CBA - Entering a Closed Deal - 12 Payment (Time 0_04_54;23).png (image/png)
CBA - Entering a Closed Deal - 12 Payment (Time 0_05_05;16).png (image/png)
 CBA - Entering a Closed Deal - 12 Payment (Time 0_05_09;25).png (image/png)
 CBA - Entering a Closed Deal - 12 Payment (Time 0_05_05;16).png (image/png)
CBA - Entering a Closed Deal - 12 Payment (Time 0_05_09;25).png (image/png)
CBA - Entering a Closed Deal - 12 Payment (Time 0_05_15;25).png (image/png)
CBA - Entering a Closed Deal - 12 Payment (Time 0_05_05;16).png (image/png)
CBA - Entering a Closed Deal - 12 Payment (Time 0_05_09;25).png (image/png)
CBA - Entering a Closed Deal - 12 Payment (Time 0_05_15;25).png (image/png)
 CBA - Entering a Closed Deal - 12 Payment (Time 0_05_15;25).png (image/png)